Table of Contents
Advertisement
Quick Links
Advertisement
Table of Contents

Related Manuals for Advance Multimedia Internet Technology BDE761AM-001

Summary of Contents for Advance Multimedia Internet Technology BDE761AM-001
- Page 1 User Manual BDE761AM-001 WiFi Broadband BG ...
-
Page 2: Table Of Contents
3.1.4.1 Static IPv6............................. 51 3.1.4.2 DHCP v6 ............................53 3.1.4.3 PPPoE ............................54 3.1.4.4 6 to 4 ............................. 55 3.1.4.5 IPv6 in IPv4 Tunnel ........................56 2 BDE761AM-001 User Manual... - Page 3 3.2.3.6 GRE Tunnel ..........................92 3.2.4 Redundancy ..........................93 3.2.4.1 VRRP ............................93 3.2.5 Management..........................94 3.2.5.1 UPnP............................. 94 3.2.5.2 SNMP............................95 3 BDE761AM-001 User Manual...
- Page 4 CHAPTOR 5 APPLICATION DESCRIPTION ....................109 5.1 VLAN A ............................109 PPLICATION 5.2 VPN S ................................ 112 ETUP 5.3 R ..............................116 EDUNDANCY APPENDIX A. LICENSING INFORMATION....................... 117 4 BDE761AM-001 User Manual...
- Page 5 CE Declaration of Conformity This equipment complies with the requirements relating to electromagnetic compatibility, EN 55022/A1 Class 5 BDE761AM-001 User Manual...
-
Page 6: Chapter 1 Introduction
1.1 Contents List Items Description Contents Quantity 1pce WiFi 2.4G Business Gateway 2pce WiFi Antenna 1pce Power Adapter 1pce RJ45 Cable 1pce 6 BDE761AM-001 User Manual... -
Page 7: Hardware Installation
An installed Ethernet adapter Browser Requirements: • Internet Explorer 6.0 or higher Web‐based Configuration Utility • Chrome 2.0 or higher Requirements • Firefox 3.0 or higher • Safari 3.0 or higher (with Java 1.3.1 or higher) 7 BDE761AM-001 User Manual... - Page 8 WiFi Broadband BG Windows® Users: Make sure you have the latest version of Java installed. Visit www.java.com to download the latest version. Computer with the following: Windows® 7, Vista®, or XP with Service • Pack 2 CD Installation Wizard Requirements • An installed Ethernet adapter CD-ROM drive • 8 BDE761AM-001 User Manual...
-
Page 9: Hardware Configuration
WiFi Broadband BG 1.2.3 Hardware Configuration Rear View: Reset Power WiFi Auto MDI/MDIX RJ‐45 Ports Button ON/OFF Antenna Automatically sense the Switch types of LAN and WAN Receptor when connecting to for Power Ethernet Adapter Front View: USB Port 9 BDE761AM-001 User Manual... -
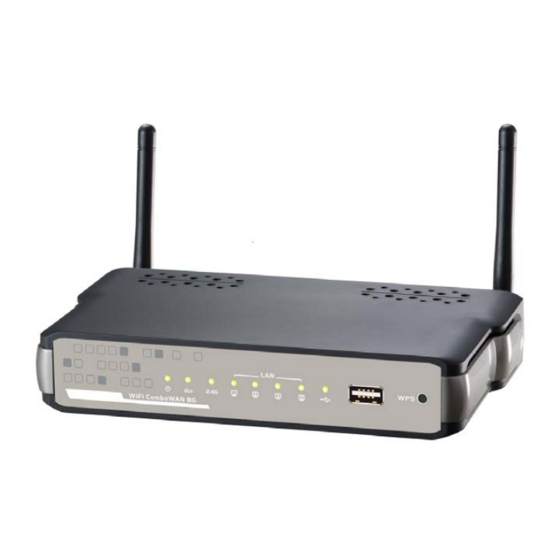
Page 10: Led Indicators
Dark: Wireless Radio is disable Green: Ethernet connection is established LAN1 ~ LAN4 Green in flash: data packet transferred via Ethernet Green: USB connection is established Green in flash: data packet transferred through USB 10 BDE761AM-001 User Manual... -
Page 11: Chapter 2 Getting Started
2.1 Easy Setup by Windows Utility Step 1. Install the Easy Setup Utility from the provided CD then follow the steps to configure the device. Step 2. Select Language then click “Next” to continue. 11 BDE761AM-001 User Manual... - Page 12 WiFi Broadband BG Step 3. Then click the “Wizard” to continue. Step 4. Click “Next” to continue. Step 5. Select Wireless Enable, and then click “Next” to continue. 12 BDE761AM-001 User Manual...
- Page 13 WiFi Broadband BG Step 6. Enter SSID, Channel and Security options, and then click “Next” to continue. Step 7. Select Auto Detect WAN service. Step 8. Save the setting. 13 BDE761AM-001 User Manual...
-
Page 14: Easy Setup By Configuring Web Ui
Browse to Activate the Setup Wizard Type in the IP Address (http://192.168.123.254) Type the default Username and password ‘admin’ in the System Password and then click ‘login’ butto Select your language. 14 BDE761AM-001 User Manual... - Page 15 Or, you can go to Basic Network / Advanced Network / Applications / System to setup the configuration by your own selection. Press “Next” to start the Setup Wizard. Configure with the Setup Wizard Step 1 You can change the password of administrator here. 15 BDE761AM-001 User Manual...
- Page 16 The system will detect the WAN type if you choose to let the system detect automatically. Step 5 Type in Host name and ISP registered MAC address. (if no such information, you can go next) 16 BDE761AM-001 User Manual...
- Page 17 WiFi Broadband BG Step 5-1 Wireless setting. Step 5-2 Wireless authentication and encryption. Step 6 Check the information again. Step 7 System is applying the setting. 17 BDE761AM-001 User Manual...
- Page 18 WiFi Broadband BG Step 8 Click finish to complete it. 18 BDE761AM-001 User Manual...
-
Page 19: Chapter 3 Making Configurations
These task buttons can be easily found in the cover page of the UI (User Interface). Enter the default username and password “admin” in the System Password and then click ‘login’ button. 19 BDE761AM-001 User Manual... - Page 20 WiFi Broadband BG Afterwards, you can go Wizard, Basic Network, Advanced Network, Application or System respectively on left hand side of web page. Note: You can see the Connection Status screen below after you logged in. 20 BDE761AM-001 User Manual...
- Page 21 WiFi Broadband BG Note : You can see all the status of this device in the ‘Status’ main menu section. 21 BDE761AM-001 User Manual...
-
Page 22: Basic Network
Ethernet WAN: The router has one RJ45 WAN port can be configured to WAN connection. Please plug in RJ45 cable from your external DSL modem and follow UI setting to setup. 22 BDE761AM-001 User Manual... -
Page 23: Physical Interface
“fail over” mode, so that when the WAN-1 connection broken, the device will try to failover the internet connection to WAN-2. Physical Interface: Select the WAN interface from the available list. For this 23 BDE761AM-001 User Manual... -
Page 24: Network Setup
PPPoE, PPTP and L2TP 3.1.1.2.1 Wireless WAN – 3G/4G Click on the “Edit” button for the 3G/4G WAN interface and you can get the detail WAN settings and then configure the settings as well. 24 BDE761AM-001 User Manual... - Page 25 “Auto-Detection”, then system will check the information automatically. If you select “Manual”, then you have to specify more ISP-related settings, such as Country, Service Provider, and APN, to get the 3G/4G service. The “Auto-Detection” option is suggested. 25 BDE761AM-001 User Manual...
- Page 26 10. MTU: Most ISP offers MTU value to users. The default value is o (auto). 11. Keep Alive: You can do preferred settings by using this feature to prevent the built-in 3G modem from some sort of auto-timeout and disconnects from 26 BDE761AM-001 User Manual...
-
Page 27: Ethernet Wan
Afterwards, click on “Save” to store your settings or click “Undo” to give up the changes. 3.1.1.2.2 Ethernet WAN Click on the “Edit” button for the Ethernet WAN interface and you can get the detail WAN settings and then configure the settings as well. 3.1.1.2.2.1 Dynamic IP Address 27 BDE761AM-001 User Manual... - Page 28 Internet. If you want to disable such function, just change the setting to disable it. Afterwards, click on “Save” to store your settings or click “Undo” to give up the changes. 28 BDE761AM-001 User Manual...
- Page 29 Multicast: Enable or disable multicast traffics from the internet. You may enable as auto mode or select by IGMP v1, IGMP v2, IGMP v3. IGMP Snooping: Enable or disable IGMP snooping function. If you enable 29 BDE761AM-001 User Manual...
- Page 30 Afterwards, click on “Save” to store your settings or click “Undo” to give up the changes. 3.1.1.2.2.3 PPP over Ethernet Select this option if your ISP requires you to use a PPPoE connection. This option is typically used for DSL services. 30 BDE761AM-001 User Manual...
- Page 31 LAN to access Internet; the other is a virtual connection that let remote user to manage this device. Afterwards, click on “Save” to store your settings or click “Undo” to give up the changes. 31 BDE761AM-001 User Manual...
- Page 32 IP Mode: Please check the IP mode your ISP assigned, and select “Static IP Address” or “Dynamic IP Address” accordingly. If you select “Static IP Address” option, you have to specify additional “My IP Address”, “My Subnet Mask”, and “Gateway IP” settings provided by your ISP. 32 BDE761AM-001 User Manual...
- Page 33 LAN to access Internet; the other is a virtual connection that let remote user to manage this device. Afterwards, click on “Save” to store your settings or click “Undo” to give up the 33 BDE761AM-001 User Manual...
- Page 34 IP Mode: Please check the IP mode your ISP assigned, and select “Static IP Address” or “Dynamic IP Address” accordingly. If you select “Static IP Address” option, you have to specify additional “IP Address”, “Subnet Mask”, and “WAN Gateway IP” settings provided by your ISP. 34 BDE761AM-001 User Manual...
- Page 35 LAN to access Internet; the other is a virtual connection that let remote user to manage this device. Afterwards, click on “Save” to store your settings or click “Undo” to give up the changes. 35 BDE761AM-001 User Manual...
-
Page 36: Lan & Vlan Setup
Subnet Mask: Input your Subnet mask. (All devices in the network must have the same subnet mask.) The default subnet mask is 255.255.255.0 Afterwards, click on “Save” to store your settings or click “Undo” to give up the changes. 36 BDE761AM-001 User Manual... -
Page 37: Lan & Vlan
LAN ports and virtual APs if required. By default, all the 4 LAN ports and 8 virtual APs belong to one VLAN, and this VLAN is a NAT type network, all the local device IP addresses are allocated by DHCP 37 BDE761AM-001 User Manual... -
Page 38: Tag-Based Vlan
VLAN, where the port VIDs assigned to the ports determine VLAN membership When the device receives a frame with a VLAN tag, referred to as a tagged frame, the device forwards the frame only to those ports that share the same VID. 38 BDE761AM-001 User Manual... -
Page 39: Dhcp Server
4. DHCP Server: Specify a DHCP server for the configuring VLAN. This device provides up to 4 DHCP servers to serve the DHCP requests from different VLANs. Afterwards, click on “Save” to store your settings or click “Undo” to give up the changes. 3.1.2.3 DHCP Server 39 BDE761AM-001 User Manual... - Page 40 Gateway. This function enables you to assign another gateway to your PC, when DHCP server offers an IP to your PC. Press “Clients List” and the list of DHCP clients will be shown consequently. 40 BDE761AM-001 User Manual...
- Page 41 WiFi Broadband BG Press “Fixed Mapping” and you can specify a certain IP address for designated local device (MAC address), so that the DHCP Server will reserve the special IP for designated devices. 41 BDE761AM-001 User Manual...
-
Page 42: Wireless Setup
Router Mode”, “WDS Hybrid Mode” and “WDS Only Mode”. You can choose the expected mode from the list. 3.1.3.1.1 AP Router Mode This mode allows you to get your wired and wireless devices connected with NAT. 42 BDE761AM-001 User Manual... - Page 43 WLAN Partition: You can check the WLAN Partition function to separate the wireless clients. The wireless clients can’t communicate each other, but they can access the internet and other Ethernet LAN devices. Channel: The radio channel number. The permissible channels depend on the 43 BDE761AM-001 User Manual...
- Page 44 Select Encryption mode and enter the Pre-share Key. You can fill in 64 hexadecimal (0, 1, 2…8, 9, A, B…F) digits, or 8 to 63 ASCII characters as the pre-share key. WPA2 Select Encryption mode and enter RADIUS Server related information. You 44 BDE761AM-001 User Manual...
- Page 45 Press “WPS Setup”, you can configure and enable the easy setup feature WPS (Wi-Fi Protection Setup) for your wireless network. WPS: You can enable this function by selecting “Enable”. WPS offers a safe and easy way to allow the wireless clients connected to your wireless network. 45 BDE761AM-001 User Manual...
-
Page 46: Wds Hybrid Mode
While acting as a wireless Bridge, Wireless Router 1 and Wireless Router 2 can communicate with each other through wireless interface (with WDS). Thus All Stations can communicate each other and are able to access Internet if Wireless Router 1 has the Internet connection 46 BDE761AM-001 User Manual... - Page 47 Regulatory Domain. The factory default setting is auto channel selection. Authentication & Encryption: You may select one of the following authentications to secure your wireless network: Open, Shared, Auto, WPA-PSK, WPA, WPA2-PSK, WPA2, WPA-PSK/WPA2-PSK, or WPA /WPA2. 47 BDE761AM-001 User Manual...
-
Page 48: Wds Only Mode
WDS peers, you don’t have to input other peer AP's MAC address. However, not all the APs can be set to enable the Lazy mode simultaneously; at least there must be one AP with all the WDS peers’ MAC address filled. 48 BDE761AM-001 User Manual... -
Page 49: Advanced Wireless Setup
RTS Threshold: If an excessive number of wireless packet collision occurred, the wireless performance will be affected. It can be improved by adjusting the 49 BDE761AM-001 User Manual... - Page 50 DTIM with a DTIM Interval value. WMM Capable: WMM can help control latency and jitter when transmitting multimedia content over a wireless connection. TX Rate: Can Fix TX Rate to transmit date. 50 BDE761AM-001 User Manual...
-
Page 51: Ipv6 Setup
IPv6 address: Enter the IPv6 address here; IPv6 addresses have a size of 128 bits. Therefore, IPv6 has a vastly enlarged address space compared to IPv4. An example of an IPv6 address is “2001:0db8:85a3:0000:0000:8a2e:0370:7334” 51 BDE761AM-001 User Manual... - Page 52 Any routers that subsequently start up, or that were not discovered because of packet loss or temporary link partitioning, are eventually discovered by reception of their periodic (unsolicited) advertisements. 52 BDE761AM-001 User Manual...
-
Page 53: Dhcp V6
Solicitation to ask for immediate advertisements, rather than waiting for the next periodic ones to arrive; if and only if no advertisements are forthcoming, the host may retransmit the solicitation a small number of times, but then 53 BDE761AM-001 User Manual... -
Page 54: Pppoe
MTU (Maximum Transmission Unit): Most ISP offers MTU value to users. The default MTU value is 0 (auto). LAN IPv6 address settings: Please enter “LAN IPv6 address” and ignore the “LAN IPv6 Link-Local address”. Address auto configuration settings: 54 BDE761AM-001 User Manual... -
Page 55: To 4
6 to 4 Settings: You may obtain IPv6 DNS automatically or set DNS address manually for Primary DNS address and secondary DNS address. LAN IPv6 address settings: Enter “LAN IPv6 address” and “LAN IPv6 55 BDE761AM-001 User Manual... -
Page 56: Ipv6 In Ipv4 Tunnel
LAN IPv6 address setting: LAN IPv6 address and LAN IPv6 Link-Local address. Address auto configuration setting: Disable or enable this auto configuration setting. You may set stateless or stateful (Dynamic IPv6), and also check if need to send Router advertisement messages periodically. 56 BDE761AM-001 User Manual... -
Page 57: Nat Setup
Service Port Private Port Server IP Enable 192.168.123.1 192.168.123.2 8080 192.168.123.3 1723 192.168.123.6 Afterwards, click on “Save” to store your settings or click “Undo” to give up the changes. 57 BDE761AM-001 User Manual... -
Page 58: Virtual Computers
NAT router. The Special Applications feature allows some of these applications to work with this product. If the mechanism of Special Applications fails to make an application work, try setting your computer as the DMZ host instead. 58 BDE761AM-001 User Manual... -
Page 59: Nat Loopback
Afterwards, Click on “Save” to store your settings or click “Undo” to give up the changes. 3.1.5.4 NAT Loopback Allow you to access the external IP address from inside your home or office network. This is useful when you run a server inside your network. 59 BDE761AM-001 User Manual... -
Page 60: Dmz
DMZ (DeMilitarized Zone) Host is a host without the protection of firewall. It allows a computer to be exposed to unrestricted 2-way communication for Internet games, Video conferencing, Internet telephony and other special applications. NOTE: This feature should be used only when needed. 60 BDE761AM-001 User Manual... -
Page 61: Routing Setup
You can enter the destination IP address, subnet mask, gateway, and hop for each routing rule, and then enable or disable the rule by checking or un-checking the Enable checkbox. 3.1.6.2 Dynamic Routing 61 BDE761AM-001 User Manual... - Page 62 You can enable the OSPF routing function by click on the “Setting” button and fill in the corresponding setting for your OSPF routing configuration. When you finished setting, click on “Save” to store your settings or click “Undo” to give up 62 BDE761AM-001 User Manual...
-
Page 63: Routing Information
A routing table, or routing information base (RIB), is a data table stored in a router or a networked computer that lists the routes to particular network destinations, and in some cases, metrics (distances) associated with those routes. The routing table 63 BDE761AM-001 User Manual... -
Page 64: Client/Server/Proxy
Username/E-mail: Input username or E-mail based on the DDNS provider you select. Password/Key: Input password or key based on the DDNS provider you select. Afterwards, click on “Save” to store your settings or click “Undo” to give up the changes. 64 BDE761AM-001 User Manual... -
Page 65: Advanced Network
DMZ host only. You can select one of the two filtering policies: Allow all to pass except those match the specified rules. Deny all to pass except those match the specified rules. 65 BDE761AM-001 User Manual... - Page 66 Access control. For more details, please refer to the Scheduling Rule section. Each rule can be enabled or disabled individually. Afterwards, click on “Save” to store your settings or click “Undo” to give up the changes. 66 BDE761AM-001 User Manual...
-
Page 67: Url Blocking
Afterwards, click on “Save” to store your settings or click “Undo” to give up the changes. 3.2.1.3 Web Content Filter Web Content filter can block files with the specific extension, like ".exe", ".bat" (applications), "mpeg” (video), and Scripts Type, like Java Applet, Java Scripts, cookies, Active X. 67 BDE761AM-001 User Manual... -
Page 68: L7 Application Filter
Afterwards, click on “Save” to store your settings or click “Undo” to give up the changes. 3.2.1.4 L7 Application Filter L7 Application Filter can categorize Internet Protocol packets based on their application layer data. 68 BDE761AM-001 User Manual... -
Page 69: Ips
IPS (Intrusion Prevention Systems) are network security appliances that monitor network and/or system activities for malicious activity. The main functions of IPS are to identify malicious activity, log information about this activity, attempt to block/stop it, and report it. 69 BDE761AM-001 User Manual... -
Page 70: Mac Address Control
You can enable the DoS Defense function and check the listed intrusion activities if necessary. 3.2.1.6 MAC Address Control MAC Address Control allows you to assign different access right for different users and to assign a specific IP address to a certain MAC address. 70 BDE761AM-001 User Manual... - Page 71 Choose "allow" or "deny" to allow or deny the clients, whose MAC addresses are not in the "Control table", to connect to this device. Afterwards, click on “Save” to store your settings or click “Undo” to give up the changes. 71 BDE761AM-001 User Manual...
-
Page 72: Others
The main goal of QoS (Quality of Service) is prioritizing incoming data, and preventing data loss due to factors such as jitter, delay and dropping. Another important aspect of QoS is ensuring that prioritizing one data flow doesn’t interfere with other data flows. 72 BDE761AM-001 User Manual... -
Page 73: Rule-Based Qos
ISP Flexible Bandwidth Management (FBM): When this management is enabled, system will share the bandwidth to normal applications Guest Setting / Bandwidth Policy: This device can allocate a designated 73 BDE761AM-001 User Manual... - Page 74 Connection Sessions NAT Session Control: Set the corresponding control type for the selected service type. Control Description Data DSCP Priority as you select CS1 ~ AF Marking DiffServ CodePoint Priority 1~6(1 is highest Priority) 74 BDE761AM-001 User Manual...
- Page 75 This Rule means IP Packets from WAN or other interfaces with DiffServ value of CS4 will be modified with DSCP Marking of “AF Class 2”, then forward corresponding packets to the Clients whose IP address is in the range of 192.168.12.10~40. 75 BDE761AM-001 User Manual...
- Page 76 Besides, you can move up or down the priority of all rules by clicking on the ‘↑’or ’↓’ icon if you want to change the priority of rules. You can also unmark any rule in the list if you don’t want to enable it. 76 BDE761AM-001 User Manual...
-
Page 77: Vpn Setup
IPSec pass-through. If you connect to another NAT router which doesn’t support IPSec pass-through at WAN side, you need to activate this option. Max. number of tunnels: The device supports up to 32 IPSec tunnels. You can 77 BDE761AM-001 User Manual... -
Page 78: Dynamic Ip Vpn
Local subnet: The subnet of LAN site of local VPN gateway. It can be a host, a partial subnet, or the whole subnet of LAN site of local gateway. Local Netmask: The local netmask and associated local subnet can define a 78 BDE761AM-001 User Manual... - Page 79 VPN clients. You can click on "XAUTH Account" button at IPSec Setting main page to edit the permitted user account / password. 13. Set IKE Proposal: Check this checkbox to enable IKE proposals. 79 BDE761AM-001 User Manual...
- Page 80 IPSec proposal. Enable: Check this checkbox to enable IPSec Proposal with this rule. Click on “Save” to store what you just select or” Undo” to give up 80 BDE761AM-001 User Manual...
-
Page 81: Ipsec-Ike Setting
Local subnet: The subnet of LAN site of local VPN gateway. It can be a host, a partial subnet, or the whole subnet of LAN site of local gateway. Local Netmask: The local netmask and associated local subnet can define a 81 BDE761AM-001 User Manual... - Page 82 18. XAUTH: For the extended authentication function (XAUTH), the VPN client (or initiator) needs to provide additional user information to the remote VPN server (or VPN gateway). The VPN server would reject the connect request from VPN 82 BDE761AM-001 User Manual...
- Page 83 IPSec proposal. Enable: Check this checkbox to enable IPSec Proposal with this rule. Click on “Save” to store what you just select or” Undo” to give up 83 BDE761AM-001 User Manual...
-
Page 84: Ipsec-Manual Setting
10. Inbound SPI: Inbound SPI will be included in the inbound packet transmitted from WAN site of remote gateway. It will be used to de-hash the coming packet and check its integrity. The value of outbound SPI should be set in hex formatted. 84 BDE761AM-001 User Manual... -
Page 85: Xauth Account
Click on “Save” to store what you just select or” Undo” to give up 3.2.3.1.4 XAUTH Account You can edit user information with this configuration page. This user information is only valid for VPN Server with XAuth Server mode selected. 85 BDE761AM-001 User Manual... -
Page 86: Vpn-Pptp Server
IP Pool End Address: This device will assign an IP address to remote PPTP client. This value indicates the end of IP pool. Authentication Protocol: You can choose authentication protocol as PAP, CHAP, MSCHAP(v1), or MSCHAP(v2). MPPE Encryption Mode: Check this checkbox to enable MPPE encryption. 86 BDE761AM-001 User Manual... -
Page 87: Vpn-Pptp Client
User Account: You can input up to 10 different user accounts for PPTP client, define each user account settings by clicking on the corresponding “Edit” button and then check the “Enable” checkbox to enable it. 87 BDE761AM-001 User Manual... - Page 88 12. Authentication Protocol: You can choose authentication protocol as PAP, CHAP, MSCHAP(v1), or MSCHAP(v2). The protocol you choose must be supported by remote PPTP server. 13. LCP Echo Type: Choose the way to do connection keep alive. 88 BDE761AM-001 User Manual...
-
Page 89: Vpn-L2Tp Server
Internet, while still maintaining a high level of security to protect data. Enter a Pre-sharekey when you use some devices, like Apple related mobile devices to establish L2TP tunnels Server Virtual IP: The IP address of L2TP server. This IP address should be 89 BDE761AM-001 User Manual... -
Page 90: Vpn-L2Tp Client
User Account: You can input up to 10 different user accounts for L2TP client, define each user account settings by clicking on the corresponding “Edit” button and then check the “Enable” checkbox to enable it. 90 BDE761AM-001 User Manual... - Page 91 CHAP, MSCHAP(v1), or MSCHAP(v2). The protocol you choose must be supported by remote L2TP server. 13. LCP Echo Type: Choose the way to do connection keep alive. Click on “Save” to store what you just select or” Undo” to give up 91 BDE761AM-001 User Manual...
-
Page 92: Gre Tunnel
Subnet: Enter the local subnet of remote host. If a packet wants to go to this subnet, the GRE tunnel will be established automatically Enable: Enable or Disable this GRE tunnel. Click on “Save” to store what you just select or” Undo” to give up 92 BDE761AM-001 User Manual... -
Page 93: Redundancy
If the physical router that is routing packets on behalf of the virtual router fails, another physical router is selected to automatically replace it. The physical router that is forwarding packets at any given time is called the master router. 93 BDE761AM-001 User Manual... -
Page 94: Management
This device supports the UPnP Internet Gateway Device (IGD) feature. By default, it is enabled. 94 BDE761AM-001 User Manual... -
Page 95: Snmp
SNMP protocol. SNMP Version: Supports SNMP V1, V2c, and V3. Get Community: The community of GetRequest that this device will respond. This is a text password mechanism that is used to weakly authenticate queries to 95 BDE761AM-001 User Manual... - Page 96 SNMP Management PCs. You have to specify the IP address, so that the device can send SNMP Trap message to the management PCs consequently. Afterwards, click on “Save” to store your settings or click “Undo” to give up the changes. 96 BDE761AM-001 User Manual...
-
Page 97: System
In this section you can see system information, system logs, use system tools for system update and do service scheduling and system administration setting. 3.3.1 System Information You can view the System Information in this page. 97 BDE761AM-001 User Manual... -
Page 98: System Status
You need to install a syslog utility on a host to receive syslogs The items you have to setup include: IP Address for syslogd: Host IP of destination where syslog will be sent to. Check Enable to enable this function. 3.3.2.3 Email Alert 98 BDE761AM-001 User Manual... -
Page 99: System Tools
You can change the System Password here. We strongly recommend you to change the system password for security reason. Click on “Save” to store your settings or click “Undo” to give up the changes. 99 BDE761AM-001 User Manual... -
Page 100: Fw Upgrade
Upgrade button to start to upgrade new firmware on this device. If you want to upgrade a firmware which is from GPL policy, please check “Accept unofficial firmware”. NOTE. PLEASE DO NOT TURN THE DEVICE OFF WHEN UPGRADE IS PROCEEDING. 100 BDE761AM-001 User Manual... -
Page 101: System Time
Sync with my PC: Click on the button if you want to set Date and Time using the PC’s Date and Time. Afterwards, click on “Save” to store your settings or click “Undo” to give up the changes. 101 BDE761AM-001 User Manual... -
Page 102: Others
IP network. Traceroute proceeds unless all (three) sent packets are lost more than twice, then the connection is lost and the route cannot be evaluated. Ping, on the other hand, only computes the final round-trip times from the destination point 102 BDE761AM-001 User Manual... -
Page 103: Scheduling
New Rule…” button at the bottom. When the next dialog popped out you can edit the Name of Rule, Policy, and set the schedule time (Week day, Start Time, and End Time). Afterwards, click “save” to store your settings or click “Undo” to give up the changes. 103 BDE761AM-001 User Manual... -
Page 104: Mmi
3.3.5.1 Web UI You can set UI administration time-out duration give remote administration host port in this page. When the host port is given please remember to check the enable box and save your settings. 104 BDE761AM-001 User Manual... -
Page 105: Chaptor 4 Troubleshooting
Type “ping 192.168.123.254”. Assure that you ping the correct IP Address assigned to the WiFi Broadband Router. It will show four replies if you ping correctly. Ensure that your Ethernet Adapter is working, and that all network drivers are installed 105 BDE761AM-001 User Manual... - Page 106 A. Can’t setup a wireless connection? Ensure that the SSID and the encryption settings are exactly the same to the Clients. Move the WiFi Broadband Router and the wireless client into the same room, 106 BDE761AM-001 User Manual...
- Page 107 C. Why does my wireless connection keep dropping? Antenna Orientation. i. Try different antenna orientations for the WiFi Broadband Router. ii. Try to keep the antenna at least 6 inches away from the wall or other objects. 107 BDE761AM-001 User Manual...
- Page 108 2. Find the Reset button on the right side 3. Press the Reset button for 8 seconds and then release. 4. After the WiFi Broadband Router reboots, it has back to the factory default settings. 108 BDE761AM-001 User Manual...
-
Page 109: Chaptor 5 Application Description
WiFi Broadband BG CHAPTOR 5 Application Description 5.1 VLAN Application Application 1: Bundled ISP Service by Port-based VLAN Feature. If you want to map WAN ID, you can setup WAN VLAN setting, and change router type to Bridge and add WAN Map VLAN ID to your value. For example: The Setting as follows: 109 BDE761AM-001 User Manual... - Page 110 WiFi Broadband BG Application 2: Port‐Based VLAN Feature for User Group and Guest Group Description: User VLAN to segment 2 Groups. One is User Group, the other is Guest Group Step1:Setup Port1~Port3 is User Group which DHCP1 and Port4 is Guest Group which DHCP2 Step2: Configure and Enable DHCP2 Server DHCP1 assigns IP Address to User Group Clients IP (192.168.12.x) and DHCP2 assigns IP Address to Guest Group Clients(192.168.2.x) Step3: Administrator can bases on different IP subnet to setup different Access Policies with Rule‐based QoS. For example, Admin can limit the Bandwidth of guest group to 500kbps. 110 BDE761AM-001 User Manual...
- Page 111 WiFi Broadband BG Application 3: Based on different VLAN ID to define different Access Policy. Description: There are 3 Groups. First group is Guest and only can access Internet and can not access intranet. Second group is Market Group and can access Internet and Intranet. Third group is Server and only for Intranet. Step1: Port‐based VLAN Feature : Market is Prot1 and Port2. Server is Port3.Guest is Port4 111 BDE761AM-001 User Manual...
-
Page 112: Vpn Setup
Step2: VLAN Routing Group : VLAN ID1(Port1 and Port2) and VLAN ID3(Port4) can access Internet. VLAN ID1(Port1 and Port2) and VLAN ID3 (Port3) can access each other. 5.2 VPN Setup Application 1: Tablet PC or Smart Phone (Android or IOS System) establishes PPTP tunnel with Embedded PPTP Server For example: 112 BDE761AM-001 User Manual... - Page 113 WiFi Broadband BG Select PPTP for VPN connection Description: Give VPN a name for this connection Server: Need the actual address or domain name. Here, please entry “118.171.154.174”(refer to the status page) or domain name. Account and Password: Entry the specified account and password. RSA SecureID: Skip the item for PPTP Connection. Connect to your VPN 113 BDE761AM-001 User Manual...
- Page 114 WiFi Broadband BG Application 2: Tablet PC or Smart Phone (Android System) establishesL2TP tunnel with Embedded L2TP Server To configure L2TP on the Android device: Go to device's 'Settings > Wireless & Networks > VPN Settings > Add VPN' and select "Add L2TP". The following window will appear: In the opened window: Give a VPN Name to your connection (i.e. MyVpn). In "Set VPN server", provide your VPN‐1 server FQDN (DNS name) or IP address. Here, please entry “118.171.154.174” (refer to the status page) or domain name You will have to define a new password for it. 114 BDE761AM-001 User Manual...
- Page 115 Application 3 : Tablet PC or Smart Phone (Android or IOS System) Establishes L2TP tunnel with Embedded L2TP/ IPsec PSK VPN Server To configure L2TP/IPsec PSK on the Gateway: Go to Gateway's 'Settings >Advanced Network > Security > L2TP Sever Enable L2TP over IPsec and enter Preshare Key”1234567890” To configure L2TP/IPsec PSK on the Android device: Select Wireless and Network or Wireless Controls, depending on your version of your device Select VPN Settings Select Add VPN Select Add L2TP/IPsec PSK VPN Select VPN Name and enter a descriptive name Select Set VPN Server and enter a server hostname: Here, please entry “118.171.154.174” (refer to the status page) Select Set IPSec pre‐shared key and enter "123456789" Select Username and Password. 115 BDE761AM-001 User Manual...
-
Page 116: Redundancy
VRRP Setup The Configuration of Master: The Configuration of Slave: ※ 254 is the highest Priority The clients under Gateway Master or Salve will get IP information form Gateway. 116 BDE761AM-001 User Manual... -
Page 117: Appendix A. Licensing Information
GPLv2 pppoe-3.8 pppd BSD ppp-2.4 l2tpd GPLv2 l2tp-0.4 iptables GNUv2 iptables-1.4.2 GNUv2 iproute2-2.6.11 wget GNU wget-1.7.1 Availability of source code Please visit our web site or contact us to obtain more information. 117 BDE761AM-001 User Manual... - Page 118 WiFi Broadband BG 118 BDE761AM-001 User Manual...
- Page 119 The act of running the Program is not restricted, and the output from the Program is covered only if its contents constitute a work based on the Program (independent of having been made by running 119 BDE761AM-001 User Manual...
- Page 120 However, as a special exception, the source code distributed need not include anything that is normally distributed (in either source or binary form) with the major components (compiler, kernel, and so on) of the operating system on which the executable runs, unless that component itself accompanies the executable. 120 BDE761AM-001 User Manual...
- Page 121 10. If you wish to incorporate parts of the Program into other free programs whose distribution conditions are different, write to the author to ask for permission. For software which is copyrighted by the Free Software 121 BDE761AM-001 User Manual...
- Page 122 DATA OR DATA BEING RENDERED INACCURATE OR LOSSES SUSTAINED BY YOU OR THIRD PARTIES OR A FAILURE OF THE PROGRAM TO OPERATE WITH ANY OTHER PROGRAMS), EVEN IF SUCH HOLDER OR OTHER PARTY HAS BEEN ADVISED OF THE POSSIBILITY OF SUCH DAMAGES. 122 BDE761AM-001 User Manual...
- Page 123 1. This device complies with Part 15 of the FCC rules/Industry Canada RSS 210 standard . Operation is subject to the following two conditions: (1) This device may not cause harmful interference, and (2) This device must accept any interference received, including interference that may cause undesired operation. 2. This device and its antenna(s) must not be co‐located or operating in conjunction with any other antenna or transmitter. 3. Changes or modifications to this unit not expressly approved by the party responsible for compliance could void the user authority to operate the equipment. IMPORTANT NOTE : (For Mobile Device Configuration) FCC Radiation Exposure Statement: This equipment complies with FCC radiation exposure limits set forth for an uncontrolled environment. This equipment should be installed and operated with minimum distance 20cm between the radiator & your body. END OF TERMS AND CONDITIONS 123 BDE761AM-001 User Manual...
Need help?
Do you have a question about the BDE761AM-001 and is the answer not in the manual?
Questions and answers