
Subscribe to Our Youtube Channel
Related Manuals for mPower Electronics VOXI


Summary of Contents for mPower Electronics VOXI
- Page 1 VOXI Fixed Photo-ionization Detectors MP812 & MP815 User’s Guide Rev 0.4 October, 2019...
-
Page 2: Table Of Contents
4. Operation Overview ..................... 11 5. Controller Operations ................... 11 5.1 Hardware and Software Requirements ......................11 5.2 Connecting the VOXI to the Controller (Mobile Device) ..................12 5.3 Operation Shortcut Buttons and Overview ....................... 12 5.4 Field Service (Calibration, etc.) .......................... 13 5.5 VOXI Settings .............................. - Page 3 Special Conditions for Safe Use The VOXI monitor must be calibrated if it does not pass a bump test, when a new sensor has been installed, or at least once every 180 days, depending on use and sensor exposure to poisons...
-
Page 4: General Information
OLED digital read-out, 4-20 mA analog output, RS-485 digital output, CAN or Modbus, 3 relays, and one port to an external strobe or horn. The VOXI offers two models that measure from low ppb to a high range up to 5000 ppm for different applications. -
Page 5: User Interface
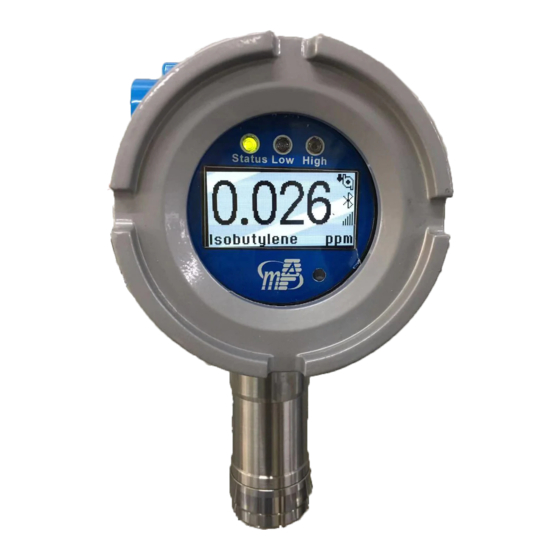
VOXI User’s Guide 2. User Interface The VOXI user interface consists one large OLED Display showing the gas concentration, one status LED, two alarm LEDs, and various status icons. Calibration and other parameters are programmed using the mPower Suite mobile App on a smart-phone or tablet. -
Page 6: Installation
Future VOXI versions that have certifications will be able to be installed and operated in hazardous-gas locations, but because the housing cannot be opened for service in the presence of flammable gases, the VOXI is easier to maintain if installed in a non-hazardous location or one that can be vented to remove hazardous gases... -
Page 7: Rain Cap
If mounted outdoors, the rain cap can be installed to further reduce the chance of precipitation ingress. This cap also allows connection of tubing to the gas outlet if it is desired to vent the exhaust away from the VOXI instrument. -
Page 8: Electrical Connections
These blocks accept 12AWG to 24AWG wire (0.2 to 4.0 mm ). Input power requirements are <5W, 12-30 VDC. An external ground wire (AWG11 recommend) must be connected to the VOXI housing reliably. Terminal Blocks... -
Page 9: Baseline 4 Ma Signal Adjustment
VOXI User’s Guide 3.3.1 Baseline 4 mA Signal Adjustment If sending the 4-20 mA signal to a remote controller, during the field installation the VOXI analog output should be adjusted. See VOXI Field Service section below for procedures. 3.3.2 MODBUS Message RTU Framing The VOXI uses RTU framing for MODBUS messages. -
Page 10: Operation Overview
The VOXI has an on-board heater which turns on at low temperature to reduce the possibility of condensation in the PID sensor. Both the VOC threshold and temperature threshold are set at the factory and cannot be adjusted by the user. -
Page 11: Connecting The Voxi To The Controller (Mobile Device)
VOXI User’s Guide 5.2 Connecting the VOXI to the Controller (Mobile Device) The system communicates wirelessly using Bluetooth Low Energy (BLE) signals when within 10 m (33 feet) distance. 1. To connect start the App, click on to search for nearby devices, and click the device name. -
Page 12: Field Service (Calibration, Etc.)
VOXI User’s Guide To enter the VOXI operations submenus, click on the device icon or the blank area to its right. VOXI operations include “Field Service”, “Settings” and “Operations (Log)”. The App automatically enters the "Field Service" screen. 5.4 Field Service (Calibration, etc.) VOXI field services include •... - Page 13 When prompted, supply clean air to the inlet and click ‘Yes’ to start the count-down timer. If the VOXI is mounted in an area where ambient air contains detectable VOCs, provide a clean air source a) by attaching a ®...
- Page 14 : Click -100; Long Click -1000. 5.4.4 Wireless Registration The VOXI can be connected (registered) to a wireless network for communication up to 2 miles (3 km) away using an mLink modem. First, put the mLink in the "Register Device" mode (NOTE: this requires a separate mobile phone or tablet dedicated to the mLink).
-
Page 15: Voxi Settings
NOTE: Firmware cannot be updated by the user. From the main screen bottom panel click on the ‘Settings’ icon and then click “GET” to display the VOXI configurations. After modifying the settings, click the "SET" button to send the modifications to the VOXI. -
Page 16: View Operations Log
VOXI User’s Guide 5.6 View Operations Log Click "Operations" and select the date from the list at the bottom to view the daily operation log. -
Page 17: Maintenance
VOXI User’s Guide 6. Maintenance The VOXI requires regular filter replacement and possibly lamp & sensor cleaning if used in areas of high dust or condensation. The pump may also need service and the expected replacement period is about 2 years. - Page 18 4. Use a clean tissue to wipe the lamp window again. 5. Re-insert the cleaned lamp, plug in the sensor and replace the sensor cap and VOXI cover. 6. Always re-calibrate the PID after cleaning the lamp and/or sensor.
-
Page 19: Replacing Pump
VOXI User’s Guide 6.2.3 Sensor Cleaning 1. Unscrew the sensor cover and pull the sensor straight out, using a slight rocking motion if necessary. 2. Put the sensor into a beaker and cover it with pure methanol or ethanol. 3. Put the beaker into an ultrasonic cleaning bath and sonicate for 15 minutes. -
Page 20: Troubleshooting
VOXI User’s Guide 7. Troubleshooting Problem Possible Reasons & Solutions Reasons: Dirty filter(s). Dirty sensor module. Excessive moisture or water condensation. Incorrect calibration. Readings abnormally High Solutions: Replace filter(s). Clean or replace sensor module. Blow-dry the sensor module. Calibrate the unit. -
Page 21: Technical Specifications
VOXI User’s Guide 8. Technical Specifications All specifications are subject to change without notice. Please check for updates at www.mpowerinc.com... - Page 22 VOXI User’s Guide Technical Support and mPower Contacts mPower Electronics Inc. 3046 Scott Blvd. Santa Clara, CA 95054 Phone: (408) 320-1266 Fax: (669) 342-7077 info@mpowerinc.com www.mpowerinc.com...
Need help?
Do you have a question about the VOXI and is the answer not in the manual?
Questions and answers