
Related Manuals for Infrapower PPS-03-S

Summary of Contents for Infrapower PPS-03-S
- Page 1 Inspired by Your Data Center User Manual PPS-03-S, IP dongle GUI & SNMP InfraPower Intelligent PDU 1-Phase 1-Phase 3-Phase Dual Feed Designed and manufactured by Austin Hughes UM-PPS-03-S-Q320V1 www.austin-hughes.com...
- Page 2 ■ Re-position or relocate the receiving antenna. ■ Increase the separation between the equipment and receiver. ■ Connect the equipment into an outlet on a circuit diff erent from that to which the receiver is connected. UM-PPS-03-S-Q320V1 www.austin-hughes.com...
-
Page 3: Table Of Contents
< 1.3 > Meter ( PDU ) Level Setting < 1.4 > IP Dongle Confi guration < 1.5 > Remote PDU Level & ID Setting < 1.6 > PPS-03-S IP Dongle GUI P.10 < 1.7 > System P.15 < 1.8 >... -
Page 4: Ip Dongle Specifi Cation
IP Dongle to the 1st PDU, then the entire daisy chain group can be remote over IP. Hence, administrator can remotely access all PDUs in the daisy chain group by one single IP via the IP Dongle. InfraPower PPS-03-S Features Capacity... - Page 5 > Common SNMP MIBs (Management Information Base) across all iPDU families USB Wifi Port > Optionally connect via a Wifi kit (IPD-WIFI) complying with 802.11 g/n/ac Remote Management Protocols > HTTP(S); SSH Command Line Interface; Telnet; SMTP; IPv6/IPv4 UM-PPS-03-S-Q320V1 www.austin-hughes.com...
-
Page 6: Ip Dongle Installation & Meter ( Pdu ) Cascade
• Detachable design • Daisy chain by Cat 5e / 6 cable • Max. cable length 300M (984 ft) • One IP dongle connect Max. 32 x 1-Phase & 3-Phase InfraPower PDU LINK Cat 5e / 6 cable Cat 5e / 6 cable... -
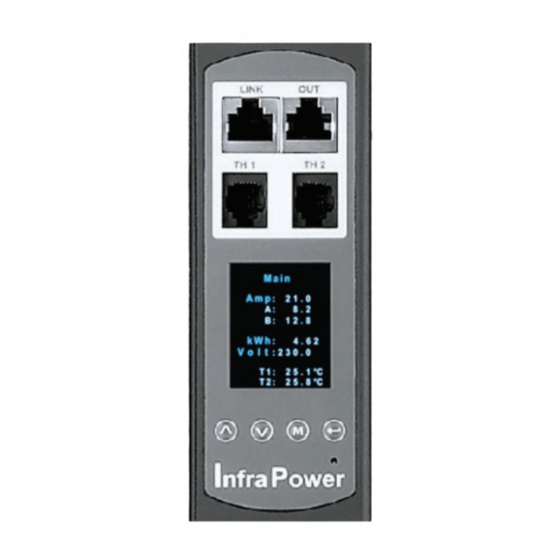
Page 7: Meter ( Pdu ) Level Setting
( III ) For 2.8″ LCD Meter ( With touchscreen function ) Setup Level Level PDU Level Level Group : Buzzer Level : Screen Sensor Outlet ON Cancel Enter Cancel Enter For PDU with fi rmware version V37 or above UM-PPS-03-S-Q320V1 www.austin-hughes.com... -
Page 8: Ip Dongle Confi Guration
The default IP setting is as below: IP address : 192.168.11.1 IP address : 192.168.0.1 Subnet mask : 255.255.255.0 Subnet mask : 255.255.255.0 Gateway : 192.168.11.254 Gateway : 192.168.0.254 Step 11. Repeat Step 4 & Step 10 for Lan 2 Port of IP dongle UM-PPS-03-S-Q320V1 www.austin-hughes.com... -
Page 9: Remote Pdu Level & Id Setting
< 1.5 > Remote PDU Level & ID Setting InfraPower Manager PPS-03-S provides a convenient way to set the PDU level. You can set the PDU level remotely via the IP Dongle WEBUI. Please follow the steps below to complete the Remote PDU level setting. - Page 10 < 1.5 > Remote PDU Level & ID Setting Step 5. After the searching is completed, the following screen will display UM-PPS-03-S-Q320V1 www.austin-hughes.com...
- Page 11 < 1.5 > Remote PDU Level & ID Setting Step 6. Assign a unique “ Level “ , “ Name “ and “ Location “ to each PDU and ensure to check the register box. Then Click “ Apply “. UM-PPS-03-S-Q320V1 www.austin-hughes.com...
- Page 12 < 1.5 > Remote PDU Level & ID Setting Step 7. After the PDU level setting is complete, “ Status “ page will display the PDU with proper level. UM-PPS-03-S-Q320V1 www.austin-hughes.com...
-
Page 13: Pps-03-Sip Dongle Gui
< 1.6 > PPS-03-S IP Dongle GUI Each IP dongle ( IPD-03-S ) provides a FREE built-in GUI , PPS-03-S, which allows user, via a web browser, to see PDU’s data and remotely manage the PDU over a TCP / IP Ethernet network. - Page 14 < 1.6 > PPS-03-S IP Dongle GUI In < Details >, - Change “ Name ” and “ Location ” of PDU & Click “ Apply ” - Change “ Alarm amp. ” & “ Low alert amp. ” of PDU’s circuits & Click “ Apply ”...
- Page 15 < 1.6 > PPS-03-S IP Dongle GUI In < Outlet setting >, - Change PDU’s outlet name - Change “ Power up sequence delay ” of PDU’s outlet ( Switched PDU only ) - Change “ Alarm amp. ”, “ Rising Alert amp.” & “ Low alert amp. ” of PDU’s outlet ( Outlet Measurement PDU only ) Click “...
- Page 16 < 1.6 > PPS-03-S IP Dongle GUI In < Sensor Status >, - View status, location, latest reading & alarm setting of Temp. & Humid sensors. - View status & location of Door sensor & Smoke sensor The GUI will not show the status / reading if sensors are NOT installed & activated.
- Page 17 < 1.6 > PPS-03-S IP Dongle GUI In < Sensor Setting >, - Default Sensor setting : Deactivate - “ Activate ” sensors ONLY when they are connected - Change “ Location ” , “ Rising alert Setting “ & “Alarm Setting ” of Temp. & Humid sensors - Change “...
-
Page 18: System
- Set the “ Date & Time “ of the IP dongle ( by “ Manually “ or “ NTP server “ ). Default is “ Manually “ - Tick “ Force HTTPS ” to provide data transmission security. Default Web Access is “ HTTP “ - Click “ Apply ” to fi nish the above settings UM-PPS-03-S-Q320V1 www.austin-hughes.com P.15... -
Page 19: Network
- Enter the IP address of “ Primary DNS ”. Default is “ 8.8.8.8 ” - Enter the IP address of “ Secondary DNS ”. Default is “ “0.0.0.0 ” - Click “ Apply ” to fi nish the above settings UM-PPS-03-S-Q320V1 www.austin-hughes.com P.16... -
Page 20: Login
- Click “ Apply ” and “ OK “ on the pop up window to make changes eff ective - You can now go to “ Domain Users ” to assign access right to the “ Domain Users ” or the “ Domain Group ” UM-PPS-03-S-Q320V1 www.austin-hughes.com... - Page 21 - Assign access right ( No access / Allow ) to “ Domain Group ” and click “ Apply ” . - The Users of the Domain Group assigned “ Allow “ access right can login the IP dongle WEBUI. UM-PPS-03-S-Q320V1 www.austin-hughes.com...
- Page 22 - Click “ Apply ” and “ OK “ on the pop up window to make changes eff ective - You can now go to “ LDAP Users ” to assign access right to the “ LDAP User ” or the “ LDAP Group ” UM-PPS-03-S-Q320V1 www.austin-hughes.com...
- Page 23 - Assign access right ( No access / Allow / Deny ) to “ LDAP Group ” and click “ Apply ” . - The LDAP Group assigned “ Allow “ access right can login the IP dongle WEBUI. UM-PPS-03-S-Q320V1 www.austin-hughes.com...
-
Page 24: Snmp Setup
Default IP address of LAN 1 is “ 192.168.11.1 “ Default IP address of LAN 2 is “ 192.168.0.1 “ Step 4. Enter “ Login name “ & “ Password “. Default login name & password are “ 00000000 “ UM-PPS-03-S-Q320V1 www.austin-hughes.com P.21... - Page 25 Step 16. Input “ Trap Station IP “ , “ Trap Port “ & “ Trap Community “ of Station 1 Step 17. Repeat Step 14 & 15 for Station 2 & 3 Step 18. Click “ Apply “ to fi nish the SNMP v1 / v2 settings UM-PPS-03-S-Q320V1 www.austin-hughes.com P.22...
- Page 26 Step 4. Enter “ Login name “ & “ Password “. Default login name & password are “ 00000000 “ Step 5. Select SNMP from the left navigation pane Step 6. The SNMP Settings window appears as below: UM-PPS-03-S-Q320V1 www.austin-hughes.com P.23...
- Page 27 Step 21. Input the “ Trap Station IP “ & “ Trap port “ Step 22. Repeat step 12 to 20 for User 2 & 3 Step 23. Click “ Apply “ to fi nish the SNMP v3 settings. UM-PPS-03-S-Q320V1 www.austin-hughes.com P.24...
- Page 28 After enable SNMP, you can click “ SNMP Traps “ to go to the “ SNMP Traps Setting “ page Below is the default setting for each PDU SNMP trap. You can set the SNMP trap option and Click “ Apply “ to fi nish the settings. UM-PPS-03-S-Q320V1 www.austin-hughes.com P.25...
-
Page 29: Notifi Cation
Step 7. Enter the “ Alarm Interval ”. ( Min. 10, Max. 60 mins ) Step 8. Enter the alarm recipient email account in “ Recipient 01 ” Step 9. Repeat step 8 for other recipients Step 10. Click “ Apply “ to fi nish the alarm email server setting UM-PPS-03-S-Q320V1 www.austin-hughes.com P.26... -
Page 30: Syslog
< 1.12 > Syslog In < Syslog > , you can view the latest 2000 device and system log UM-PPS-03-S-Q320V1 www.austin-hughes.com P.27... -
Page 31: Ip Dongle Firmware Upgrade
Default IP address of LAN 2 is “ 192.168.0.1 “ Step 6. Enter “ Login name “ & “ Password “. Default login name & password are “ 00000000 “ Step 7. Select the Firmware from the left navigation pane UM-PPS-03-S-Q320V1 www.austin-hughes.com P.28... - Page 32 Click “ Open ” Step 10. Click “ Upgrade ” to start the upgrade process. It takes a few minutes to complete. Step 11. Once complete, UI will return to the login page. UM-PPS-03-S-Q320V1 www.austin-hughes.com P.29...
-
Page 33: Dhcp Setting
Step 5. Select “ Network “ from the left navigation pane Step 6. Dual Lan Mode: Select “ ON “ from “ DHCP “ of LAN 1 & LAN 2 Click “ Apply “ to save the settings UM-PPS-03-S-Q320V1 www.austin-hughes.com P.30... - Page 34 Step 7. Select “ Firmware “ from the left navigation pane Step 8. Record the “ MAC address “ of LAN 1 & LAN 2. Step 9. Assign an IP addressof LAN 1 & LAN 2 of to the IP Dongle from your DHCP server. UM-PPS-03-S-Q320V1 www.austin-hughes.com P.31...
- Page 35 Step 10. Failover Mode: Select “ ON “ from “ DHCP “ & Click “ Apply “ to save the settings Step 11. Select “ Firmware “ from the left navigation pane Step 12. Record the “ MAC address “ Step 13. Assign an IP address to the IP Dongle from your DHCP server. Complete UM-PPS-03-S-Q320V1 www.austin-hughes.com P.32...
-
Page 36: Command Line Interface Access
The company reserves the right to modify product specifi cations without prior notice and assumes no responsibility for any error which may appear in this publication. All brand names, logo and registered trademarks are properties of their respective owners. Copyright 2020 Austin Hughes Electronics Ltd. All rights reserved. UM-PPS-03-S-Q320V1 www.austin-hughes.com P.33...
Need help?
Do you have a question about the PPS-03-S and is the answer not in the manual?
Questions and answers