
Related Manuals for Blonder tongue BTPRO-7000

Summary of Contents for Blonder tongue BTPRO-7000
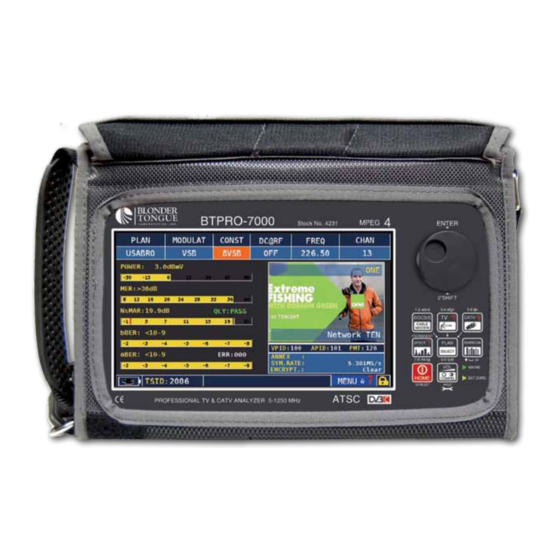
- Page 1 BTPRO-7000 BTPRO-7000 B T P R O - 7 0 0 0 B T P R O - 7 0 0 0 Instruction Manual Hardware Version 2 TFT 16:9 TFT 16:9 www.blondertongue.com...
- Page 2 NOTES...
- Page 3 INDEX – Get to know your BTPRO-7000 – Home and navigation – Volume & configuration SPECT – Screen Shot CATV – CATV: analyze cable television signals – TV: analyze television SPECT – SPECT: spectrum analyzer MPEG SERVICE – LIST: show and select available MPEG TS services...
- Page 4 GET TO kNOw yOur BTPrO-7000 Front panel ___________________________________ • poWEr To turn on press To turn off press and the ‘HOME’ key. hold the ‘HOME’ key • WHEEL Use the wheel to navigate across the screen and adjust the values...
-
Page 5: Side Panels
SiDE pAnELS ____________________________________________________ • LEFT SiDE • riGHT SiDE • Top SiDE LAN Eternet RJ45 OPTIC IN: FC-ST-SC opt. USB B SW upgrades RF out “F” 75 Ω USB A memory stick ASI OUT (opt.) Power Supply input (12 V DC - 1A) 10 = ASI IN (opt.) 11 =... -
Page 6: Home Screen
HOME aND NaVIGaTION ‘HoME’ ScrEEn ________________________________________________ Press the ‘HOME’ key to go to the home screen, then rotate the wheel to navigate on ‘TV’ or ‘CATV’ icons and press the wheel to select the measurement mode required. Press the ‘HOME’ key at any time to return to the home screen nAviGATion ____________________________________________________... - Page 7 How to select from the menus and change a value using the drop down menus: • Rotate the wheel and select the menu required (fig. 1) • Keep the wheel pressed for 2” to visualize the drop down menu (fig. 2) •...
- Page 8 fig. 5 fig. 4 nAviGATion uSinG MiXED coMMAnDS: MEcHAnicAL & ToucH • Touch a value in the menu (fig. 1) • Rotate the wheel to adjust the value (fig. 3) or touch the value required (fig.2) • Press the wheel and confirm the selection (fig.3) or touch the monitor outside the drop down menu (fig.3) Ex.
- Page 9 fig. 4 Select the frequency and set the value using the numerical keyboard: • Touch FREQ (fig. 1) • Touch again to show the menu “INSERT FREQ” (fig. 2) • Touch the numbers to digit the required frequency value (fig. 3) •...
-
Page 10: Volume & Configuration
VOluME & cONfIGuraTION Volume selection is immediately active, press “ENTER” for the Display configuration and other important settings. viDEo in ________________________________________________________ • “VIDEO IN” (connector 7 on page 5): Select “EXT” to visualize an external video source. BATTEry SAvinG AnD TiMEr oFF ________________________ Settings for battery save mode. -
Page 11: Touch Screen Calibration
ToucHScrEEn cALiBrATion _____________________________ if the touchscreen does not respond to the commands, it may be necessary to calibrate: Touch “CONFIGURATION MENU” Touch “METER” from the volume window; then “CALIBRATE TOUCHSCREEN”; Touch the center of the squares that appear note: Use the pen and touch in the corners of the screen, the screen exactly in the center repeat four times for every square. - Page 12 DiScovEry _____________________________________________________ Identifies the modulation of a tuned TV channel in the TV master PLAN Touch the “CONFIGURATION MENU” in the VOLUME window Tv MoDE cATv (cABLE) MoDE ____________________ ____ In “TV MODE” the “DISCOVERY” function is In “CATV MODE” the “DISCOVERY” function set on mode TERR ONLY.
- Page 13 ScrEEN SHOT The “SCREEN SHOT” function allows you to directly save the TFT monitor screens in an external memory. • Connect an external memory source (not provided) to the USB A socket. • Set the instrument on the screen to be saved: Spectrum, Measurements, Constellaton, Echoes etc.
- Page 14 CATV CATV caTV AnALyzE cABLE TELEviSion SiGnALS SWiTcH To cATv MoDE _____________________________________ CATV CATV CATV channel plan selection DiGiTAL cATv DvB-c MEASurEMEnT DiSpLAy _______ Main measurements & live picture Touch the picture to enlarge, Touch again to return to the measurements 64 QAM constellation Touch “ZOOM”...
- Page 15 AnALoG rADio MEASurEMEnT DiSpLAy _____________ Touch “CHAN” & select “FMH” or “FML”, Touch “MODULAT” & select “FM Radio”, Touch “FREQ” and select the frequency required. AnALoG Tv MEASurEMEnT DiSpLAy ___________________ Touch “CHAN” and select the channel required. If it is analog you will see the following displays: Level measurement, audio-vidio SNR and HUM measurement measurement and picture...
- Page 16 Waveform monitoring measurement Teletext measurement Press repeatedly to navigate in the CATV measurement screens...
- Page 17 cHAnnEL LoGGEr ____________________________________________ Touch “MENU” on the main measurements Touch “CHANNEL LOGGER” and picture screen Touch “MENU” Select the time interval (TIME INTVL) and where you want to store the file, either in the meter’s memory, or in the USB memory stick (send to USB-ON), with the relative file name (File name) EXAMpLE 1:...
-
Page 18: Related Functions
viSuALizE niT ___________________________________________________ Touch “MENU&?” from the “MAIN Touch “VISUALIZE NIT”. MEASUREMENTS & PICTURES”. example 1: “NIT INFO VISUALIZATION” noTE: - The function VISUALIZE NIT is available in TV & CATV mode rELATED FuncTionS _________________________________________ BARSCAN BARSCAN MPEG SERVICE MPEG SERVICE TV Channel MPEG Plan... - Page 19 AnALyzE TELEviSion SWiTcH To Tv MoDE ________________________________________ (All channels received at the Antenna) Tv channel plan 8vSB MEASurEMEnT DiSpLAyS ___________________________________ Navigate in “CHAN” and select the channel required. If it is digital you will see the following displays: Main measurements and picture 8VSB constellation Navigate in “ZOOM”...
-
Page 20: Field Strength
FiELD STrEnGTH _______________________________________________ Touch “CONFIGURATION MENU” from the Touch “EDIT ANT FACTOR” VOLUME screen EXAMpLE 1: Set the antenna parameters: Complete the insertion of the parameters • Frequency value (FREQ:) for the various frequencies. • Antenna gain (ANT. FACTOR:) • Cable attenuation (CABLE LOSS:) Touch “Field Strength”... -
Page 21: Spectrum Analyzer
SPECT SPECT SPEcT SpEcTruM AnALyzEr SWiTcH To SpEcT MoDE ___________________________________ SPECT SPECT SpEcTruM AnALyzEr ScrEEnS ___________________________ Touch “SPAN” to modify the value or directly select the active span value Fast spectrum Rotate to Enter to Press the spectrum key again to activate Navigate confirm the “MAX HOLD”... - Page 22 MPEG SERVICE MPEG SERVICE lIST MpEG SHoW AnD SELEcT AvAiLABLE MpEG TS SErvicES SErvicE Or touch MPEG SERVICE MPEG SERVICE Vpid - Apid in the measurement windows TV-CATV Press ENTER Press ENTER, navigate in & rotate to Vpid - Apid & press ENTER to navigate, return to the measurements, or touch...
- Page 23 lTE INTErfErENcE auTOTEST Press the “BARSCAN” key twice to go to the LTE INTERFERENCE AUTOTEST function. Here you can find some examples: eXAMpLE 1: Low LTE interference. The lower part of the display shows the following information: PASS = NO filter required eXAMpLE 2: High LTE interference.
-
Page 24: Special Functions
HElP The “HELP” function identifies the tuning parameters of a digital TV signal. HoW To uSE THE “HELp” FuncTion ________________________ Spectrum mode move In measurement the “mrk. mode when Fr” to the the lock icon center of is open (the a digital signal is not carrier... - Page 25 MEMORY MEMORY MEMOry cHAnnEL pLAnS AnD LoG FiLES MEMORY MEMORY AuToMEMory (Tv) __________________________________________ To automatically store all the existing channels in a city or building Set the desired parameters: Touch “AUTOMEMORY TV” Touch “to FILE N” and select the destination file “AUTO” where the search must be saved. Touch “LEVEL”...
- Page 26 LoGGEr SAvE _________________________________________________ Touch “SAVE DATALOGGER” and set the DATA LOGGER run parameters required. Touch “START SAVE” to create a new log file LoGGEr rEcALL ______________________________________________ EXAMpLE 1: Browse through measurements saved in Touch “RECALL DATALOGGER” the log file and Set the LOG file parameters. Touch “RECALL?”...
- Page 27 OPTIONS...
- Page 28 “aPP” DOcSIS caBlE MODEM (opt.) SWiTcH To DocSiS MoDE _________________________________ rAnGinG METHoD (SEArcH) Using the Standard Navigation Mode, select whether the search parameters are Fixed, thus exactly matching the values you will enter into the remaining lines of this menu, or AUTOMATIC: if so, the meter will explore the frequency range in automatic mode.
- Page 29 connEcTion To THE cMTS _______________________________ The meter will start scanning the selected channels in order to connect to the CMTS While performing this process the display will indicate Scanning now at bottom and WAIT or UNLOCKED in the various parameters fields. Once completed the synchronization process, the LCD will display “CM is Registered”...
- Page 30 TonE piLoT 1 - MoDuLATion Using the Standard Navigation Mode, select MODUL and set the desired modulation for the master test tone to be upstreamed. The possible selectable modulations are 8 QAM, 16 QAM, 32 QAM, 64 QAM, QPSK. Press ENTER to confirm. TonE piLoT 1 –...
- Page 31 “App” opTicAL (opT.) _________________________________________ The meter has an internal optical converter. This measures the POWER and OPTICAL ATTENUATION and carries out RF measurements from the optical input, decode the services and visualize the spectrum. ATTEnTion: • +7 dBm to -40 dBm optical power measurement •...
- Page 32 opTicAL inpuT rF MEASurEMEnTS, SpEcTruM & oMi Touch “RF IN” and select “OPTICAL” from the In TV or CATV mode press the “PLAN” key, volume screen select the plan required, then “SPECT” to visualize the spectrum TV spectrum Press the “TV” key to carry out the RF measurements &...
- Page 33 “App” rEMoTE conTroL _____________________________________ The SW REMOTE CONTROL application allows you to configure and monitor the device and all the measurements remotely via web browser (PC, tablet and smartphone) EXAMpLE oF “DHcp” conFiGurATion Touch “CONFIGURATION MENU” from Touch “METER” and then the volume screen “LAN CONFIGURATION”...
- Page 34 Example of remote connection “DHCP” BLONDER TONGUE BLONDER TONGUE BT-7000 71945 _BT-7000_ BLONDER TONGUE 1. Open a web browser, 2. Write the IP address assigned, example 192.168.15.134/index.html, 3. Insert in the “USERNAME” field the NAME of the instruments preceded and followed by the symbol_ , example: _BT-7000_, 4.
- Page 35 EXAMpLE oF “STATic” conFiGurATion Touch “CONFIGURATION MENU” from Touch “METER” and then volume screen “LAN CONFIGURATION” Touch “IP CONFIG” and select “STATIC”, Touch “CHECK” insert the “IP” parameters, “NMASK” & “GWAY” At the end touch “EXIT” for exit...
- Page 36 EXAMpLE oF “STATic” conFiGurATion The WEB MONITORING app for BTPRO-7000 Series instruments will allow the user to monitoring by remote control any kind of RF signal. With a simple WEB browser application, the user can pilot the instruments for monitoring the DVBC, DVBT, RADIO and TV ANALOG modulations.
- Page 38 Tv: “App” rEFLEcToMETEr ______________________________ (opT.) The application “HD COAX CABLE REFLECTOMETER” allows you to check the correct impedance matching of a 75Ω distribution installation. Using a ROVER instrument, combined with a calibrated noise generator (for example the ROVER CNG 90 STC), if in a distribution installation there was an impedance mismatch, such as a cable short-circuit, a cable cut or a not properly terminated cable to a 75 ohm dummy load, it will create a standing wave pattern that can be seen on the spectrum of the instrument as shown in the figures below.
- Page 39 EXAMpLE 1: In the DISTANCE window, read the cable’s mismatching value: example 1.7 m conFiGurATion oF coAXiAL cABLES Cable: from 1 to 5. • Default coaxial cable configurations (adjustable). TYPE: Type of cable to be tested. • AIRSPACE: coaxial cable with dielectric in the air. •...
-
Page 40: Connection Diagrams
connEcTion DiAGrAMS USB Noise Distribution cable Generator Mod. ROVER OMNIA 7000 Distribution cable Mod. BTPRO 7000... - Page 41 lI-ION POlIMEr BaTTErIES iMporTAnT: • ALWAyS Turn THE inSTruMEnT oFF BEForE connEcTinG THE BATTEry cHArGEr; • Do noT LEAvE THE BATTEriES DiScHArGED For LonG pErioDS; • ALWAyS cHArGE THE BATTEriES AT niGHT For AT LEAST 7 HourS, EvEn iF THEy ArE noT coMpLETELy DiScHArGED.
- Page 42 THiS procEDurE EXpLAinS HoW To rEGEnErATE/cHEck your BATTEriES AnD cALiBrATE THE BATTEry cHArGE inDicATor uSEFuL ADvicE: • Charge the batteries every night after use, even if they are not completely discharged; • Always use the “battery save” & “timer off” functions to increase your meter’s autonomy; •...
- Page 43 Flashing WITH A POWER The meter does not turn on. SUPPLY NOT FROM 0.5 SECONDS OFF Check the mains power adapter BLONDER TONGUE 0.5 SECONDS ON FLASHES turning ON NO or YES The meter is being turned on 15 TIMES...
-
Page 44: Disposal Of Electronic Equipment
Do not use hairdryer or other strong heating sources, but just leave the meter in quiet air. • If possible, contact Blonder Tongue Technical Services for assistance. If possible, contact Rover Laboratories S.p.A. Technical Assistance. -
Page 45: Accessories Supplied
SuGGESTED ValuES SuGGESTED ValuES This table shows the suggested measurements at a user’s socket for the main digital modulations. This table shows the suggested measurements at a user’s socket for the main digital modulations. � � DVB-T2 & GB COFDM DVB-T2 &... -
Page 46: Limited Warranty
lIMITED warraNTy Seller will at its sole option, either repair or replace (with a new or factory reconditioned product, as Seller may determine) any product manufactured or sold (or in the case of software, licensed) by Seller which is defective in materials or workmanship or fails to meet the applicable specifications that are in effect on the date of shipment or such other specifications as may have been expressly agreed upon in writing: (i) for a period of three (3) years from the date of original purchase for all stock hardware products (other than those specifically referenced herein below having a shorter warranty period);... - Page 47 NOTES...
- Page 48 www.blondertongue.com UG-BTPRO7000-EVO-EN-V1,2 Designed in Europe, Assembled in Europe One Jake Brown Road, P.O. Box 1000 Old Bridge, NJ 08857-1000 USA(800) 523-6049 • (732) 679-4000 • FAX: (732) 679-4353 Product specification are subject to change without notice . All trademarks used are properties of their respective owners.
Need help?
Do you have a question about the BTPRO-7000 and is the answer not in the manual?
Questions and answers