Advertisement
10012437A-2GIG-RPTR1-345-INSTALL-INSTR-en-PRT, 09/16/2016, BLACK, 20LB MEAD BOND, 8.5X11", TOL. +/- 0.125, SCALE: 1:1, FRONT & BACK, FOLD TO FIT BOX
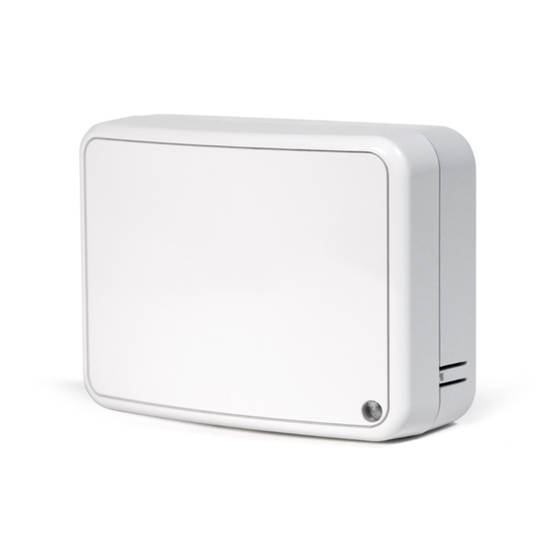
2GIG-RPTR1-345
WIRELESS INDOOR REPEATER
INSTALLATION INSTRUCTIONS
The 2GIG Wireless Indoor Repeater (2GIG‐RPTR1‐345) is a remotely
powered wireless indoor repeater. The repeater is a peripheral device
that communicates with the 2GIG Panel using a proprietary 345 MHz
transmission protocol. The repeater receives and recognizes messages
from other 345 MHz devices that are unable to directly communicate
with the system, and "repeats" those messages to extend the range of
these devices.
The repeater will typically be installed at the mid‐point between the
panel and the wireless devices being repeated. When a transmission
from a device is repeated, the repeater adds a bit to the message to
indicate to the system that the message is not coming directly from
the device. The repeater will not repeat already repeated messages.
The repeater is powered by an AC adapter and is equipped with a
rechargeable battery which supports 24 hours of battery back up
under conditions of local power failure. When the power source for
the repeater changes from AC power to battery backup, or from
battery backup to AC power, the repeater will automatically send a
message to the system within two (2) minutes. In addition,
supervisory messages are sent approximately every 70 minutes that
indicate the repeater status.
The repeater is equipped with a status indicator LED visible from the
front of the unit, and a learn button is located on the side of the unit.
Figure 1 Wireless Indoor Repeater Package Contents
A
H
F
G
E
A Rechargeable Lithium‐Ion Battery
B AC Adapter
C Tamper Screw
D Mounting Screws and Anchors (4)
E Learn Button
F Status Indicator
G Power Input
H Case Locking Screw
Installing the Battery
The rechargeable battery can be installed by opening the enclosure
while the power is disconnected (see Figure 2).
Polarity of the battery must be observed. Align the
WARNING:
battery to match the polarity indicators on the circuit board.
Improper installation of the battery may result in heat
generation, explosion, or fire which may lead to personal
injury.
PRINTER'S INSTRUCTIONS
Installing the Repeater
Figure 2
5
1 Rechargeable Lithium‐Ion Battery
2 Tamper Switch
3 Repeater
4 Power Input Connector
5 Learn Button
Mounting Guidelines
Use these guidelines when installing the wireless indoor repeater:
• Mount Repeaters within 100 ft (30 m) of the Control Panel.
Although the transmitter may have a range of 350 ft (106.7 m) in
open air, the repeater location can have a significant effect on
range. In open/unobstructed situations, the transmitter range may
be greater. In adverse wireless conditions, changing the repeater
orientation may lead to improved range.
• Mount Repeaters as high as possible. Mounting the repeater high
off the ground helps receiver sensitivity.
B
• Do Not Expose Repeaters to Moisture or Extreme Temperature. It
is best to mount repeaters in a dry location where the operating
temperature does not exceed 32° to 120° F (0° to 49° C).
C
• Keep Repeaters Away from Metal/Metalic Surfaces. To keep the
repeater away from metal or metallic surfaces (for example, foil
wallpaper), it is recommended that you use spacers (not included).
D
You should also avoid mounting sensors in areas where there is a
large quantity of metal or electrical wiring (for example, near a
furnace or in a utility room).
To install the wireless repeater:
1
Open the repeater case.
Attach the base to the desired wall location with the four (4)
2
Phillips head screws and anchors supplied (see Figure 2).
3
Install the tamper screw (see Figure 2). With the tamper screw
installed, removing the case from the wall triggers tamper.
NOTE:
be installed into a wall stud. Do not use a wall anchor.
4
Install the battery. Observe battery polarity.
Connect the 2‐conductor wire to the power supply and to the
5
terminal connector on the circuit board. Make sure the wire
passes through the grommet and hole on the repeater base before
connecting to the terminal.
6
Attach the repeater cover to the base and secure the assembly
with the Phillips head case locking screw.
Wireless Indoor Repeater Component and Feature Locations
OBSERVE
BATTERY
POLARITY
1
2
6
4
3
6
Repeater Base
7
Tamper Screw
8
Mounting Screws (4)
9
Mounting Anchors (4)
For the tamper to work correctly, the tamper screw must
Copyright © 2016 Nortek Security & Control LLC
7
8
9
1
Advertisement
Table of Contents

Summary of Contents for Nortek Security & Control 2GIG-RPTR1-345
- Page 1 PRINTER’S INSTRUCTIONS 10012437A-2GIG-RPTR1-345-INSTALL-INSTR-en-PRT, 09/16/2016, BLACK, 20LB MEAD BOND, 8.5X11”, TOL. +/- 0.125, SCALE: 1:1, FRONT & BACK, FOLD TO FIT BOX 2GIG-RPTR1-345 WIRELESS INDOOR REPEATER INSTALLATION INSTRUCTIONS Installing the Repeater Figure 2 Wireless Indoor Repeater Component and Feature Locations The 2GIG Wireless Indoor Repeater (2GIG‐RPTR1‐345) is a remotely ...
- Page 2 Wireless Indoor Repeater Installation Instructions Plug the AC adapter into an AC outlet. The status indicator will REGULATORY INFORMATION emit a steady green light. This equipment has been tested and found to comply with the limits for Class B Digital Do not connect the AC adapter to an AC outlet that is NOTE: Device, pursuant to Part 15 of the FCC Rules. These limits are designed to provide reasonable controlled by a switch.
Need help?
Do you have a question about the 2GIG-RPTR1-345 and is the answer not in the manual?
Questions and answers