Advertisement
Table of Contents
2GIG® GC3 Security & Automation System
2GIG-ZWM-500 Z-Wave Module Installation Instructions
10008951A | Proprietary & Confidential
Installing the 2GIG Z-Wave Module
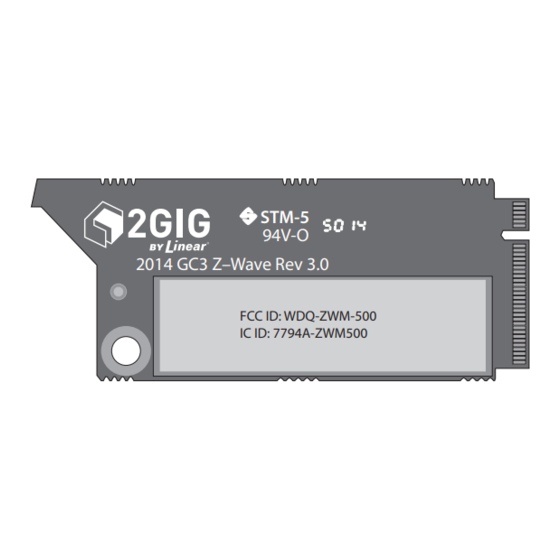
The 2GIG Z-Wave Module (2GIG-ZWM-500) provides the GC3 Security &
Automation System with the ability to communicate with up to 232 smart home
devices using the Z-Wave wireless communication protocol.
Box Contents
Verify that the package includes the following:
1—2GIG Z-Wave Module (2GIG-ZWM-500)
STM-5
94V-O
2014 GC3 Z–Wave Rev 3.0
FCC ID: WDQ-ZWM-500
IC ID: 7794A-ZWM500
Figure 1
2GIG Z-Wave Module
Install the Z-Wave Module
To install the 2GIG Z-Wave Module into a Control Panel, do the following:
1. If the Cellular Radio Module bay is locked, remove the faceplate and then
move the door-lock screw to the UNLOCK position. See "(Optional)
Lock/Unlock the Cellular Radio Module Door" on the next page.
Otherwise, continue with step 2.
2. Remove the hinged door from the GC3 Control Panel.
Figure 2
Cellular Radio Module—Hinged Door
3. If a Cellular Radio Module is present in the system, pull the tab to remove
remove it. Otherwise, skip this step and continue with step 4.
4. Remove the backplate's screw lock from the bottom of the GC3 Panel.
This unlocks the panel's backplate from the rest of the chassis..
Figure 3
GC3 Panel Backplate—Locking Screw
5. Separate the backplate from the GC3 Panel.
6. Disconnect the wired backup battery pin from the PCB battery connector.
Nortek Security & Control | 1950 Camino Vida Roble, Suite 150 | Carlsbad, CA 92008-6517 | USA | 800-421-1587 | www.nortekcontrol.com
Figure 4
GC3 Panel—Backup Battery Connector
7. Disconnect the Piezo Sounder connector.
Figure 5
GC3 Panel—Piezo Sounder Connector
8. Disconnect the internal siren/speaker connector.
Figure 6
GC3 Panel—Internal Siren/Speaker Connector
9. Remove the two screws that secure the rear plate to the chassis and
remove the plate.
Figure 7
GC3 Panel—Rear Plate
Copyright © 2015 Nortek Security & Control LLC.
lin e -gc3-bac kup -b attery-en
lin e -gc3-pie zo -sounde r-en
lin e -gc3-panel-speake
r-en
1
Advertisement
Table of Contents

Subscribe to Our Youtube Channel
Related Manuals for Nortek 2GIG-ZWM-500


Summary of Contents for Nortek 2GIG-ZWM-500
- Page 1 6. Disconnect the wired backup battery pin from the PCB battery connector. Figure 7 GC3 Panel—Rear Plate Nortek Security & Control | 1950 Camino Vida Roble, Suite 150 | Carlsbad, CA 92008-6517 | USA | 800-421-1587 | www.nortekcontrol.com Copyright © 2015 Nortek Security & Control LLC.
- Page 2 These limits are designed to provide reasonable protection against harmful interference in a residential installation. This equipment generates and can radiate Nortek Security & Control | 1950 Camino Vida Roble, Suite 150 | Carlsbad, CA 92008-6517 | USA | 800-421-1587 | www.nortekcontrol.com Copyright © 2015 Nortek Security & Control LLC.
- Page 3 Les modifications non autorisées apportées à cet appareil qui ne sont pas approuvés par Nortek Security & Control LLC peut Nortek Security & Control | 1950 Camino Vida Roble, Suite 150 | Carlsbad, CA 92008-6517 | USA | 800-421-1587 | www.nortekcontrol.com Copyright © 2015 Nortek Security & Control LLC.
Need help?
Do you have a question about the 2GIG-ZWM-500 and is the answer not in the manual?
Questions and answers