
Related Manuals for Dalsa Xtium2-CXP PX8 Series


Summary of Contents for Dalsa Xtium2-CXP PX8 Series
- Page 1 ™ Xtium2-CXP PX8 User's Manual Edition 1.00 sensors | cameras | frame grabbers | processors | software | vision solutions P/N: OC-A8XM-PX8U0 www.teledynedalsa.com...
- Page 2 Use of the products described herein is understood to be at the user’s risk. TELEDYNE DALSA assumes no liability whatsoever for the use of the products detailed in this document and reserves the right to make changes in specifications at any time and without notice.
- Page 3 NSTALLATION VERVIEW Hardware Installation Multi-board Sync & I/O Setup Sapera LT Library & Xtium2-CXP PX8 Driver Installation Teledyne DALSA Device Drivers Installation Procedure Xtium2-CXP PX8 Firmware Loader Firmware Update: Automatic Mode Firmware Update: Manual Mode Executing the Firmware Loader from the Start Menu...
- Page 4 Sapera and Hardware Windows Drivers Recovering from a Firmware Update Error Driver Information via the Device Manager Program Information Window Teledyne DALSA Log Viewer On-board Image Memory Requirements for Acquisitions Symptoms: CamExpert Detects no Boards Troubleshooting Procedure Symptoms: Xtium2-CXP PX8 Does Not Grab...
- Page 5 Using the Bayer Filter SAPERA DEMO APPLICATIONS VERVIEW Using the Grab Demo XTIUM2-CXP PX8 REFERENCE LOCK IAGRAM 2-CXP F TIUM IAGRAM RIGGER OURCE ELECTION FOR INE SCAN PPLICATIONS HAFT NCODER NTERFACE IMING IRTUAL RAME RIGGER FOR AMERAS Synchronization Signals for a 10 Line Virtual Frame Synchronization Signals for Fixed Frame Length Acquisition Synchronization Signals for Variable Frame Length Acquisition APERA...
- Page 6 Status LEDs Functional Descriptions S: Boot-up/PCIe Status LED L1, L2, L3, L4: CoaXPress Status LED J7: External I/O Signals Connector (Female DH60-27P) J8: Internal I/O Signals Connector (40-pin TST-120-01-G-D) Note 1: General Inputs / External Trigger Inputs Specifications Block Diagram: Connecting External Drivers to General Inputs External Driver Electrical Requirements Note 2: General Outputs /Strobe Output Specifications Block Diagram: Connecting External Receivers to the General Outputs 110...
- Page 7 Tables Table 1: Xtium2-CXP PX8 Board Product Numbers ..............8 Table 2: Xtium2-CXP PX8 Software Product Numbers ............... 8 Table 3: Xtium2-CXP PX8 Cables & Accessories ................ 8 Table 4: Xtium2-CXP PX8 Device Drivers ................41 Table 5: Grab Demo Workspace Details ................65 Table 6: CORACQ_PRM_EXT_LINE_TRIGGER_SOURCE –...
- Page 8 Figures Figure 1: Automatic Firmware Update ................... 18 Figure 2: Manual Firmware Update ..................19 Figure 3: Start Menu Firmware Update Shortcut ..............20 Figure 4: Create an install.ini File ..................23 Figure 5: Device Manager Parameter Setting Differences ............25 Figure 6: Firmware Update Status ..................
- Page 9 Figure 55: Photo of cable OR-YXCC-27BE2M1 ..............121 Figure 56: OR-YXCC-H270000 Custom Wiring Kit ..............122 Figure 57: DB37 Output Cable ................... 123 Figure 58: Photo of cable OR-YXCC-BSYNC40 ..............125 Figure 59: Photo of cable assembly OR-YXCC-PWRY00 ............126 Xtium2-CXP PX8 User's Manual Contents •...
- Page 10 Item Product Number Sapera LT version 8.50 or later for full feature support Free download at the (required) Teledyne DALSA website. 1. Sapera LT: Provides everything needed to build imaging application 2. Current Sapera compliant board hardware drivers 3. Sapera documentation: (compiled HTML help, Adobe Acrobat®...
- Page 11 User Programmable Configurations Use the Xtium2-CXP PX8 firmware loader function in the Teledyne DALSA Device manager utility to select firmware for one of the supported modes. Firmware selection is made either during driver installation or manually later on (see Firmware Update: Manual Mode).
- Page 12 ACUPlus: Acquisition Control Unit ACUPlus consists of a grab controller, one pixel packer and one time base generator per camera input. ACUPlus acquires variable frame sizes up to 64KB per horizontal line and up to 64K lines per frame. ACUPlus can also capture an infinite number of lines from a line scan camera without losing a single line of data.
- Page 13 Sapera++ LT Library Sapera++ LT is a powerful development library for image acquisition and control. Sapera++ LT provides a single API across all current and future Teledyne DALSA hardware. Sapera++ LT delivers a comprehensive feature set including program portability, versatile camera controls, flexible display functionality and management, plus easy to use application development wizards.
- Page 14 Quick Start Setup & Installation The following procedure outlines the basic steps required to install the Teledyne DALSA Xtium2- CXP PX8. For complete installation details and information see Installing Xtium2-CXP PX8. PCIe x8 Install the Xtium2-CXP PX8 in an available slot on the host computer.
- Page 15 update the Xtium2-CXP PX8 firmware To complete the installation, when prompted (see Xtium2-CXP PX8 Firmware Loader); select Automatic to update the firmware (default configuration) or select Manual to choose an alternate configuration. Reboot when all software and board drivers are installed. Launch Sapera LT CamExpert to verify the installation;...
- Page 16 When CamExpert detects a camera (as per the CXP device discovery protocol), camera parameters are displayed along with the board parameters. When properly connected, the video status bar displays camera signals in green. Click Grab to acquire a test image to validate the setup. 14 •...
- Page 17 Modify the board and camera parameters as necessary. When completed, save the camera configuration file. The Xtium2-CXP PX8 can be configured using the parameter settings in this file when using the Sapera LT API in your application to acquire images Xtium2-CXP PX8 User's Manual Quick Start Setup &...
- Page 18 Installing Xtium2-CXP PX8 Warning! (Grounding Instructions) Static electricity can damage electronic components. Please discharge any static electrical charge by touching a grounded surface, such as the metal computer chassis, before performing any hardware installation. If you do not feel comfortable performing the installation, please consult a qualified computer technician.
- Page 19 Installation Procedure Sapera LT is installed before Teledyne DALSA board drivers. • Download the Sapera LT SDK from the Teledyne DALSA website and run the executable file; the • installation menu is presented. The installation program may prompt to reboot the computer. It is not necessary to reboot the •...
- Page 20 Xtium2-CXP PX8 Firmware Loader The Device Manager-Firmware Loader program automatically executes at the end of the driver installation and on every subsequent reboot of the computer. It will determine if the Xtium2-CXP PX8 requires a firmware update. If firmware is required, a dialog displays. This dialog also allows the user to load alternative firmware if available for the Xtium2-CXP PX8.
- Page 21 Figure 2: Manual Firmware Update • Observe the firmware update progress in the message output window. Close the Device manager program when the device reset complete message is shown. • Xtium2-CXP PX8 User's Manual Installing Xtium2-CXP PX8 • 19...
- Page 22 If required, the Xtium2-CXP PX8 Firmware Loader program is executed via the Windows Start Menu shortcut: Start • Programs • Teledyne DALSA • Xtium2-CXP PX8 • Firmware Update. A firmware change after installation would be required to select a different configuration mode. See User Programmable Configurations.
- Page 23 Both Sapera LT and the Xtium2-CXP PX8 driver installations share the same installer technology. When the installations of Teledyne DALSA products are embedded within a third party’s product installation, the mode can either have user interaction or be completely silent. The following installation mode descriptions apply to both Sapera and the hardware driver.
- Page 24 Silent Mode Uninstall Similar to a silent installation, a response file must be prepared first as follows. Creating a Response File The installer response file is created by performing a device driver un-installation with a command line switch "-r". The response file is automatically named setup_uninstall.iss which is saved in the \windows folder.
- Page 25 Device Manager – Board Viewer). • When each board setup is complete, using the Teledyne DALSA Device Manager tool, click on the Save Config File button. This will create the “install.ini” file. Figure 4: Create an install.ini File Run the Installation using install.ini Copy the install.ini file into the same directory as the setup installation file.
- Page 26 Upgrading Sapera or Board Driver When installing a new version of Sapera or a Teledyne DALSA acquisition board driver in a computer with a previous installation, the current version must be un-installed first. Described below are two upgrade situations. Note that if the board is installed in a different slot, the new hardware wizard opens.
- Page 27 Preserving Board Parameters during Driver Upgrade User defined parameter settings for previously installed boards can be preserved when upgrading a device driver by using an install.ini file as described in Custom Driver Installation using install.ini. Clicking Automatic on the Device Manager Start-up dialog will apply the settings specified in the install.ini file.
- Page 28 “User Defined” or “Manual Configuration” in the Teledyne DALSA Device Manager start-up dialog under the Device Info column. User-defined settings are specific to the PCI Express slot on the system.
- Page 29 The following screen image shows the Device Manager program with the Information/Firmware tab active. The left window displays all Teledyne DALSA boards in the system and their individual device components. The right window displays the information stored in the selected board device.
- Page 30 [Read/Write]: This is a 64-byte general-purpose user storage area. For information on how to read/write this field at the application level, contact Teledyne DALSA Technical Support. User Interface GIOs [Read/Write]: Use this field to reserve User Interface GIOs for use by the Reservation acquisition module.
- Page 31 User Interface GIOs Default [Read/Write]: Use this field to select the default input level of the User Input Level Interface GIOs. By default, boards are shipped with inputs set for 24V signaling. Note that the input level can also be modified at the application level.
- Page 32 Acquisition Start/Stop Mode [Read/Write]: Use this field to indicate if frame grabber driver will automatically call the AcquisitionStart/AcquisitionStop camera feature upon connecting/disconnecting the transfer respectively. Click on the ‘Value’ field to open the dialog box show below. By default, boards are shipped with this option set to ‘Automatic’. Stream Packet Size [Read/Write]: Use this field to indicate the maximum stream packet size the Maximum...
- Page 33 When programming is complete, the Reset button is displayed in green, click the button to reset the board. Device Information Report Teledyne DALSA Technical Support may request device information report to aid in troubleshooting installation or operational problems. Generate the Xtium2-CL MX4 device manager report file (BoardInfo.txt) by clicking File • Save Device Info.
- Page 34 Configuring Sapera The Sapera configuration program (Start • Programs • Teledyne DALSA • Sapera LT • Sapera Configuration) allows the user to see all available Sapera servers for the installed Sapera-compatible boards. The System entry represents the system server. It corresponds to the host machine (your computer) and is the only server that should always be present.
- Page 35 Host Computer Frame Buffer Memory Limitations When planning a Sapera application and its host frame buffers used, plus other Sapera memory resources, do not forget the Windows operating system memory needs. A Sapera application using the preferred scatter gather buffers could consume most of the remaining system memory, with a large allocation of frame buffers.
- Page 36 Troubleshooting Problems Overview The Xtium2-CXP PX8 (and the Xtium family of products) is tested by Teledyne DALSA in a variety of computers. Although unlikely, installation problems may occur due to the constant changing nature of computer equipment and operating systems. This section describes what the user can verify to determine the problem or the checks to make before contacting Teledyne DALSA Technical Support.
- Page 37 Device Manager launched at startup will display a message indicating that a normal reboot is required. Possible Functional Problems Driver Information: Use the Teledyne DALSA device manager program to view information • about the installed Xtium2-CXP PX8 board and driver. See...
- Page 38 Figure 10: Diagnostic Tool Main Window 36 • Troubleshooting Problems Xtium2-CXP PX8 User's Manual...
- Page 39 Diagnostic Tool Self-Test Window Click the Start button to initiate the board memory self-test sequence. A healthy board will pass all memory test patterns. Figure 11: Diagnostic Tool Main Window Camera Input Eye Diagram Monitor Eye Diagrams allow the user to evaluate visibly the signal integrity between camera data lanes or between different cable sets.
- Page 40 As shown in the following screen image, use the first drop menu to select the PCI device to examine. Select the device from Teledyne DALSA. Note the bus and slot number of the installed board (this will be unique for each system unless systems are setup identically). Click on the Diagnostic button to view an analysis of the system PCI configuration space.
- Page 41 The information display box will detail any PCI conflicts. If there is a problem, click on the Save button. A file named ‘pcidiag.txt’ is created (in the Sapera\bin directory) with a dump of the PCI configuration registers. Email this file when requested by the Teledyne DALSA Technical Support group along with a full description of your computer.
- Page 42 Windows Device Manager An alternative method to confirm the installation of the Xtium2-CXP PX8 board and driver is to use the Windows Device manager tool. Use the Start Menu shortcut Start • Control Panel • System • Device Manager. As shown in the following screen images, look for Xtium2-CXP PX8 board under “Imaging Devices”.
- Page 43 CorSerial Sapera Serial Port manager Kernel Driver Teledyne DALSA Technical Support may request that you check the status of these drivers as part of the troubleshooting process. Recovering from a Firmware Update Error This procedure is required if any failure occurred while updating the Xtium2-CXP PX8 firmware on installation or during a manual firmware upgrade.
- Page 44 Xtium2-CXP PX8 (described elsewhere in this manual). Execute the program via the Windows Start Menu shortcut Start • Programs • Teledyne DALSA • Xtium2-CXP PX8 • Device Manager. If the Device Manager Program does not run, it will exit with a board was not found message.
- Page 45 Start • Programs • Teledyne DALSA • Sapera LT • Tools • Log Viewer. The Log Viewer lists information about the installed Teledyne DALSA drivers. Click on File • Save and you will be prompted for a text file name to save the Log Viewer contents. Email this text file to Teledyne DALSA Technical Support when requested or as part of your initial contact email.
- Page 46 Troubleshooting Procedure When CamExpert detects no installed Teledyne DALSA board, there could be a hardware problem, a system bus problem, a kernel driver problem, or a software installation problem. Make certain that the card is properly seated in PCIe slot.
- Page 47 Figure 18: PCI Diagnostic Tool Perform all installation checks described in this section before contacting Technical Support. • Symptoms: Card acquisition bandwidth is less than expected The Xtium2-CXP PX8 acquisition bandwidth is less than expected. Review the system for problems or conflicts with other expansion boards or drivers. •...
- Page 48 Figure 19: CamExpert PoCXP Parameter • If PoCXP is enabled in CamExpert, check that the Video status PoCXP of the respective connection is green. The linked image cannot be displayed. The file may have been moved, renamed, or deleted. Verify that the link points to the correct file and location. Figure 20: CamExpert Video Status Bar Over-current protection circuit is tripped To identify this condition:...
- Page 49 To clear the TRIP condition of the Xtium2-CXP PX8 over-current circuit: • Open the SaperaLT Logviewer and clear its contents. • Start CamExpert and set PoCXP to Disable, then change the setting to Enable. This resets the over-current protection circuit for the current acquisition module. If necessary, perform this procedure for any other cameras in this condition connected to the board.
- Page 50 CamExpert Quick Start Interfacing CXP Cameras with CamExpert CamExpert is the camera-interfacing tool for Teledyne DALSA frame grabber boards supported by the Sapera library. CamExpert generates the Sapera camera configuration file (yourcamera.ccf) based on timing and control parameters entered. For backward compatibility with previous versions of Sapera, CamExpert also reads and writes the *.cca and *.cvi camera parameter files.
- Page 51 CamExpert groups camera features into functional categories. The features shown depend on the frame grabber used and what camera is connected. The values are either the camera defaults or the last stored value when the camera was used. The general descriptions below are not specific to a particular camera.
- Page 52 Camera Configuration file used by Sapera LT and the CamExpert utility. CCA File Details Teledyne DALSA distributes camera files using the legacy “.CCA” extension, (CAMERA files), which contain all parameters describing the camera video signal characteristics and operation modes (what the camera outputs).
- Page 53 The dialog that opens allows adding details such as camera information, mode of operation, and a file name for the .ccf file. Camera Interfacing Check List Before interfacing a camera from scratch with CamExpert: Confirm that Teledyne DALSA has not already published an application note with camera • files [ www.teledynedalsa.com Confirm that the correct version or board revision of Xtium2-CXP PX8 is used.
- Page 54 Using CamExpert with Xtium2-CXP PX8 The Sapera CamExpert tool is the interfacing tool for Xtium2-CXP PX8 frame grabbers and connected cameras; it is supported by the Sapera library and hardware. CamExpert allows a user to test frame grabber and camera functions. Additionally CamExpert saves the frame grabber settings configuration as individual camera parameter files on the host system (*.ccf).
- Page 55 Basic Timing Category The Basic Timing category groups parameters such as camera type, the active image size, and other settings related to basic timing. Parameter Descriptions The following table describes the CamExpert Basic Timing category of Sapera LT parameters. Acquisition server notes, if applicable, indicate if parameter availablility or supported values are dependent on the selected frame grabber acquisition server and acquisition device.
- Page 56 Advanced Control Category The Advanced Control category groups parameters for configuring camera control signals, board sync outputs and other advanced settings. Area Scan Parameters Line Scan Parameters Parameter Descriptions The following table describes the CamExpert Advanced Control category of Sapera LT parameters. Acquisition server notes, if applicable, indicate if parameter availablility or supported values are dependent on the selected frame grabber acquisition server and acquisition device.
- Page 57 Line Sync Source CORACQ_PRM_EXT_LINE_TRIGGER_ENABLE Selects the line trigger source for Applies to line CORACQ_PRM_INT_LINE_TRIGGER_ENABLE linescan cameras, unless free-running. scan cameras CORACQ_PRM_SHAFT_ENCODER_ENABLE only. Interal Line CORACQ_PRM_INT_LINE_TRIGGER_FREQ Sets the internal line trigger frequency, Applies to line Trigger Frequency in Hz. Applies only when the Line Sync scan cameras (in Hz) Source is set to Internal Line Trigger.
- Page 58 External Trigger Category The External category groups parameters for configuring an external trigger for controlling image acquisition. Area Scan Parameters Line Scan Parameters 56 • CamExpert Quick Start Xtium2-CXP PX8 User's Manual...
- Page 59 Triggers and User Interface General Outputs 1 & 2 reserved for Strobe Outputs. Refer to Information Field Description for more information on using the Teledyne DALSA Device Manager tool to reserve GPIOs. External Trigger CORACQ_PRM_EXT_TRIGGER_DURATION Minimum external trigger pulse duration (in µs), needed Minumum Duration for the pulse to be acknowledged by the acquisition device.
- Page 60 Shaft Encoder CORACQ_PRM_SHAFT_ENCODER_DIRECTION Selects the direction of the shaft encoder that Direction increments/decrements the acquisition device encoder counter. Support of dual phase encoders might require that the direction of motion be considered. This is the case where system vibrations and/or conveyor backlash can cause the encoder to momentarily travel backwards.
- Page 61 Image Buffer and ROI Category The Image Buffer and ROI category groups parameters for the configuring the image buffer format, size and offset settings, as well as image flipping. Area Scan Parameters Line Scan Parameters Parameter Descriptions The following table describes the CamExpert Image Buffer and ROI category of Sapera LT parameters.
- Page 62 Image Left Offset CORACQ_PRM_CROP_LEFT Number of pixels to crop from the left side of Note: image data is not (in Pixels) the acquisition image before transfer to the scaled. frame buffer. The maximum left offset is the active horizontal width of the image source less one increment step.
- Page 63 Verify a Dark Acquisition Close the camera lens iris and cover the lens with a lens cap. Using CamExpert, click on the grab button and then the histogram button. The following figure shows a typical histogram for a very dark image (8-bit acquisition). Figure 24: CamExpert Histogram of Dark Image Important: In this example, the average pixel value for the frame is close to black.
- Page 64 Figure 25: CamExpert Histogram of Bright Image Important: In this example, the average pixel value for the frame is bright gray. Also note that sensors may show a much higher maximum or a much lower minimum pixel value due to one or more "hot or dead pixels".
- Page 65 Flat Field Correction Dialog The Flat Field Correction dialog provides a three-step process to acquire two reference images and then save the flat field correction data for the camera used. To aid in determining if the reference images are valid, a histogram tool is provided so that the user can review the images used for the correction data.
- Page 66 Using the Bayer Filter Tool CamExpert supports the use of Bayer Filter cameras by providing a tool to select the Bayer filter mosaic pattern and to perform an auto white balance. Color calibration can then be manually fine- tuned with RGB gain and gamma adjustments. The CamExpert Bayer filter tool supports using either software or hardware based decoding.
- Page 67 Sapera Demo Applications Grab Demo Overview The Grab Demo program demonstrates the basic acquisition functions included in the Sapera library. The program either allows you to acquire images, in continuous or in one-time mode, while adjusting the acquisition parameters. The program code may be extracted for use within your own application.
- Page 68 Start•Programs•Sapera LT•Demos (GUI based)•Sapera++ Demos•GrabDemo.exe The demo program first displays the acquisition configuration menu. The first drop menu displayed permits selecting from any installed Sapera acquisition servers (installed Teledyne DALSA acquisition hardware using Sapera drivers). The second drop menu permits selecting from the available input devices present on the selected server.
- Page 69 Xtium2-CXP PX8 Reference Block Diagram CXP Status Indicator C1 — HD-BNC CXP Control Lane Data / Control Lane Data Lane (coaxial cable) SerDes CXP Status Indicator C2 — HD-BNC CXP Control Lane Data / Control Lane Data Lane (coaxial cable) SerDes CXP Status Indicator Frame Buffer and...
- Page 70 Xtium2-CXP Flow Diagram The following diagram represents the sequence in which the camera data acquired is processed through the Xtium2-CXP. ACU-Plus Camera CXP Image Front-End Buffer White-Balance Color Cropper Dain (RDB Conversion (Coarse) Pixels) (Bayer) Look Up Table Horizontal Flip FFC/FLC Host Cropper (Fine)
- Page 71 Line Trigger Source Selection for Line scan Applications Line scan imaging applications require some form of external event trigger to synchronize line scan camera exposures to the moving object. This synchronization signal is either an external trigger source (one exposure per trigger event) or a shaft encoder source composed of a single or dual phase (also known as a quadrature) signal.
- Page 72 Shaft Encoder Interface Timing Dual Balanced Shaft Encoder RS-422 Inputs: Input Phase A: • • Connector J7: Pin 3 (Phase A +) & Pin 2 (Phase A -) Connector J8: Pin 5 (Phase A +) & Pin 6 (Phase A -) •...
- Page 73 Example using Sequential Encoder Input Support of a dual phase encoder should consider the direction of motion of one phase signal to the other. Such a case might exist where system vibrations and/or conveyor backlash can cause the encoder to briefly travel backwards. The acquisition device must in those cases count the reverse steps and subtract the forward steps such that only pulses after the reverse count reaches zero are considered.
- Page 74 Virtual Frame Trigger for Line Scan Cameras When using line scan cameras, a frame buffer is allocated in host system memory to store captured video lines. To control when a video line is stored as the first line in this “virtual” frame buffer, an external frame trigger signal is used.
- Page 75 Synchronization Signals for a 10 Line Virtual Frame The following timing diagram shows the relationship between External Frame Trigger input, External Shaft Encoder input (one phase used with the second terminated), and camera control output to the camera. Virtual Frame Trigger Shaft Encoder Camera...
- Page 76 Synchronization Signals for Fixed Frame Length Acquisition A trigger event is only generated when a grab is active; when not grabbing no trigger events are generated. When a frame is complete, the frame grabber checks for the specified active trigger level and, if present, grabs the next frame;...
- Page 77 Synchronization Signals for Variable Frame Length Acquisition For variable length frames, trigger ignored events are not issued (SapAcquisition::EventExternalTriggerIgnored); a valid trigger event always initiates either a frame start or frame end. 1 frame per trigger edge; selected level determines frame length (up to max) Grab Start Trigger Trigger >...
- Page 78 CVI File (VIC) Parameters Used The VIC parameters listed below provide the control functionality for virtual frame reset. Sapera applications load pre-configured CVI files or change VIC parameters during runtime. Note: Sapera camera file parameters are easily modified by using the CamExpert program. External Frame Trigger Enable = X, where: (with Virtual Frame Trigger enabled) •...
- Page 79 Trigger to Image Reliability Trigger-to-image reliability incorporates all stages of image acquisition inside an integrated controller to increase reliability and simplify error recovery. The trigger-to-image reliability model brings together all the requirements for image acquisition to a central management unit. These include signals to control camera timing, on-board frame buffer memory to compensate for PCI bus latency, and comprehensive error notification.
- Page 80 Frame Lost • The Frame Lost event indicates that an acquired image failed to transfer to on-board memory. An example is if there are no free on-board buffers available for the new image. This may be the case if the image transfer from onboard buffers to host PC memory is not sustainable due to bus bandwidth issues or no host buffers are available to receive an image.
- Page 81 Transfer Events Transfer events are the ones related to the transfer module. Transfer events provide feedback on image transfer from onboard memory frame buffers to PC memory frame buffers. Start of Frame • Start of Frame event generated when the first image pixel is transferred from on-board memory into PC memory.
- Page 82 • CORXFER_VAL_CYCLE_MODE_SYNCHRONOUS_WITH_TRASH Before cycling to the next buffer in the list, the transfer device will check the next buffer's state. If its state is full, the transfer will keep the image in on-board memory until the next buffer’s state changes to empty. If the on-board memory gets filled, trash callbacks will be generated.
- Page 83 Output LUT Availability The following table defines the supported output LUT (look up tables) for the Xtium2-CXP PX8. Note that unsupported modes are not listed. Table 7: Output LUT Availability Number of Digital Output Pixel LUT Format Notes* Bits Format MONO 8 8-in, 8-out MONO 16...
- Page 84 I/Os (for example, Low, bit = 0 or High, bit = 1). • reserved: 25 bytes reserved for future usage. • Metadata Example For a demo application showing this feature, please contact Teledyne DALSA technical support. 82 • Xtium2-CXP PX8 Reference Xtium2-CXP PX8 User's Manual...
- Page 85 Flat Field Correction: Theory of Operation The following provides additional details on the Flat Field Correction and Flat Line Correction (FFC/FLC) implementation. Flat Field Correction Lists The Xtium2-CXP PX8 supports defining more than one Flat Field Correction (FFC) / Flat Line Correction (FLC) data sets.
- Page 86 Programming the sets The following scheme is used to program FFC/FLC data within a set: // select an active set CorAcqSetPrm( hAcq, CORAQ_PRM_FLAT_FIELD_SET_SELECT, 0); // Create 4 new FFC that will be part of the currently active set ‘0’ For( i = 0; i < 4; i++) CorAcqNewFlatfield( hAcq, pFlatfieldNumber);...
- Page 87 Xtium2-CXP PX8 Supported Parameters The tables below describe the Sapera capabilities supported by the Xtium2-CXP PX8. Unless specified, each capability applies to all configuration modes and all acquisition modes. The information here is subject to change. The application needs to verify capabilities. New board driver releases may change product specifications.
- Page 88 CORACQ_PRM_CAM_TRIGGER_METHOD CORACQ_VAL_CAM_TRIGGER_METHOD_1 (0x1) CORACQ_PRM_CAM_TRIGGER_POLARITY CORACQ_VAL_ACTIVE_LOW (0x1) CORACQ_VAL_ACTIVE_HIGH (0x2) CORACQ_PRM_CAM_TRIGGER_DURATION min = 5 μsec max = 85899345 µs step = 1 μsec CORACQ_PRM_CAM_NAME Mono Default Camera CXP Area Scan Mono Default Camera CXP Area Scan Color Bayer Default Camera CXP Bayer Area Scan Color CORACQ_PRM_LINE_INTEGRATE_METHOD CORACQ_VAL_LINE_INTEGRATE_METHOD_3 (0x4) CORACQ_PRM_LINE_TRIGGER_METHOD...
- Page 89 CORACQ_PRM_CROP_WIDTH Mono min =32 pixel Bayer max = 65536 pixel step =8 pixel min =32 pixel max = 16384 pixel step =8 pixel * Maximum allowed is 64 kBytes, so maximum in pixels is dependent on the output pixel depth. For RGB-12, data is unpacked to 16161616, so maximum will be 8192 pixels.
- Page 90 CORACQ_PRM_EXT_FRAME_TRIGGER_DETECTION CORACQ_VAL_ACTIVE_LOW (0x1) CORACQ_VAL_ACTIVE_HIGH (0x2) CORACQ_VAL_RISING_EDGE (0x4) CORACQ_VAL_FALLING_EDGE (0x8) CORACQ_VAL_DOUBLE_PULSE_RISING_EDGE (0x20) CORACQ_VAL_DOUBLE_PULSE_FALLING_EDGE (0x40) CORACQ_PRM_EXT_LINE_TRIGGER_ENABLE TRUE FALSE CORACQ_PRM_EXT_LINE_TRIGGER_DETECTION CORACQ_VAL_RISING_EDGE (0x4) CORACQ_VAL_FALLING_EDGE (0x8) CORACQ_PRM_SNAP_COUNT Not Available CORACQ_PRM_INT_LINE_TRIGGER_ENABLE TRUE FALSE CORACQ_PRM_INT_LINE_TRIGGER_FREQ Default = 5000 Hz CORACQ_PRM_BIT_ORDERING CORACQ_VAL_BIT_ORDERING_STD (0x1) CORACQ_PRM_EXT_TRIGGER_LEVEL CORACQ_VAL_LEVEL_TTL (0x1) CORACQ_VAL_LEVEL_422 (0x2) CORACQ_VAL_LEVEL_12VOLTS (0x040) CORACQ_VAL_LEVEL_24VOLTS (0x8) CORACQ_PRM_STROBE_LEVEL...
- Page 91 CORACQ_PRM_EXT_LINE_TRIGGER_SOURCE (*) min = 0 max = 5 step = 1 CORACQ_PRM_EXT_TRIGGER_SOURCE (*) min = 0 max = 7 step = 1 CORACQ_PRM_SHAFT_ENCODER_MULTIPLY min = 1 max = 32 step = (2 CORACQ_PRM_EXT_TRIGGER_DELAY min = 0 max = 16777215 step = 1 CORACQ_PRM_EXT_TRIGGER_DELAY_TIME_BASE CORACQ_VAL_TIME_BASE_LINE_VALID (0x4) CORACQ_VAL_TIME_BASE_LINE_TRIGGER (0x8)
- Page 92 CORACQ_PRM_BOARD_SYNC_OUTPUT1_SOURCE_STR [0] = Disabled [1] = External Frame Trigger [2] = Reserved [3] = External Trigger Ignore Region [4] = Shaft Encoder Before Mult/Drop [5] = Shaft Encoder After Mult/Drop [6] = Internal Line Trigger CORACQ_PRM_BOARD_SYNC_OUTPUT2_SOURCE_STR [0] = Disabled [1] = External Frame Trigger [2] = Reserved [3] = External Trigger Ignore Region [4] = Shaft Encoder Before Mult/Drop...
- Page 93 ACQ Related Parameters Table 11: Acquisition Related Parameters Parameter Values CORACQ_PRM_LABEL Mono CXP Mono CXP Color RGB CORACQ_PRM_EVENT_TYPE CORACQ_VAL_EVENT_TYPE_START_OF_FRAME CORACQ_VAL_EVENT_TYPE_END_OF_FRAME CORACQ_VAL_EVENT_TYPE_EXTERNAL_TRIGGER CORACQ_VAL_EVENT_TYPE_VERTICAL_SYNC CORACQ_VAL_EVENT_TYPE_FRAME_LOST CORACQ_VAL_EVENT_TYPE_DATA_OVERFLOW CORACQ_VAL_EVENT_TYPE_EXTERNAL_TRIGGER_IGNORED CORACQ_VAL_EVENT_TYPE_EXT_LINE_TRIGGER_TOO_SLOW CORACQ_VAL_EVENT_TYPE_LINK_ERROR CORACQ_VAL_EVENT_TYPE_SHAFT_ENCODER_REVERSE_COUNT_OVERFLOW CORACQ_VAL_EVENT_TYPE_LINE_TRIGGER_TOO_FAST CORACQ_PRM_EVENT_TYPE_EX CORACQ_VAL_EVENT_TYPE_START_OF_FRAME CORACQ_VAL_EVENT_TYPE_END_OF_FRAME CORACQ_VAL_EVENT_TYPE_EXTERNAL_TRIGGER CORACQ_VAL_EVENT_TYPE_VERTICAL_SYNC CORACQ_VAL_EVENT_TYPE_FRAME_LOST CORACQ_VAL_EVENT_TYPE_DATA_OVERFLOW CORACQ_VAL_EVENT_TYPE_EXTERNAL_TRIGGER_IGNORED CORACQ_VAL_EVENT_TYPE_EXT_LINE_TRIGGER_TOO_SLOW CORACQ_VAL_EVENT_TYPE_LINK_ERROR CORACQ_VAL_EVENT_TYPE_SHAFT_ENCODER_REVERSE_COUNT_OVERFLOW CORACQ_VAL_EVENT_TYPE_LINE_TRIGGER_TOO_FAST CORACQ_VAL_EVENT_TYPE_LINK_LOCK CORACQ_VAL_EVENT_TYPE_LINK_UNLOCK...
- Page 94 CORACQ_CAP_FLAT_FIELD_GAIN 8-bit Mono min = 0 max = 255 step = 1 10-bit Mono min = 0 max = 1023 step = 1 12-bit Mono min = 0 max = 4095 step = 1 14-bit Mono min = 0 max = 16383 step = 1 16-bit Mono Not Available...
- Page 95 Transfer Related Parameters Table 13: Transfer Related Parameters Parameter Values CORXFER_PRM_EVENT_TYPE CORXFER_VAL_EVENT_TYPE_START_OF_FRAME CORXFER_PRM_EVENT_TYPE_EX CORXFER_VAL_EVENT_TYPE_END_OF_FRAME CORXFER_VAL_EVENT_TYPE_END_OF_LINE CORXFER_VAL_EVENT_TYPE_END_OF_NLINES CORXFER_VAL_EVENT_TYPE_END_OF_TRANSFER CORXFER_PRM_START_MODE CORXFER_VAL_START_MODE_ASYNCHRONOUS (0x0) CORXFER_VAL_START_MODE_SYNCHRONOUS (0x1) CORXFER_VAL_START_MODE_HALF_ASYNCHRONOUS (0x2) CORXFER_VAL_START_MODE_SEQUENTIAL (0x3) CORXFER_PRM_CYCLE_MODE CORXFER_VAL_CYCLE_MODE_ASYNCHRONOUS (0x0) CORXFER_VAL_CYCLE_MODE_SYNCHRONOUS_WITH_TRASH (0x2) CORXFER_VAL_CYCLE_MODE_OFF (0x3) CORXFER_VAL_CYCLE_MODE_SYNCHRONOUS_NEXT_EMPTY_WITH_TRASH (0x5) CORXFER_PRM_FLIP CORXFER_VAL_FLIP_OFF (0x0) CORXFER_VAL_FLIP_VERT (0x2) CORXFER_PRM_INT_BUFFERS * Depends on acquired image size.
- Page 96 General Inputs #1: Related Capabilities (for GIO Module #1) Inputs available on connector J7 and J8. Table 16: GIO-1 Related Capabilities Capability Values CORGIO_CAP_IO_COUNT 4 I/Os CORGIO_CAP_DIR_OUTPUT CORGIO_CAP_DIR_TRISTATE CORGIO_CAP_EVENT_TYPE CORGIO_VAL_EVENT_TYPE_RISING_EDGE (0x1) CORGIO_VAL_EVENT_TYPE_FALLING_EDGE (0x2) CORGIO_CAP_READ_ONLY 0x03 (* depends on external trigger inputs reserved for acquisition device) General Inputs #1: Related Parameters (for GIO Module #1) Table 17: GIO-1 Related Parameters Parameter...
- Page 97 Sapera Servers and Resources A Sapera Server is an abstract representation of a physical device like a frame-grabber or camera. When using the SapAcquisition or SapAcqDevice constructors, the location parameter specifies the server to use to create the object. Use the Sapera Configuration utility to find the names and indices of all Sapera servers in your system.
- Page 98 Xtium2-CXP_PX8_1 Acquisition CXP Mono #1 CXP Mono Camera Module (4 Cameras) CXP Mono #2 CXP Mono #3 CXP Mono #4 CXP Color RGB #1 CXP RGB Camera CXP Color RGB #2 CXP Color RGB #3 CXP Color RGB #4 CXP Bayer #1 CXP Bayer Camera CXP Bayer #2 CXP Bayer #3...
- Page 99 Approximately 6.8 GB/s (maximum obtained is dependent on firmware System loaded and PC characteristics) Controls Compliant with Teledyne DALSA Trigger-to-Image Reliability framework Comprehensive event notifications Timing control logic for camera triggers and strobe signals 4 opto-coupled general inputs where 2 are shared acquisition trigger inputs...
- Page 100 Host System Requirements Xtium2-CXP PX8 Dimensions Approximately 6.5 in. (14 cm) wide by 4 in. (10 cm) high General System Requirements for the Xtium2-CXP PX8 PCI Express Gen3 x8 slot compatible; • (will work in Gen1 or Gen2 x8 slot with reduced bandwidth to host) •...
- Page 101 This equipment is intended to be a component of a larger industrial system. CE Declaration of Conformity Teledyne Dalsa declares that this product complies with applicable standards and regulations. Changes or modifications not expressly approved by the party responsible for compliance could void the user's authority to operate the equipment.
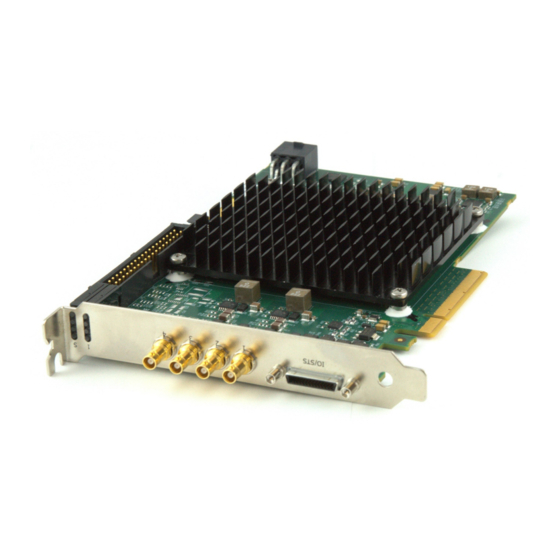
- Page 102 Connector and Switch Locations Xtium2-CXP PX8 Board Layout Drawing Figure 38: Board Layout Connector / LED Description List The following table lists components on the Xtium2-CXP PX8 board. Detailed information concerning the connectors/LEDs follows this summary table. Table 24: Board Connector List Location Description Location...
- Page 103 Connector and Switch Specifications Xtium2-CXP PX8 End Bracket Detail Figure 39: End Bracket Details The hardware installation process is completed with the connection of a supported camera to the Xtium2-CXP PX8 board using a HDBNC to HDBNC or DIN 1.0/2.3 CXP cable. (See the CoaXPress Cables section).
- Page 104 Status LEDs Functional Descriptions LED indicators mounted on the board bracket, provide information on board and connection status as per the tables below. S: Boot-up/PCIe Status LED — Provides general board status information L1, L2, L3, L4: CoaXPress status LED — Indicates status for C1, C2, C3 and C4 respectively. S: Boot-up/PCIe Status LED Table 25: S Boot-up/PCIe Status LED Color...
- Page 105 J7: External I/O Signals Connector (Female DH60-27P) Table 27: DH60-27P Connector Signals Description Pin # Pin # Description Ground External Trigger Input 3/General Input 3 (+) RS-422 Shaft Encoder Phase A (-) External Trigger Input 4/General Input 4 (+) TTL/RS-422 Shaft Encoder Phase A (+) External Trigger Input 4/General Input 4 (-) (see note Ground...
- Page 106 J8: Internal I/O Signals Connector (40-pin TST-120-01-G-D) Warning: J7 and J8 have the same signal assignments. Signals are routed to both connectors directly from their internal circuitry. Therefore, never connect both J7 and J8 to external devices at the same time. Table 28: 40-pin TST-120-01-G-D Connector Signals Description Pin #...
- Page 107 Note 1: General Inputs / External Trigger Inputs Specifications Each of the four General Inputs are opto-coupled and able to connect to differential or single ended source signals. General Inputs can also act as External Trigger Inputs. See “Board Information” user settings.
- Page 108 = user set debounce duration from 1 to 255µs t(vt) = time of validated trigger in µs Note: Teledyne DALSA recommends using the fastest transition to minimize the time it takes for the opto-coupler to change state. If the duration of the external trigger is > t(oc) + t(d), then a valid acquisition trigger is detected.
- Page 109 Block Diagram: Connecting External Drivers to General Inputs Using J7 External Signals Xtium2-CXP PX8 User Signal Ground V (+) Ground Shaft Encoder RS-422 A (-) Shaft Encoder RS-422 / TTL A (+) Differential Ground Driver Shaft Encoder RS-422 B (-) Shaft Encoder RS-422 / TTL B (+) General Input 1 / Trigger 1 (-) V (+)
- Page 110 Using J8 External Signals Xtium2-CXP PX8 Power Output (5 Volts) User Signal Ground V (+) Power Output (12 Volts) Ground Ground Differential Shaft Encoder RS-422 / TTL A (+) Driver Shaft Encoder RS-422 A (-) : Shaft Encoder RS-422 / TTL B (+) Shaft Encoder RS-422 B (-) Ground 10 :...
- Page 111 Note 2: General Outputs /Strobe Output Specifications Each of the eight General Outputs is TTL (3.3V) compatible. General Outputs 1, 2, 3 and 4 can also function as the Strobe Output controlled by Sapera strobe control functions. See “Board Information” user settings. The following figure is typical for each General Output. 3.3V Buffer LVTTL...
- Page 112 Block Diagram: Connecting External Receivers to the General Outputs Using J7 To External Devices Xtium2-CXP PX8 User Signal Ground Compatible Receiver Ground Shaft Encoder RS-422 A (-) Shaft Encoder RS-422 / TTL A (+) Compatible Ground Receiver Shaft Encoder RS-422 B (-) Shaft Encoder RS-422 / TTL B (+) General Input 1 / Trigger 1 (-) General Input 1 / Trigger 1 (+)
- Page 113 Using J8 To External Devices Xtium2-CXP PX8 Power Output (5 Volts) User Signal Ground Compatible Power Output (12 Volts) Receiver Ground Ground Shaft Encoder RS-422 / TTL A (+) Shaft Encoder RS-422 A (-) Compatible : Shaft Encoder RS-422 / TTL B (+) Receiver Shaft Encoder RS-422 B (-) Ground...
- Page 114 Note 3: RS-422/TTL Shaft Encoder Input Specifications Dual Quadrature Shaft Encoder Inputs (phase A and phase B) connect to differential signals (RS-422), single ended signals or TTL signals. The figure below shows the simplified representation of these inputs. WARNING: When using shaft encoders, make sure to connect a common ground between the shaft encoder and frame grabber.
- Page 115 RS-422 Input Specifications: • Input signals must meet the following • Maximum differential input voltage is +/- 7V. • Minimum differential voltage level is +/- 200mV. • Both inputs have a 100-ohm differential resistor. • • TTL Input Specifications: RS-422 differential line receiver used is am26lv32 •...
- Page 116 Note 3.1: Interfacing to an RS-422 Driver Output Using J7 External Signals Xtium2-CXP PX8 V (+) Ground RS-422 Shaft Encoder RS-422 A (-) Compatible Shaft Encoder RS-422 / TTL A (+) Driver Ground Shaft Encoder RS-422 B (-) Shaft Encoder RS-422/ TTL B (+) V (+) General Input 1 / Trigger 1 (-) General Input 1 / Trigger 1 (+)
- Page 117 Using J8 External Signals Xtium2-CXP PX8 Power Output (5 Volts) User Signal Ground V (+) Power Output (12 Volts) Ground Ground RS-422 Shaft Encoder RS-422 / TTL A (+) Compatible Shaft Encoder RS-422 A (-) Driver : Shaft Encoder RS-422 / TTL B (+) Shaft Encoder RS-422 B (-) Ground V (+)
- Page 118 Note 3.2: Interfacing to a Line Driver (also called Open Emitter) Output Interfacing Line Driver/Open Emitter Output to RS-422 Inputs Generic Line Driver/Open Emitter Output RS-422 / TTL (+) input 100 ohm RS-422 (-) input Pull-down resistor needed if it is not already present in the Shaft Encoder.
- Page 119 Note 3.4: Interfacing directly to a TTL (also called Push-Pull) Output Interfacing TTL Output via a Line Buffer/Driver TTL signal source & Buffer Driver Frame Grabber System (example: 74ACT244) RS-422 / TTL (+) input FG/system GND Figure 52: Interfacing TTL to TTL Shaft Encoder Inputs NOTE: User must select the Shaft Encoder TTL level when using this mode •...
- Page 120 Board Sync Cable Assembly OR-YXCC-BSYNC40 for 3 or 4 boards). Warning: Multi-Board Sync / Bi-directional General I/Os are only for use with Teledyne DALSA frame grabbers within the same PC, otherwise electrical damage to boards can occur. Configuration via Sapera Application Programming Sync Master Board Software Setup: Choose one Xtium as “Sync Master”.
- Page 121 Configuration via Sapera CamExpert Start the first instance of CamExpert and select one installed Xtium2 board to be the sync • master. As shown in the following image, this board is configured to use an external trigger on input #1. The Sync Master Xtium2 board is also configured to output the external trigger on board •...
- Page 122 CXP input as per CoaXPress specifications. Cables & Accessories The following cables and accessories are available for purchase via third party vendors or Teledyne DALSA. Contact sales for information. CoaXPress Cables The Xtium2 CXP frame grabber uses HD-BNC coaxial connectors (camera connectors may vary depending on the camera model).
- Page 123 DH40-27S Cable to Blunt End (OR-YXCC-27BE2M1, Rev B1) Cable assembly consists of a 2000 mm (~6 ft.) blunt end cable to mate to Xtium external connector J7. Note: The applicable wiring color-code table is included with the printed Product Notice shipped with the cable package — no other wiring table should be used. Important: The older cable part number OR-YXCC-27BE2M0 (rev.3) is obsolete.
- Page 124 DH40-27S Connector Kit for Custom Wiring Teledyne DALSA makes available a kit comprised of the DH40-27S connector plus a screw lock housing package, for clients interested in assembling their own custom I/O cable. Order part number “OR-YXCC-H270000”, (package as shown below).
- Page 125 Cable assemblies for I/O connector J8 Flat ribbon cables for connecting J8 to a DB37 bracket can be purchased from Teledyne DALSA or from third party suppliers. External Signals Connector Bracket Assembly The External Signals bracket (OC-X4CC-IOCAB) provides a simple way to bring out the signals from the External Signals Connector J8 to a bracket mounted DB37.
- Page 126 Strobe 3 / General Output 3 Strobe 4 / General Output 4 General Output 5 General Output 6 General Output 7 General Output 8 Ground Ground External Trigger Input 1/General Input 1 (+) External Trigger Input 1/General Input 1 (-) External Trigger Input 2/General Input 2 (+) External Trigger Input 2/General Input 2 (-) External Trigger Input 3/General Input 3 (+)
- Page 127 Board Sync Cable Assembly OR-YXCC-BSYNC40 This cable connects 3 to 4 Xtium2 boards for the board sync function as described in section Multi-Board Sync / Bi-directional General I/Os. For a shorter 2-board cable, order cable assembly OR-YXCC-BSYNC20. For a third part source of cables contact https://www.samtec.com/ for information.
- Page 128 4-pin large power connectors to a 6- pin power connector. Figure 59: Photo of cable assembly OR-YXCC-PWRY00 This is an industry standard adapter cable, which can be purchased from Teledyne DALSA. 126 • Technical Specifications Xtium2-CXP PX8 User's Manual...
- Page 129 CoaXPress Interface CoaXPress Overview Note: The following text is extracted from the CoaXPress website; refer to their site www.coaxpress.com for additional information. CoaXPress (CXP) is an asymmetric high-speed point-to-point-serial communication standard for the transmission of video and still images, scalable over single or multiple coaxial cables. It has a high-speed downlink of up to 12.5Gbps per cable for video, images and data, plus a lower speed, 40Mbps uplink for communications and control.
- Page 130 Sales Information Visit our web site: http://www.teledynedalsa.com/en/products/imaging/ Email: mailto:info@teledynedalsa.com Canadian Sales Teledyne DALSA — Head office Teledyne DALSA — Montreal office 605 McMurray Road 880 Rue McCaffrey Waterloo, Ontario, Canada, N2V 2E9 St. Laurent, Quebec, Canada, H4T 2C7 Tel: 519 886 6000...
Need help?
Do you have a question about the Xtium2-CXP PX8 Series and is the answer not in the manual?
Questions and answers