TC Electronic DITTO X2 LOOPER Quick Start Manual
Highly intuitive looper pedal with dedicated stop button and loop effects
Hide thumbs
Also See for DITTO X2 LOOPER:
- Service note (4 pages) ,
- English manual (26 pages) ,
- Quick start manual
Advertisement
Quick Links
Quick Start Guide
DITTO X2 LOOPER
Highly Intuitive Looper Pedal with Dedicated Stop Button and Loop Effects
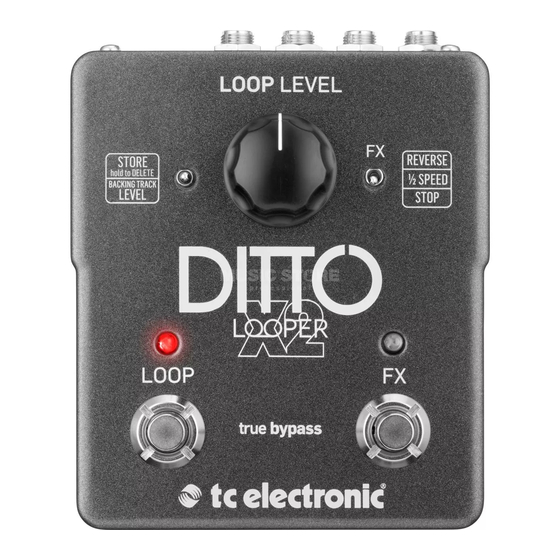
Controls
(7)
(4)
(2)
(6)
(8)
(5)
(3)
(1) (9)
(1) Power input - The power input of this pedal is a standard 5.5 / 2.1 mm DC plug
(centre = negative). To power up your pedal, connect a power supply to its power
input socket. Ditto X2 Looper requires a 9 V power supply providing 100 mA or
more (not supplied). To minimize hum, use a power supply with isolated outputs.
You can also run Ditto X2 Looper using batteries.
(2) Audio inputs - This pedal has two standard ¼" jack TS inputs for stereo
operation. If your signal source is mono (e.g. a regular guitar or a mono effect
pedal), connect it to the MONO input.
(3) Audio outputs - This pedal has two standard ¼" TS outputs for stereo operation.
If the next device in the signal chain is mono, connect it to the MONO output.
(4) LOOP footswitch and LED - Use this footswitch to control all loop-related
functions of the pedal (record, playback, undo/ redo, clear).
(5) FX footswitch and LED - Use this footswitch to either control one of Ditto
X2 Looper's built-in effects or to stop loop playback. The assignment of this
footswitch is determined by the setting of the FX selector switch.
(6) Loop / backing track level control knob - Use the LOOP LEVEL control knob
to control the level of your loops. Use the LOOP LEVEL control knob while
holding down the Store / Backing track level switch to control the level of
your backing track.
(7) Store / Delete / Backing track level switch
To store the current loop as a backing track, nudge this switch up.
•
To delete the stored loop/backing track, hold this switch in the up position for
•
three seconds.
To set the level of the backing track, turn the Loop level control knob while
•
holding this switch in the down position.
(8) FX selector switch - Use this switch to determine the function of the FX
footswitch. Available settings are:
Reverse: FX footswitch toggles the Reverse effect on and off.
•
½ Speed: FX footswitch toggles the Half speed effect on and off.
•
Stop: FX footswitch acts as a dedicated stop footswitch.
•
(9) USB port - Connect Ditto X2 Looper to a computer to transfer loops between
your computer and Ditto X2 Looper. If there should be firmware updates for this
device, they can also be installed using the USB port.
Advertisement

Related Manuals for TC Electronic DITTO X2 LOOPER


Summary of Contents for TC Electronic DITTO X2 LOOPER
- Page 1 (centre = negative). To power up your pedal, connect a power supply to its power input socket. Ditto X2 Looper requires a 9 V power supply providing 100 mA or more (not supplied). To minimize hum, use a power supply with isolated outputs.
- Page 2 Technical specifications, appearances and other information are subject to change without notice. All trademarks are the property of their respective owners. Midas, Klark Teknik, Lab Gruppen, Lake, Tannoy, Turbosound, TC Electronic, TC Helicon, Behringer, Bugera and Coolaudio are trademarks or registered trademarks of Music Tribe Global Brands Ltd. © Music Tribe Global Brands Ltd.
Need help?
Do you have a question about the DITTO X2 LOOPER and is the answer not in the manual?
Questions and answers