
Subscribe to Our Youtube Channel
Related Manuals for Excera EP5500


Summary of Contents for Excera EP5500
- Page 1 Digital Portable Radio Digital Portable Radio Quick Reference Guide Quick Reference Guide...
-
Page 2: Alert Icon
This manual helps you quickly get basic operations of our digital portable radio. Before using this product, please read this manual carefully. Alert Icon Caution: Indicates situations that could cause human injury or damage to your products. Note: Indicates tips that can help you make better use of your products. -
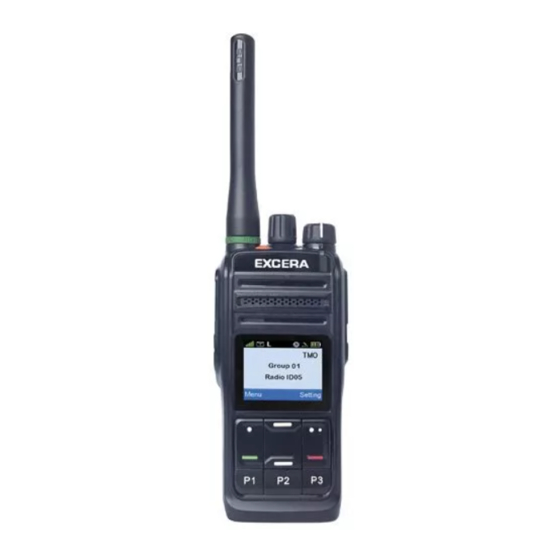
Page 3: Getting Started
Getting Started Radio Controls Part Name Part Name PTT Key Channel/ Side Key 1 (SK1) Group Selector Knob Side Key 2 (SK2) Radio On-Off/ Volume Control Knob Antenna LED Indicator Emergency Top Key (TK) Speaker Setting Key/Back Key Microphone FK2/End/Home Key LCD Display Up/Down Key Menu/OK Key... - Page 4 Radio Status Indication LCD Icon Icon Meaning Received Signal Strength Indicator (RSSI) New Message /Full Inbox Scanning Scan Paused (Conventional) High Power Low Power Battery Power Roam GPS Enabled GPS Located GLONASS Located BDS Located Missed Call Man Down Bluetooth Disabled Wireless PTT Bluetooth Earpiece Wireless PTT and...
-
Page 5: Basic Operations
LED Indicator LED Indicator Radio Status LED flashes green slowly. None LED flashes green rapidly. Upgrading or powering on LED glows green. Receiving LED flashes red slowly. Low battery LED flashes red rapidly. None LED glows red. Transmitting LED flashes orange slowly. Scanning LED flashes orange rapidly. - Page 6 Adjusting the Volume After turning the radio on, rotate the Radio On-Off/Volume Control knob clockwise to increase the call volume, or counterclockwise to decrease it. Adjusting Power Level With this option, you may adjust power levels quickly. We recommend you to adopt low power for battery saving. However, if you cannot communicate with radios located at a distant place with low power, please select high power.
- Page 7 Switching the Channel Mode This radio can operate in either digital or analog conventional mode. Each channel can be programmed as either analog or digital channel via the CPS. If the current zone includes a mixture of analog and digital channels, you may quickly switch between digital and analog through the Channel Selector knob.
- Page 8 All Call An all call is a call from an individual radio to every radio on the channel. Note: The All Call ID is fixed. You can make an all call through Contact or Call Log Procedure: 1. In the home screen, press the Menu key to enter the main menu.
Need help?
Do you have a question about the EP5500 and is the answer not in the manual?
Questions and answers