Table of Contents
Advertisement
Advertisement
Table of Contents

Related Manuals for Envitec PhysioQuant


Summary of Contents for Envitec PhysioQuant
- Page 1 PhysioQuant Ambulatory Blood Pressure System User-Manual NVITE...
- Page 2 2 / 48...
- Page 3 All reproduction, translation and duplication in any shape or form – including extracts – require the written approval of the manufacturer. This manual is subject to updates by EnviteC-Wismar GmbH. Doc.No.: 45-07-0500002-a © 2004 Envitec Wismar GmbH...
- Page 4 4 / 48...
-
Page 5: Table Of Contents
3.1 Software 3.2 Settings 3.3 Attaching the connecting cable to the recorder 3.4 Network installation 3.5 GDT interface PHYSIOQUANT RECORDER 4.1 Operation controls 4.2 Symbols on the device 4.3 LCD display with all symbols and display options 4.4 Power supply 4.5 Inserting batteries... - Page 6 IMPORTING RECORDER DATA AFTER MEASUREMENTS 7.1 Connecting the recorder 7.2 Starting the programme ANALYSIS OF MEASUREMENT RESULTS 8.1 Starting the programme 8.2 Find/delete measurement results 8.3 Representation 8.4 Overview 8.5 Single-value graph 8.6 Single-value table 8.7 Hourly mean values graph and table 8.8 Findings report 8.9 Printing 8.10 GDT export to general practice IT systems...
-
Page 7: General Remarks / Symbols
General Remarks / Symbols This symbol means: please consult the manual. It refers to things to which you should pay careful attention when using the device. The safety instructions in this manual are indicated in the following way: This refers to a potentially dangerous CAUTION! situation. -
Page 8: Safety Instructions And Use
Safety Instructions and Use • The product PhysioQuant carries the CE mark CE-0123 in accordance with European Council Directive 93/42/EEC in relation to medical devices and complies with the fundamental requirements stated in Appendix I of this Directive. The device has an internal power source and comes within Class IIa (MDD). - Page 9 It can be used for adults, children and infants by applying the corresponding cuffs. PhysioQuant must not be used for newborn babies and is not suitable for use in Intensive Care Units. PhysioQuant can be used to take blood pressure measurements at various intervals for up to 30 hours and is able to store measurement results.
- Page 10 The PhysioQuant Recorder can be connected to, and operated from, a PC on which PhysioQuantWin software has been installed. Please note that no patient should be connected to the PhysioQuant Recorder as long as it is connected to the PC.
-
Page 11: Installation
Installation Software • Put the PhysioQuant CD in your CD-ROM drive. • If the 'Auto start Function' of your CD-ROM drive is activated, then installation will begin automatically. If not: - Open Windows Explorer, select your CD-ROM-drive and double click on setup.exe. - Page 12 Enter your name and that of your practice and confirm with [Next]. The programme will normally be installed under your standard program directory. You can change this location via [Browse]. 12 / 48...
- Page 13 All settings are summarised before installation commences. After [Next] confirming with , the copy and installation process begins. Once the installation has been completed, the PhysioQuant programme starts automatically and the required settings can be selected. 13 / 48...
-
Page 14: Settings
Settings After the programme has started, the main screen will be displayed. To configure the software, click on the 'Settings' icon to open the Settings menu: Settings menu: 14 / 48... - Page 15 SYSTEM: • Setting the serial PC interface, to which the PhysioQuant Recorder will be connected: This displays all serial interfaces of the system. • Setting / changing the folder for the database (also see 3.4 Network installation, page 18) Selecting another folder for the database.
- Page 16 PRINT: Activate print preview. Selecting standard print pages. Headings that should be included with every print- out. GDT: The description of the GDT interface and the required settings can be found in Section 3.5 GDT interface,18. 16 / 48...
-
Page 17: Attaching The Connecting Cable To The Recorder
Attaching the connecting cable to the recorder In order to start the recorder and read information from it, the recorder must be connected to the PC via a special connecting cable. This special connecting cable is connected to a free serial interface of the PC ('COM x') via the 9-pin DSB port. -
Page 18: Network Installation
To this end, a corresponding directory is first created on the central server. This folder must be connected as a 'drive' on all workstations. A local programme installation is then carried out on all workstations that will use the PhysioQuant software (as described in Section 3 Installation, page 11). - Page 19 (general practice IT system and PhysioQuant database). Identification The ID is a unique identifier that consists of a minimum of 1 and a maximum of 8 characters, which uniquely identifies the PhysioQuant system during GDT data transfer. 19 / 48...
- Page 20 File names The file names that are used for the communication between general practice IT systems and PhysioQuant software should be entered in the 'File names' field. File names consists of a device identification code (1 - 4 characters), e.g. PHYQ, and a EDP identification code (1 - 4 characters) for the general practice IT systems, e.g.
-
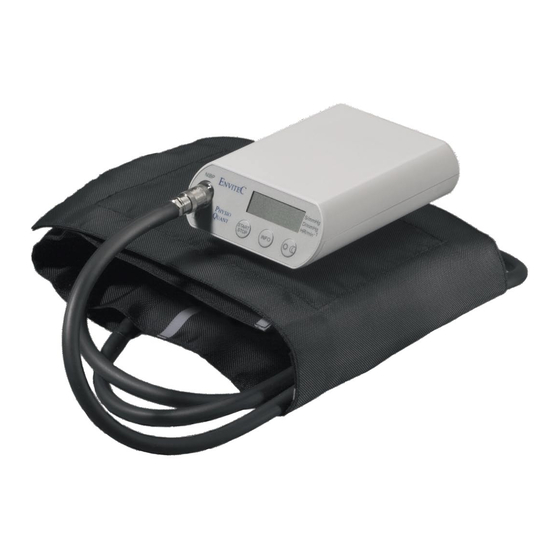
Page 21: Physioquant Recorder
PhysioQuant Recorder Operation controls Cuff connection Start/Stop button to delete additional measurements and to interrupt a measurement in process. Info button to display the most recently measured values. The following values will be displayed respectively: - Systolic value 'S/mmHg' - Diastolic value... -
Page 22: Symbols On The Device
On/Off switch Battery compartment lid Connecting port for PC connecting cable Symbols on the device Warning, please observe the manual Data export / data import Application part type BF (defibrillation-proof) 22 / 48... -
Page 23: Lcd Display With All Symbols And Display Options
• Night phase has been selected Power supply The PhysioQuant Recorder requires either two nickel metal hydride rechargeable batteries, or two alkaline batteries. When starting the recorder via the PhysioQuantWin software, please ensure that the relevant power source has been selected (see... -
Page 24: Inserting Batteries
Battery capacity reduces in line with increased use. If the capacity of the two fully-charged rechargeable batteries clearly falls below 24 operating hours, then you need to replace them. Always insert two fully-charged rechargeable batteries or two new batteries, before taking a new measurement. Inserting batteries The battery compartment is located on the underside of the recorder. -
Page 25: Function Control
Function control The Ph ysioQuant recorder will automatically carry out a self-test when it is switched on, which will activate all symbols and segments of the LCD display. The device will then check the inserted (rechargeable) batteries and will display the available capacity. In this context, e.g. -
Page 26: Connecting The Cuff To The Recorder
The cuff can be removed again from the recorder by pulling back the external metal plug cover. PhysioQuant Cuffs Various cuff sizes are available for the PhysioQuant (standard, large and children size). Please select the correct cuff size (see printed text on the cuff) Cuffs that are too small will result in measurements that are too high. -
Page 27: Commencing Long-Term Blood Pressure Measurement
No. 6, page 21) > > The recorder display will show > Starting the programme After the PhysioQuant software has started, the main screen appears. To programme the recorder, click on the 'Start' tab to open the relevant menu: 27 / 48... -
Page 28: Selecting A Patient
Selecting a patient The selection window of the patient database appears: In the 'NAME' field, enter the first letter of the patient's surname. All patients whose names start with this letter will then be displayed (e.g. those beginning with P ): Select the required patient, by double clicking on the relevant line. -
Page 29: Adding A New Patient
Adding a new patient If the required patient is not in the database, then you can directly enter new patient data. To do so, open the entry screen with the [NEW] button. Enter all the required data and save it to the database with [Save]: Editing patient data Patient data that has been entered can be edited and updated at any time ([Edit] button in the Patient selection window). -
Page 30: Programming The Recorder
Programming the recorder After you have selected the patient, a window will appear for configuring and programming the PhysioQuant Recorder. Number of measurement intervals Up to 4 different measurement intervals can be selected. The standard setting is at 2 intervals (day and night phase). - Page 31 Max. pump pressure Limits the max. cuff pressure to the value set between 200 mmHg and 280 mmHg. The number of all programmed measurements will be displayed for each measurement interval and a summary is provided for each 24 hours. The [Standard] button will reset the parameters to the following values: 2 measurement intervals Interval 1 (day phase):...
-
Page 32: Attaching The Cuff And The Recorder
Attaching the cuff and the recorder The PhysioQuant Recorder must not CAUTION! be connected to a PC, while it is being attached to the patient. Please remove the connecting cable to the PC. Attach the cuff to the arm that is less used by the patients. For adults: approx. -
Page 33: Test Measurement
Switch on the PhysioQuant Recorder and place it in the carrier bag. Use the belt to attach the bag to the body of the patient. For hygienic reasons, the bag should not come into direct contact with the skin. Place the cuff tube around the patient's neck in order to release any strain and connect it to the PhysioQuant (see 4.7 Connecting the cuff to the recorder,... -
Page 34: Instructing The Patient
Stay calm during the measurement, so that there will be no incorrect readings as a result of any movement by the patient; • During the night, it is best to place the PhysioQuant Recorder in its carrier bag on the bedside table; •... -
Page 35: Important Measurement Information
6.10 Important measurement information For the first measurement, the device will inflate the cuff to approx. 160 mmHg (starting pressure). For subsequent measurements, the inflation pressure will be 25 mmHg above the last measured systolic value (minimum 120mmHg). If the measurement value is in excess of the inflation pressure, then additional inflation of 50 mmHg will take place. -
Page 36: Button Functions
6.11 Button functions Recorder buttons have the following functions during long-term blood pressure measurements: is used too begin and end a measurement. is used to display the most recent measured values or the most recent error message. is used to manually switch the measurement intervals from the day to night phase, and vice versa. -
Page 37: Importing Recorder Data After Measurements
The recorder display will show > Starting the programme After the PhysioQuant software has started , the main screen appears. To import data from the recorder, click on the [Import] tab to open the relevant menu: The measurement values are imported from the recorder and assigned to the relevant patient. -
Page 38: Analysis Of Measurement Results
Analysis of Measurement Results Starting the programme After the PhysioQuant software has started, the main screen appears. To request saved measurement results, click on the [Analysis] tab to open the relevant menu: Find/delete measurement results The selection window of the patient database is displayed. Select the required patient (see 6.3 Selecting a patient,... -
Page 39: Representation
You can request the relevant saved measurement results by double clicking on the relevant data in the selection window. Deleting measurement results In order to delete a specific measurement result from the database, you need to click on the relevant date line in the selection window (the line will appear in blue). -
Page 40: Overview
Overview The overview displays a numerical summary of the long-term blood pressure measurements, as well as the statistical measurement results, for the whole monitoring period, according to day and night phase. Single-value graph This graph displays the results of all individual measurements. The set critical values for the day and the night phase (see 3.2 Settings, page 14) -
Page 41: Printing
8.10 GDT export to general practice IT systems If the PhysioQuant software of the general practice IT system interface has been activated, you can then create a GDT file in accordance with the selected settings by using the [GDT export] tab, which will be saved in the configured directory. -
Page 42: Error Codes
At least 8 oscillations need to be detected for a correct measurement. The cuff should be attached sufficiently tightly (you should be able to put one finger beneath the cuff, but not two). PhysioQuant will regulate the deflation rate for follow-up measurements accordingly. -
Page 43: Scope Of Delivery
PhysioQuant, standard adult blood pressure cuff, PhysioQuantWin software, interface cable, carrier bag, belt and manual. PhysioQuant Recorder 45-00-0502 Includes: PhysioQuant, standard adult blood pressure cuff, carrier bag, belt and manual. 11 Accessories and Spare Parts Standard cuff – Adult 45-00-0509 Large cuff –... -
Page 44: Cleaning And Maintenance
CAUTION! Always disconnect the device from your PC before cleaning it. • Switch off the PhysioQuant Recorder. • Use only a moist cloth and ensure that no fluid enters the device. The most commonly used cleaning and disinfection agents in practices and clinics can be used. -
Page 45: Cleaning Of Tubes
Measurement technical check The PhysioQuant is a measuring device in accordance with the German 'Medical Device Code - Operation V' ('MP Betrieb V') § 11/ Appendix 2. As a result, the device must undergo a 'measurement technical check' every 2 years. -
Page 46: Calibration Mode
• Press the INFO button 3 times: the display shows an internal value, which should be between 25 and 100. If the displayed value is outside this range, then the PhysioQuant Recorder must be sent away for maintenance. • Press the Start/Stop button: The display shows '0' (current pressure in mmHg). -
Page 47: Technical Information
13 Technical Information Measurement Measurement method oscillometric Measurement duration 30 – 45 sec. (depends on patient) Data preservation unlimited Measurement intervals 2 – 90 min., programmable Capacity 200 measurements or 30 hours Measurement range Systole 60 – 260 mmHg Diastole 40 –... - Page 48 NVITE Envitec Wismar GmbH Alter Holzhafen 18 23966 Wismar, Germany Tel.: +49-(0)-3841-360-1 Fax: +49-(0)-3841-360-222 Email: info@envitec.com Website: www.envitec.com 48 / 48...
Need help?
Do you have a question about the PhysioQuant and is the answer not in the manual?
Questions and answers