
Related Manuals for Kitronik Mono amplifier kit


Summary of Contents for Kitronik Mono amplifier kit
- Page 1 TEACHING RESOURCES SCHEMES OF WORK DEVELOPING A SPECIFICATION COMPONENT FACTSHEETS HOW TO SOLDER GUIDE CREATE YOUR OWN SPEAKER DOCK WITH THIS MONO AMPLIFIER KIT Version 3.0...
- Page 2 Mono Amplifier Teaching Resources www.kitronik.co.uk/2165 Index of Sheets TEACHING RESOURCES Index of Sheets Introduction Schemes of Work Answers The Design Process The Design Brief Investigation / Research Developing a Specification Which Batteries Should I Use With My MP3 Amplifier? Mounting the Speaker...
- Page 3 Please feel free to print any pages of this booklet to use as student handouts in conjunction with Kitronik project kits.
- Page 4 Mono Amplifier Teaching Resources www.kitronik.co.uk/2165 Schemes of Work Two schemes of work are included in this pack; the first is a complete project including the design & manufacture of an enclosure for the kit (below). The second is a much shorter focused practical task covering just the assembly of the kit (next page).
- Page 5 Mono Amplifier Teaching Resources www.kitronik.co.uk/2165 Electronics only Hour 1 Introduction to the kit demonstrating a built unit. Using ‘Soldering in 8 Steps’ sheet practice soldering. Hour 2 Build the kit using the ‘Build Instructions’. Hour 3 Check the completed PCB and fault find if required using ‘Checking Your Amplifier PCB’ and fault finding flow chart.
-
Page 6: The Design Process
Mono Amplifier Teaching Resources www.kitronik.co.uk/2165 The Design Process The design process can be short or long, but will always consist of a number of Design Brief steps that are the same on every project. By splitting a project into these clearly defined steps, it becomes more structured and manageable. - Page 7 Mono Amplifier Teaching Resources www.kitronik.co.uk/2165 The Design Brief A manufacturer of MP3 players has developed a simple audio amplifier circuit. The circuit has been developed to the point where they have a working Printed Circuit Board (PCB). Although they are used to the design of MP3 players, they have not designed an amplifier case before.
- Page 8 Mono Amplifier Teaching Resources www.kitronik.co.uk/2165 Investigation / Research Using a number of different search methods, find examples of similar products that are already on the market. Use additional pages if required. Name………………………………………………… Class………………………………...
- Page 9 Mono Amplifier Teaching Resources www.kitronik.co.uk/2165 Developing a Specification Using your research into the target market for the product, identify the key requirements for the product and explain why each of these is important. Name……………………………………………………… Class……………………………… Requirement Reason Example: The enclosure should have Example: So that the sound can be heard.
- Page 10 Mono Amplifier Teaching Resources www.kitronik.co.uk/2165 Which Batteries Should I Use With My MP3 Amplifier? The Amplifier will work off a supply of 2.2 volts to 5.5 volts; however you won’t be able to set the volume as high on the lower voltages. The higher the voltage, the more batteries you will need and the bulkier the case will have to be to accommodate them.
-
Page 11: Mounting The Speaker
Mono Amplifier Teaching Resources www.kitronik.co.uk/2165 Mounting the Speaker To get the best performance from your amplifier, you will need to mount the speaker into an enclosure. If the speaker is left in open air, as the paper cone moves in and out, the air will move around the edge of the speaker, giving it poor performance. - Page 12 Mono Amplifier Teaching Resources www.kitronik.co.uk/2165 Design Develop your ideas to produce a design that meets the requirements listed in the specification. Name……………………………………………… Class………………………………...
- Page 13 Mono Amplifier Teaching Resources www.kitronik.co.uk/2165 Design Review (group task) Split into groups of three or four. Take it in turns to review each person’s design against the requirements of their specification. Also look to see if you can spot any additional aspects of each design that may cause problems with the final product.
- Page 14 Mono Amplifier Teaching Resources www.kitronik.co.uk/2165 Soldering in 8 Steps INSERT COMPONENT Place the component into the board, making sure that it goes in the correct way around, and the part sits closely against the board. Bend the legs slightly to secure the part. Place the board so you can access the pads with a soldering iron.
- Page 15 Mono Amplifier Teaching Resources www.kitronik.co.uk/2165 APPLY SOLDER Feed a small amount of solder into the joint. The solder should melt on the pad and flow around the component leg. STOP SOLDERING Remove the solder, and then remove the soldering iron.
-
Page 16: Resistor Values
Mono Amplifier Teaching Resources www.kitronik.co.uk/2165 Resistor Values A resistor is a device that opposes the flow of electrical current. The bigger the value of a resistor, the more it opposes the current flow. The value of a resistor is given in Ω (ohms) and is often referred to as its ‘resistance’. - Page 17 Mono Amplifier Teaching Resources www.kitronik.co.uk/2165 Calculating resistor markings Calculate what the colour bands would be for the following resistor values. alue 1st Band 2nd Band Multiplier x 180 Ω 3,900 Ω 47,000 (47K) Ω 1,000,000 (1M) Ω What does tolerance mean? Resistors always have a tolerance but what does this mean? It refers to the accuracy to which it has been manufactured.
- Page 18 Mono Amplifier Teaching Resources www.kitronik.co.uk/2165 Capacitor Basics What is a capacitor? A capacitor is a component that can store electrical charge (electricity). In many ways, it is like a rechargeable battery. A good way to imagine a capacitor is as a bucket, where the size of the base of the bucket is equivalent to the capacitance (C) of the capacitor and the height of the bucket is equal to its voltage rating (V).
- Page 19 Mono Amplifier Teaching Resources www.kitronik.co.uk/2165 Ceramic Disc Capacitors Values The value of a capacitor is measured in Farads, though a 1 Farad capacitor = 1,000mF would be very big. Therefore we tend to use milli Farads (mF), micro Farads = 1,000,000F (F), nano Farads (nF) and pico Farads (pF).
- Page 20 Mono Amplifier Teaching Resources www.kitronik.co.uk/2165 Instruction Manual Your amplifier is going to be supplied with some instructions. Identify four points that must be included in the instructions and give a reason why. Point to include: Point to include: Reason: Reason:...
- Page 21 Mono Amplifier Teaching Resources www.kitronik.co.uk/2165 Evaluation It is always important to evaluate your design once it is complete. This will ensure that it has met all of the requirements defined in the specification. In turn, this should ensure that the design fulfils the design brief.
- Page 22 Mono Amplifier Teaching Resources www.kitronik.co.uk/2165 Packaging Design If your product was to be sold in a high street electrical retailer, what requirements would the packaging have? List these giving the reason for the requirement. Requirement Reason Develop a packaging design for your product that meets these requirements. Use additional pages if required.
- Page 23 ESSENTIAL INFORMATION BUILD INSTRUCTIONS CHECKING YOUR PCB & FAULT-FINDING MECHANICAL DETAILS HOW THE KIT WORKS CREATE YOUR OWN SPEAKER DOCK WITH THIS MONO AMPLIFIER KIT Version 3.0...
-
Page 24: Build Instructions
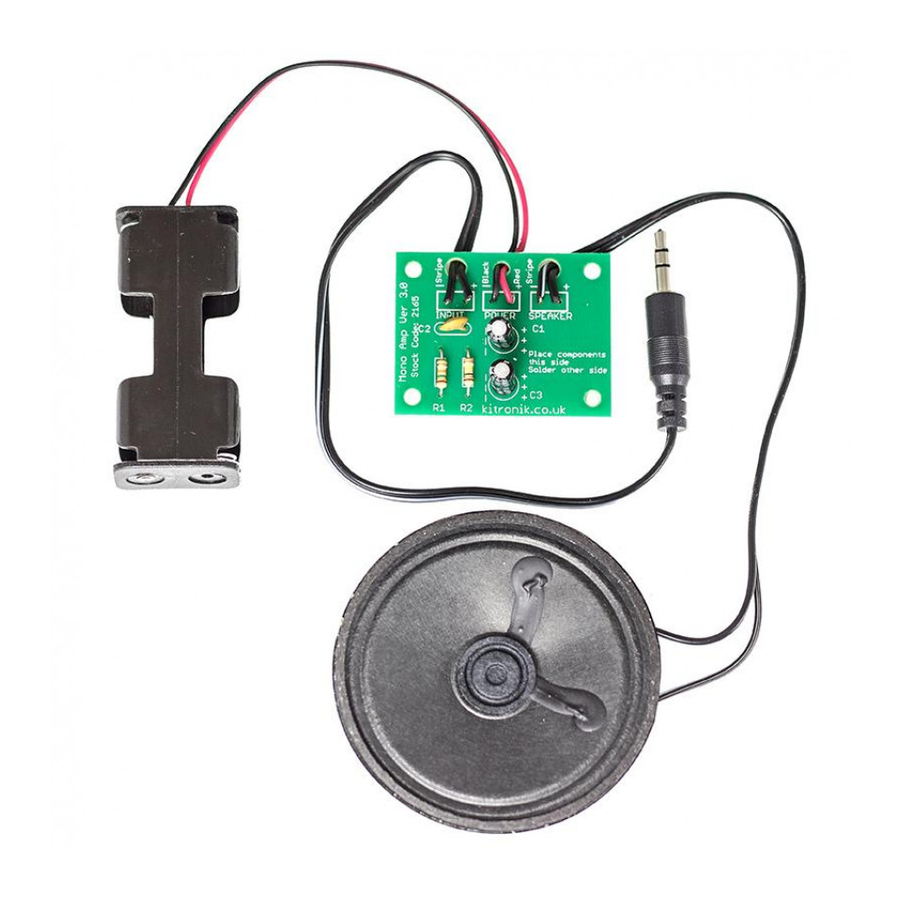
Mono Amplifier Essentials www.kitronik.co.uk/2165 Build Instructions Before you start, take a look at the Printed Circuit Board (PCB). The components go in the side with the writing on and the solder goes on the side with the tracks and silver pads. If the PCB is pre-built, proceed to step 4. -
Page 25: Checking Your Amplifier Pcb
Mono Amplifier Essentials www.kitronik.co.uk/2165 Take the piece of wire that you have cut off and strip the ends of the wire. Connect one end to the two terminals on the speaker and the other end to the board connection marked ‘Speaker’. Whilst it doesn’t matter which way around the speaker connections go you may wish to connect the stripe to the pad on the board marked stripe and at the speaker end connect the stripe to the ‘-‘... -
Page 26: Adding An On / Off Switch
Mono Amplifier Essentials www.kitronik.co.uk/2165 Adding an On / Off Switch If you wish to add a power switch, don’t solder both ends of the battery clip directly into the board, instead: Solder the black wire ‘-‘ of the battery clip to the PCB. - Page 27 Mono Amplifier Essentials www.kitronik.co.uk/2165 START Fault finding flow chart Power up the board with it connected to a music source CHECK C3 is the right way around and the joints are good Power Leads is correct way around ...
-
Page 28: Designing The Enclosure
Mono Amplifier Essentials www.kitronik.co.uk/2165 Designing the Enclosure When you design the enclosure, you will need to consider: The size of the PCB (below left, height including components = 15mm) How big the batteries are. How to mount the speaker (below right). -
Page 29: How The Amplifier Works
Mono Amplifier Essentials www.kitronik.co.uk/2165 How the Amplifier Works At the centre of the circuit is an audio amplifier Integrated Circuit or IC. Inside the IC are lots of transistors, which are connected together to allow the small input signal to be amplified into a more powerful output that can drive a speaker. -
Page 30: Online Information
/ omissions in the notes. Kitronik Ltd - Any unauthorised copying / duplication of this booklet or part thereof for purposes except for use with Kitronik project kits is not allowed without Kitronik’s prior consent.
Need help?
Do you have a question about the Mono amplifier kit and is the answer not in the manual?
Questions and answers