Table of Contents
Advertisement
Chapter1 Safety Precautions ......................................................................................................... 1
Chapter2 Main Unit ...................................................................................................................... 6
Chapter4 External Interfaces ....................................................................................................... 10
Chapter5 Dry Battery/AC Adapter Installation ........................................................................... 13
5.1 Dry Battery Installation .............................................................................................. 14
5.2 Using the AC Adapter ................................................................................................. 14
Chapter6 Setting the Date and Time ........................................................................................... 16
Chapter7 Unit ............................................................................................................................. 19
Chapter8 Alarm Function ............................................................................................................ 20
Chapter9 Applying the Limb Cuff .............................................................................................. 22
Chapter10 BP Measurement ....................................................................................................... 26
10.1 Accurate Measurement Way ..................................................................................... 26
10.2 BP Measurement ....................................................................................................... 28
Chapter11 Memory Function ...................................................................................................... 30
11.1 Review the Memory Value ........................................................................................ 30
11.2 Delete Memory Values .............................................................................................. 32
Chapter13 Error Message ........................................................................................................... 37
Chapter14 Troubleshooting ......................................................................................................... 39
Chapter15 Clean and Maintenance ............................................................................................. 41
Chapter16 Specification .............................................................................................................. 46
Contents
I
Advertisement
Table of Contents

Related Manuals for Gima CONTEC08A-VET


Summary of Contents for Gima CONTEC08A-VET
-
Page 1: Table Of Contents
Contents Chapter1 Safety Precautions ......................1 Chapter2 Main Unit ........................6 Chapter4 External Interfaces ....................... 10 Chapter5 Dry Battery/AC Adapter Installation ................13 5.1 Dry Battery Installation ....................14 5.2 Using the AC Adapter ....................14 Chapter6 Setting the Date and Time ................... 16 Chapter7 Unit .......................... -
Page 2: Chapter1 Safety Precautions
Chapter1 Safety Precautions Before use, carefully read "Safety Precautions" for a correct use. To prevent users suffered hurt or damnification due to improper use, see "Safety Precautions", and use this product properly. For safety reasons, be sure to comply with safety precautions. Note If not to use correctly, it exists that a potentially hazardous situation which may result in injury to the user or patient or damage to the equipment or other property. - Page 3 Note Self-diagnosis and treatment using measured results may be dangerous. Follow the instructions of your physician. Contact your physician for specific information about your animal’s blood pressure. Please hand measurement results to the doctor who know your animal’s health to accept diagnosis.
- Page 4 Operation for AC Adapter (Separate Sale) Note Please use sold separately dedicated AC adapter. Otherwise it may cause trouble. The dedicated AC adapter must use AC 100V-240V. Otherwise it may cause fire or electric shock. When there is breakage of sold separately dedicated AC adapter plug or wire , please immediately pulled the plug from the socket.
- Page 5 Operation for battery Note Please use 4 "AA" size manganese or alkaline batteries, do not use batteries of other types. Otherwise it may cause fire. New and old batteries, different kinds batteries can not be confusion. Otherwise it may cause battery leakage, heat, rupture, and damage to Electronic Sphygmomanometer.
- Page 6 Advice Do not subject the device to strong shocks, such as dropping the unit on the floor. Do not inflate before the cuff wrapps around the arm. Do not inflect the cuff and the air tube forcibly. Warning You must not perform NIBP measurements on animals with sickle-cell disease or under any condition which the skin is damaged or expected to be damaged.
-
Page 7: Chapter2 Main Unit
Chapter2 Main Unit The production is in the package. Open the package and confirm whether the production is whole. - Page 8 Accessories: Cuff: The sphygmomanometer supports cuffs in a variety of sizes, please choose suited cuff according to the size of the animal. User Manual Optional Accessories: AC adapter...
- Page 9 Input: voltage: AC 100V~240V frequency: 50Hz/60HZ Rated current: AC 150mA Output: DC 6.0V±0.2V 1.0A or DC5.0V±0.2V 1.0A Cuff: There are several suitable cuffs(range of limb circumference,middle of upper limb) the range of limb circumference is 6-11cm the range of limb circumference is 10-19cm the range of limb circumference is 18-26cm the range of limb circumference is 22-32cm the range of limb circumference is 32-43cm...
- Page 10 Note When the product and accessories described in this manual are about to exceed the period of use, they must be disposed according to relevant product handling specification. If you want to know more information, please contact our company or representative organization.
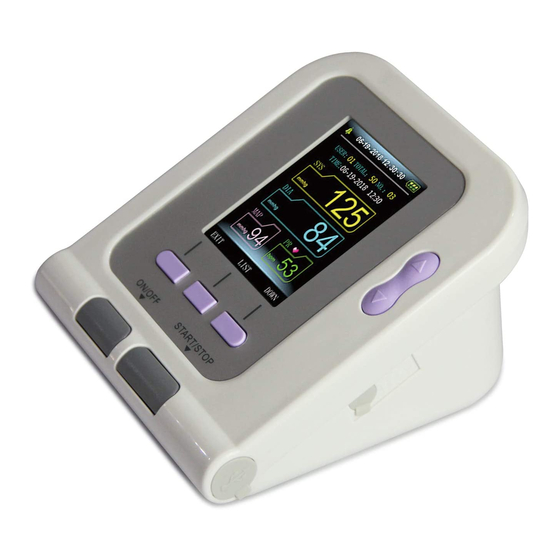
- Page 11 Chapter3 Button Functions All the operations to the Electronic Sphygmomanometer are through the buttons. The names of the buttons are above them. They are: 【ON/OFF】 Hold the button to start or close the device. 【START/STOP】 Press to inflate the cuff and start a blood pressure measurement.
-
Page 12: Chapter4 External Interfaces
Chapter4 External Interfaces Note Please hold the air plug to remove the NIBP cuff. -
Page 14: Chapter5 Dry Battery/Ac Adapter Installation
Chapter5 Dry Battery/AC Adapter Installation The production can use dry battery or AC adapter as power source. ... -
Page 15: Dry Battery Installation
5.1 Dry Battery Installation ① Demount the battery cover in the direction of the arrow. ② Install "AA" dry batteries according to polarities. ③ Slide to close the battery cover. Icon “ ”: the batteries power will exhaust. Replace with four new batteries (the same sort) at the same time. Turn the unit off before replacing the batteries. - Page 16 ② Remove the AC Adapter plug from the unit. Please be sure to use dedicated AC adapter. Note You'd better take off batteries when use the AC adapter as power source. If there is any damage to the AC adapter, you should use batteries to run the device. When adapter and batteries are both used at the same time, the battery power will not be consumed.
-
Page 17: Chapter6 Setting The Date And Time
Chapter6 Setting the Date and Time is necessary to set date and time after turning on the device. The Electronic Sphygmomanometer can automatically stores measurement results, date and time. If dry battery power exhausts or removed, the time to stop. At the moment, please reset date and time. - Page 18 【ENTER】 button. (2)Press 【MENU】 button on the main interface to enter system menu, then enter 【SYSTEM TIME】 item, the current time will be displayed on the screen. Set date and time with 【UP】, 【DOWN】 and 【ENTER】 button...
- Page 19 2. After setting, select 【CONFIRM】 option and press 【ENTER】 button to confirm the setting value. If you do not want to change the time, select 【EXIT】 option and press 【ENTER】 button to return to the previous menu. Note The year can be set between 2010 and 2099. When the display reaches 2099, it will return to 2010 when pressing【UP】button.
-
Page 20: Chapter7 Unit
Chapter7 Unit There are two units: "mmHg" and "kPa". The default is: "mmHg". To switch "mmHg" and "kPa" units, enter the 【SYSTEM SETUP】 submenu in 【SYSTEM MENU】, and complete switching in 【UNIT】 item. -
Page 21: Chapter8 Alarm Function
Chapter8 Alarm Function Alarms are classified into two categories: technical alarm and physiological alarm. Physiological Alarm User can press 【MENU】 button to enter system menu, select 【ALARM SETUP】 item to enter its interface, and then set alarm on-off and the high and low alarm limits, when blood pressure is higher than the high limit or lower than the low limit, the physiological alarm will occur. - Page 22 Technical Alarm When power is about to exhaust and alarm is on , then the alarm will occur. This alarm can not be cancelled unless being closed or the power replaced.
-
Page 23: Chapter9 Applying The Limb Cuff
Chapter9 Applying the Limb Cuff The measurement can be carried out by applying the cuff on left or right forelimb. Carry out the operation in a room with comfortable temperature. In order to measure accurately, pay attention to applying the cuff properly. Select a proper cuff according to different animals, then select proper cuff type(large, middle and small). - Page 24 Wear the cuff accurately following these steps: ① Make sure the air plug is securely inserted in the main unit. ② Apply the blood pressure cuff to the animal's leg following the instructions below . Ensure that the cuff is completely deflated. ...
- Page 25 Note Every CUFF TYPE corresponds to different cuff sizes, which are identified on the cuff. As follows:...
- Page 26 Animal Type Limb perimeter Small <13 Middle 8 ~ 26 cm Large >25 cm Make sure that the cuff edge falls within the range of mark.If it does not, use a larger or smaller cuff that fits better. Warning Before starting a measurement, verify that you have selected a appropriate setting of animal type (large,middle,or small)for your animal according to its limb perimeter.
-
Page 27: Chapter10 Bp Measurement
Chapter10 BP Measurement 10.1 Accurate Measurement Way The limb chosen for taking the measurement should be placed at the same level as the animal's heart. If this is not possible you should apply the following corrections to the measured values:If the cuff is placed higher than the heart level, add 0.75 mmHg for each inch of difference.If it is placed lower than the heart level, deduct 0.75 mmHg for each inch of difference. - Page 28 Try to measure your animal’s blood pressure at the same time each day with the same arm and the same pose for consistency. Do not touch Electronic Sphygmomanometer, cuff and windpipe during measurement. Measurements should be taken in a quiet place and the body relax. Remain still 4~5 minutes before measurement.
-
Page 29: Bp Measurement
10.2 BP Measurement ① Press 【START/STOP】 button to take a measurement. Start measurement measurement result During measurement, please keep correct pose and quiet state, do not move. Stop Measurement During measurement, if you wish to stop measuring, press 【START/STOP】 button to stop and deflate. - Page 30 of your physician. Note Wait at least 4-5 minutes between measurements. When repeated measurements, because, the limb appears congestion, it may not get correct blood pressure measurement. After the blood flow, take a measurement once again. When some factors affect the measurement results in measurement process, error messages hints will appear on the screen, you can obviate the malfunction and restart a measurement.
-
Page 31: Chapter11 Memory Function
Chapter11 Memory Function The device is designed to store and display the blood pressure, pulse rate values and the date and time when measured, which are up to 100 items. If there have been 100 items stored, when the 101 measurement have been taken, the earliest results are deleted. 11.1 Review the Memory Value 1.In the main interface (interface when boot-strap), press 【MEMORY】... - Page 32 2.Press 【UP】/【DOWN】 button to circularly switch the former measurement values. *The right figure shows that there is no Measurement result. 3.Press 【LIST】 button to switch to data table interface.
-
Page 33: Delete Memory Values
4.Press 【TREND】 button to display trend interface. 5.Finish displaying the measurement values Press 【EXIT】 to return the main interface or hold 【ON/OFF】 button to turn the power off. *The device will automatically turn off after two minutes in which there is no operation to the device, even if you forget to turn the power off. - Page 34 2.Finish Operation Select 【CONFIRM】 or 【EXIT】 to return the previous menu, or hold 【ON/OFF】 button to turn the power off. *The device will automatically turn off after two minutes in which there is no operation to the device, even if you forget to turn the power off.
- Page 35 Chapter12 Keys and Symbols Signal Description Warning – See User Manual Systolic pressure MAP pressure Diastolic pressure Pulse rate (bpm) LARGE Large animal MIDDLE Middle animal SMALL Small animal INFO Information...
- Page 36 Open the alarm sound indication Close the alarm sound indication Low-power Full-power 1.no NIBP data to review 2.An indicator of signal inadequacy ClassⅡ equipment WEEE (2002/96/EC) Type BF Applied Part...
- Page 37 Serial number This item is compliant with Medical Device Directive 93/42/EEC of June 14, 1993, a directive of the European Economic Community. European Representative USB socket connect SpO probe(This item only fit for European Union market)
-
Page 38: Chapter13 Error Message
Chapter13 Error Message Error message will be displayed in the screen if there is something wrong when measuring. The causes and solutions are shown as follows: Error Message Causes Solutions Self-test failure Function abnormal Please contact us System failure Cuff is not connected Loose cuff Correctly connect cuff (refer to Chapter 9) correctly. - Page 39 Excessive The signal extent is too movement big owing to the arm or Over range body moving or other Keep limb, body still, measure again Saturated signal reasons when measuring Time out It takes too much time...
-
Page 40: Chapter14 Troubleshooting
Chapter14 Troubleshooting Abnormal Causes Solutions Phenomenons Correctly connect cuff (refer to Cuff is not connected correctly. measurement Chapter 9) values too high or Keep quiet restart too low. Move limbs when measuring measurement Cuff leakage Buy a new cuff cuff windpipe Correctly connect No pressure... - Page 41 temperature Power batteries can be Replace all four batteries with new exhausted ones. Hold the on/off button but can not Check the battery installation for start the device The battery polarities is reversed proper placement of the battery polarities. Cuff inflation start before press the measurement Pull out the cuff to deflate.
-
Page 42: Chapter15 Clean And Maintenance
Chapter15 Clean and Maintenance *Please follow the instructions in the user manual. If you do not comply, our company will not assume responsibilities of the quality. Warning Must remove batteries and cut off the alternating power supply before cleaning the sphygmomanometer, accessories must be clean separately. - Page 43 The device should be inspected regularly(or according to the inspection procedure of hospital). The device can be inspected by inspection organizations which designated by the state, or inspected by professionals, also, users can contact with our company. Warning Do not submerge the device in water. Advice ...
- Page 44 Do not attempt to clean or wash the cuff. Keeping Advice Do not place the machine in the following areas: Easy to splash water areas. Direct sunlight, extreme hot, humidity, dust, causticity gas areas.
- Page 45 Lean or the area which can cause vibration, impact. Chemicals or corrosive gas storage areas. Remove the batteries if the unit will not be used for long time. Warning It is recommended that you check if there is any damage on the Sphygmomanometer or the accessories regularly, if you find any damage, stop using it, and contact our Customer Service immediately.
- Page 46 the portable and mobile RF communications equipment with higher EM interference can affect this device. The internal components and cables should not be changed,as this may decreased IMMUNITY of the device. The Electronic Sphygmomanometer should not be used adjacent to or stacked with other equipment.
-
Page 47: Chapter16 Specification
Chapter16 Specification Name Electronic Sphygmomanometer Display 2.8'' color LCD Display NIBP Specifications Measurement Method Oscillometric method Working modes Automatic Operation mode Continuous operation Pressure:0~290mmHg(0~38.6kPa) Measurement Range Pulse: 40~240/min Resolution Pressure:1mmHg Accuracy Static pressure: ±3mmHg(±0.4kPa) The BP Value of the device is equivalence with the measurement Error value of Stethoscopy. - Page 48 Temperature: -20ºC~+55ºC; Relative humidity: ≤95%; No corrosive Storage gas and drafty. Atmospheric pressure 700hPa~1060hPa Power supply 4 "AA" alkaline batteries, AC Adapter(AC, 100V-240V, optional) When the temperature is 23ºC, limb circumference is 270mm, the Battery life measured blood pressure is normal, 4 "AA" alkaline batteries cab be used about 300 times.
Need help?
Do you have a question about the CONTEC08A-VET and is the answer not in the manual?
Questions and answers