Table of Contents
Advertisement
Quick Links
Advertisement
Table of Contents

Related Manuals for madur electronics GA-60


Summary of Contents for madur electronics GA-60
- Page 1 GAS ANALYSER GA-60 Manual Version: 3.1 9/2013 Index...
-
Page 2: Table Of Contents
GA-60 www.madur.com Manual 1. Introduction........................3 Package Contents......................4 General information......................5 4. Construction........................6 4.1. Front panel......................6 4.2. channel......................7 4.2.1. probe......................7 4.2.2. pump......................7 4.2.3. Electrochemical sensors................7 4.2.4. NDIR sensors....................7 4.3. Analogue outputs....................8 4.4. Power........................9 Working with the analyser..................10 5.1. Starting up the analyser..................10 5.2. -
Page 3: Introduction
It is a high quality instrument produced using the latest technical discoveries. The GA-60 is easy to use. You also have the possibility of using the extra capabilities of this analyser, of examining measurement results, checking service intervals and many others. -
Page 4: Package Contents
GA-60 www.madur.com Manual 2. PACKAGE CONTENTS 1. GA-60 gas analyser 2. RS-232 (PC-analyser) communication cable 3. Software CD 4. MMC / SD memory card + USB card reader 5. Gas probe pipe (optionally) 6. Gas probe holder (optionally) 7. Mains cable... - Page 5 GA-60 www.madur.com Manual 3. GENERAL INFORMATION GA-60 gas analyser can be equipped with up to 6 electrochemical sensors and 2 NDIR gas sensors. Depended on the configuration, the analyser can measure the concentration of the following gases: O , CO...
-
Page 6: Construction
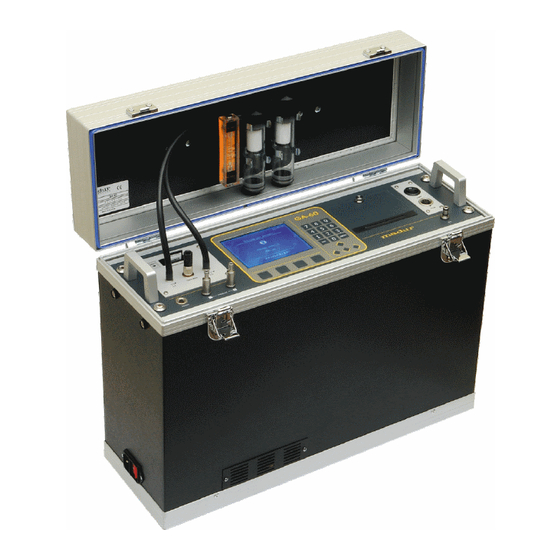
4.1. Front panel Drawing 1. Front panel of the GA-60 gas analyser The drawing above shows the front panel of the analyser with its essential parts: 1. Gaseous connection of gas filter that is installed in case's lid. 2. MMC / SD card's slot – this memory card is used for saving measurements in a form of reports, that can be later viewed and processed on PC computer. -
Page 7: Gas Channel
4.2.2. Gas pump GA-60 is equipped with a gas pump (efficiency – 90l/h) that provides gas sample to the sensors. It is possible to manually switch the pump off (for example when analyser is to work with external gas dryer equipped with its own pump, like PGD-100). -
Page 8: Analogue Outputs
4.3. Analogue outputs GA-60 can be equipped with 16 analogue outputs (8 current and 8 voltage ones). Analogue outputs module is mounted on the right side in the analysers lid (shown in Drawing 2.). Connectors are numbered 1÷8 starting from the left. Each connection has a pair of outputs –... -
Page 9: Power
4.4. Power Analyser GA-60 is to be powered from the mains power supply (110VAC or 230VAC). It can also be powered from its own built-in rechargeable battery for up to 12 hours. This battery charges whenever the analyser is connected to the mains power... -
Page 10: Working With The Analyser
GA-60 www.madur.com Manual 5. WORKING WITH THE ANALYSER 5.1. Starting up the analyser To start up the analyser you have to use the switch placed on the right side of the front panel. If you did not use the mains power cord, the analyser will start, using its built- in rechargeable battery. -
Page 11: Preparation For Measurements
GA-60 www.madur.com Manual Attention! Fresh air must be provided to the analyser through the analyser's probe throughout the whole process of zeroing. If an auto-start option is chosen in the saving options, and an SD/MMC card is in the card port, the third screen visible will include request for clients number for which all following measurements will be carried (you can find more information about auto-start in chapter 5.3.3.3) - Page 12 Measurement time XL – it is a time of single XL measurement. GA-60 measures for the set time, averages the result and stores it as a report in its inner memory or on a SD/MMC card.
-
Page 13: In Nox
Fuel – currently used fuel. Name of the fuel is displayed in the line below the setting name. GA-60 stores 14 different fuel settings, of which 10 are factory defaults and 4 can be set by the user. -
Page 14: Results Screens
5.3.2. Results screens GA-60 analyser displays measurements results on 4 screens. You can switch between them by pressing up and down arrow keys. The computer software can be used for setting order in which the results will appear on the 4 results screens. - Page 15 GA-60 www.madur.com Manual Description of function keys available on the Results screens: M+ – go to the Saving options screen screen Operation – go to Operation screen screen. Print– go to Print options screen. Param. – go to Measurement parameters screen.
-
Page 16: Results Screen Number 4
GA-60 www.madur.com Manual 5.3.2.1. Results screen number 4 The number 4 results screen is specific because some measurement results can be presented graphically. Functions available for function keys are also different on this screen. Drawing 9. Example of a graph on results screen 4. -
Page 17: Saving Options Screen
5.3.3. Saving options screen GA-60 stores the measurements results as reports, with information about actual measurements parameters and values of all measured and calculated variables Results can be saved on a SD/MMC memory card or on an internal memory. - Page 18 GA-60 www.madur.com Manual Drawing 11. Example of saving options screen Information about the memory card, remaining memory available and space for reports is displayed on the bottom part of the screen Saving options. Multiple saving settings are also available here.
-
Page 19: Start Function Key
GA-60 www.madur.com Manual Description of function keys available on the Saving options screen: Esc – go back to Results screens. Start – starts the process of saving for chosen savings options (chapter 5.3.3.1). Options – go to Storage options screen (chapter 5.3.3.2). - Page 20 GA-60 www.madur.com Manual Drawing 13. Screen with information about lack of free space in memory for saving measurements results. Choosing Esc will take you back to the saving options. Choosing Yes will allow overriding the oldest result with the current one.
-
Page 21: Function Key Options
GA-60 www.madur.com Manual Drawing 15. Screen for stopping the multiple storage process. Yes will stop the process. Esc will cancel the question and lead back to results screen. 5.3.3.2. Function key Options Pressing the Options key on the saving options screen will open the screen with storage options: Drawing 16. -
Page 22: Mmc/Sd
GA-60 www.madur.com Manual by left/right arrow key or Change function key between these values: 10sec, 20sec, 30sec, 1min, 2min, 5min, 10min, 15min, 20min, 30min. In the mean time XL single and triple test can be carried out. Storage quantity – this parameter concerns only the multiple storage option. - Page 23 GA-60 www.madur.com Manual Drawing 18. Screen with information about card detection. When autostart option is set to Yes, card detection screen will be followed by the screen with request for customer number. Attention! In case when: analyser is starting Autostart option was previously set to Yes MMC/SD card is in the card slot The analyser will try to initialize the multiple storage saving process.
- Page 24 GA-60 www.madur.com Manual Drawing 19. Internal memory results preview screen. Information about the size and available space on the memory card is collected from the card only once, immediately after the card is insert into the card slot. Possible is...
- Page 25 GA-60 www.madur.com Manual When the last page of all available will be opened key Next will be replaced with Home that will lead to the first page of the results reports. Desired report can be chosen with the use of up/down arrow keys.
-
Page 26: Operation Screen
GA-60 www.madur.com Manual Drawing 22. MMC/SD card formatting process information screen. 5.3.4. Operation screen From the Results screen you can directly jump to the Operation screen (pressing the function key Operation) Drawing 23. Operation Screen From the Operation screen one can perform the following operations: Hold –... -
Page 27: Soot Test
GA-60 www.madur.com Manual Get pressure value – analyser will perform single pressure measurement. The result of the following measurement will be displayed on the screen presented below and saved in the next report Drawing 24. Get pressure value screen. Reset averaging – clears the buffer of the last measurements, new data for averaging will be calculated after performing this operation Gas sensors zeroing –... - Page 28 GA-60 www.madur.com Manual To start the procedure select Soot test in the Operation screen and follow the steps presented below: 1. Put the soot test filter into the probe holder's slot. 2. Set the pointer on the Pump regulation and press Start function key Drawing 25.
- Page 29 GA-60 www.madur.com Manual 7. Measurement lasts for 60 seconds. During the measurement observe flow value on the flow meter and, if necessary, regulate the pump efficiency using (+), (-) function keys. Drawing 27. Soot measurement screen. 8. When the measurement is finished read the soot level from paper filter (compare it with the paper scale) and enter the result into the analyser.
-
Page 30: Print Options
GA-60 www.madur.com Manual 5.3.5. Print options When you press function key Print you will be moved to this screen: Drawing 29. Printing options screen. Print options screen contains 3 printing options to choose from: Current results – in this case current measurement results will be printed. -
Page 31: Menu
GA-60 www.madur.com Manual Format 7 – designed for printing current results; includes values of mass concentrations of measured gases. Format 8 – designed for printing reports; includes values of mass concentrations of measured gases. 5.3.6. Menu To get to the menu from the results screen you have to press the right arrow key or any of the numerical keys. -
Page 32: Settings
GA-60 www.madur.com Manual 5.3.6.2. Settings Drawing 31. Settings screen. This screen allows access to the following options: Pressure unit – pressure unit can be changed between: Pa, hPa, mmH2O, inH2O. Temperature unit – temperature unit can be changed between °C and °F. -
Page 33: Internal Memory
GA-60 www.madur.com Manual Values in each setting can be changed with arrow keys left/right or with the Change function key. 5.3.6.3. Internal memory Drawing 32. Example screen of the content of the internal memory. This screen allows access to the reports stored in the internal memory. Up to 4 separate reports can be stored in this memory. -
Page 34: Gas Conditioner
Gas conditioner screen. This screen shows settings for the external gas conditioning unit PGD-100 that can work in cooperation with the GA-60. (+) and (-) function keys allow changing settings for the conditioning unit (gas dryer). Setting available include: pump efficiency, heated hose temperature and the temperature of cooling unit. -
Page 35: Clock / Calendar
GA-60 www.madur.com Manual Possible communicates in the Is column include: „---” – unknown parameter (the dryer is not switched on). „???” – parameter reading error. „140” – current value. The field below the parameter settings is used to communicate current status of the dryer to the user. -
Page 36: Service
GA-60 www.madur.com Manual The function key Change opens a screen with particular setting: Drawing 36. Screens allowing date and time setting. Date format setting includes to variants: day / month / year or month / day / year. Lower part of the Clock / Calendar screen contains a month time calendar. -
Page 37: Info
GA-60 www.madur.com Manual 5.3.6.6.1. Info Drawing 38. Info screen. This screen contains basic information about the analyser like: software version, serial number, number of the last saved report, and a list of all installed in the analyser sensors. 5.3.6.6.2. Control list This option is only available for the authorised madur services. - Page 38 GA-60 www.madur.com Manual Choosing this setting will lead to a Warning confirmation screen for making sure that the setting was not accessed by mistake, going forward is possible with they Yes function key: Drawing 39. IR sensors calibration: a) warning screen, b) a list of all possible IR sensors.
- Page 39 GA-60 www.madur.com Manual Reference gas – gas concentration in the reference point (gas of known concentration, set by the user) Bottom part of the screen includes calibration options for selected sensor: Change reference gas – displays screen with setting for the new concentration value of reference gas: Drawing 41.
-
Page 40: Elchem Sensors Calibration
GA-60 www.madur.com Manual Attention! When calibrating the NO sensor, before the zeroing, analyser must be ventilated with pure 100% nitrogen gas. If this operation is not possible, value of the reference gas must be raised by 15 ppm. 3. Allow the analyser to sample the reference gas (with known concentration) through the gas probe and heated hose and let the sensor measure it. - Page 41 GA-60 www.madur.com Manual Choosing this setting will lead to a Warning – confirmation screen for making sure that it was not accessed by mistake, going forward is possible with they Yes function key: Drawing 42. Electrochemical sensors calibration: a) warning screen, b) a list of all possible IR sensors.
-
Page 42: Pressure Calibration
GA-60 www.madur.com Manual 5.3.6.6.5. Pressure calibration Attention! Pressure calibration performed by untrained member of staff can cause loss of correct analyser's setting and in consequence make further measurement impossible. Madur company strongly discourages changing settings in this menu without a proper training!!! Choosing this setting will lead to a Warning –... -
Page 43: Restore Settings Of The Multi Module
GA-60 www.madur.com Manual Bottom part of the screen includes calibration options for pressure sensor: Change reference pressure – displays screen with setting for the new value of reference gas: Drawing 45. New pressure value for reference pressure screen. Make zeroing – this option will lead (through the confirmation screen) to... -
Page 44: Tips On How To Use The Analyser
In time electrochemical sensors loose their parameters, so the analyser should be serviced and recalibrated regularly. 7. COMPUTER SOFTWARE MadCom computer software is used for communication with the GA-60 (and other madur gas analysers). It allows preview of current measurements results, reading results stored on a memory card and printing.
Need help?
Do you have a question about the GA-60 and is the answer not in the manual?
Questions and answers