
Subscribe to Our Youtube Channel
Related Manuals for DHN DU7800


Summary of Contents for DHN DU7800
- Page 1 Laser Light Source Projector User Manual ________________________________________________________________________________ Version: 1.0...
-
Page 2: Table Of Contents
Contents Important safety instructions I. Introduction 1. Characteristics of Projector 2. External Overview of Projector 3. Control and Function II. Installation of Projector 1. Placement Method 2. Projection Size/Projection Distance Relation III. Connection IV. Menu System 1. Basic Settings Menu 2. -
Page 3: Important Safety Instructions
Important safety instructions Your projector has been designed and tested, and meets the latest safety standards for information technology equipment. However, in order to ensure the safe use of the product, it is essential to follow the instructions mentioned in the manual and marked on the product. ... -
Page 4: Introduction
I. Introduction The projector series of the product is characterized of high brightness and high-definition resolution, and widely applied to digital high-definition cinemas, large exhibition halls, private cinemas, large-screen splicing, etc. It is also suitable for digital advertisement display, large-scale stadium display, city image and project construction. -
Page 5: Characteristics Of Projector
1. Characteristics of Projector With single chip laser DLP™ projector for providing high-definition images; The service life is 20,000 hours; Support vertical and lateral projections; Due to vertical digital keystone correction function, ideal symmetrical images can be easily obtained;... -
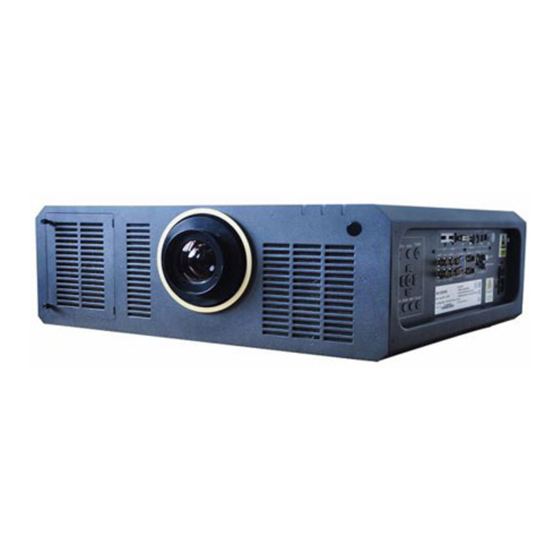
Page 6: Control And Function
1 HEPA high-efficiency filter screen 2 Projection lens 3 Indicator light 4 Remote control receiver (front/side) 5 Air inlet 6 Keypad 7 Interface panel 8 Power interface/switch Back/Bottom/Left 9 Air outlet 10 Remote controller receiver 11 Air inlet 12 Hoisting hole 13 Adjustment pin 14 Air outlet 3. - Page 7 Projector Warning indicator light Confirm key Temperature indicator light Focus key Power supply indicator light Zoom key Power supply key Lens displacement key OSD menu Custom key Signal selection Power switch Direction/selection key Remote controller...
- Page 8 Infrared (IR) remote control sensors are located at front/right/rear sides of the projector. When the remote controller is held, it is necessary to maintain an orthogonal angle between the remote controller and the infrared remote-control sensor within 30 degrees, so that the projector can work normally.
-
Page 9: Installation Of Projector
Open the battery cover as follows: Turn over the remote controller with the back facing up, press and hold the handle on the battery cover with your fingers, and push the battery cover according to the direction indicated by the arrow in figure. Open the battery cover. Take out the existing battery (if necessary), and then put in two AAA batteries according to the battery polarity indicated on the battery compartment. -
Page 10: Placement Method
You can choose the installation location according to your room layout or personal preference. Factors to be considered include: the size and location of the screen, the location of an appropriate power socket, and the location of the projector and other equipment as well as the distance between them. -
Page 11: Projection Size/Projection Distance Relation
Rear Ceiling When projection is carried out on the position, the projector shall be hung upside down on the ceiling behind the screen. Please pay attention that a dedicated rear projection screen and a kit for suspension installation of the projector on ceiling shall be prepared for this installation location. - Page 12 Shut down all equipment before any connection. Select the correct signal line for each signal source. Make sure the cable is firmly inserted. DP high-definition digital input interface D-SUB computer input HDMI high-definition digital input interface 16. D-SUB computer output DVI-D digital input interface RS232 input HD-BaseT input interface...
-
Page 13: Menu System
IV. Menu System Please pay attention that OSD (on screen display) menu will vary depending on the type of signal selected. 1. Basic Settings Menu First level Second level Third level Four level Options Language English/ Simplified Chinese/Traditional Chinese Menu display time Always display/10s/20s/30s/40s/50s/60s Upper left... -
Page 14: Advanced Setting Menu
2. Advanced Setting Menu First level Second level Third level Four level Options Color mode Highlight/Standard/Movie/Splicing Mode Brightness 0 - 100 Contrast ratio 0 - 100 Image scale Auto/4:3/16:6/16:9/16:10/2.35:1 HDMI format Auto/RGB/YUV HDMI setting HDMI range Auto/Normal/Enhanced Position Horizontal/Vertical -5 - 5 Zoom 0.8x - 2.0x Color... - Page 15 High altitude mode Invalid/valid Screen mode Invalid/valid Screen replacement Invalid/valid tips Screen prompt Screen mode 100/200/300/400/500 time Service time of 0 - 20000 Power settings screen Screen time Cancel/reset reset Direct startup Invalid/valid Automatic shutdown Invalid/valid Fast shutdown Invalid/valid Green mode Invalid/valid HDMI CEC Invalid/valid...
-
Page 16: Information Menu
3. Information Menu First level Second level Third level Four level Options VGA/BNC/DVI_D/DP/HDMI/HD- Signal source BASET/Composite Video/S-terminal Color mode Highlight/Standard/Movie/Splicing Mode Resolution ratio 1920x1080 60Hz Information menu Color system RGB/YUV IP address (optional) xxx.xxx.xxx.xxx MAC address (optional) xx.xx.xx.xx.xx.xx Firmware version Vx.xx 4. -
Page 17: Indicator Lights
V. Indicator Lights Projector status light Power light Warning light Temperature light The red light always goes Standby mode Close Close The blue light is tunned Non energy-saving on for 1s and tunned off Close Close standby mode for 5s. The blue light flashes Startup Close... - Page 18 waits for 2s. The blue light flashes The red light flashes The red light always DMD error twice for 1s and waits for once for 1s and waits goes on. for 2s. The blue light flashes The red light flashes The red light always DAD error twice for 1s and waits for...
-
Page 19: Product Specification
VI. Product Specification 1. Technical Indicators Optics Resolution ratio XGA: 1024*768 1080P: 1920*1080 WUXGA:1920*1200 Projection lens Standard lens: F = 2.0~2.95, f = 20.68~37.23mm, magnification = 1.8, and projection ratio = 1.4 ~ 2.52 (0.65 chip) alternative lens: TR: 0.65; TR: 0.8:1; TR:1.46-2.99; TR:2.9-4.7 Input interface VGA computer input 1 ( /15 pin) ×... -
Page 20: Overall Dimensions
Audio input (3.5mm) × 1, Remote controller receiver × 3 Control port RS232 serial interface (9 pins, male) input× 1, RS232 serial interface (9 pins, male) output× 1, 3D VESA× 1 Drive-by-wire remote controller (mini port) × 1 USB (TypeB) × 1 Environmental requirements Operating temperature = 0°C-40°C (at sea level) Operating relative humidity = 10%-90% (no condensing) -
Page 21: Suspended Ceiling Type Installation
3. Suspended Ceiling Type Installation Ceiling mounting screw: M6x6pcs (maximum screw-in depth of thread = 12 mm) - Page 22 Unit: mm Note: The contents of the user manual are subject to change without prior notice, and real objects shall prevail.
Need help?
Do you have a question about the DU7800 and is the answer not in the manual?
Questions and answers