
Subscribe to Our Youtube Channel
Summary of Contents for Ametek ORTEC 480
- Page 1 Model 480 Pulser Operating and Service Manual ® Printed in U.S.A. ORTEC Part No. 733390 0815 801 South Illinois Avenue Manual Revision C Oak Ridge, Tennessee 37830 United States of America...
- Page 2 Advanced Measurement Technology, Inc. ® ® a/k/a/ ORTEC , a subsidiary of AMETEK , Inc. WARRANTY ORTEC* warrants that the items will be delivered free from defects in material or workmanship. ORTEC makes no other warranties, express or implied, and specifically NO WARRANTY OF MERCHANTABILITY OR FITNESS FOR A PARTICULAR PURPOSE.
-
Page 3: Table Of Contents
CONTENTS WARRANTY..............SAFETY INSTRUCTIONS AND SYMBOLS. -
Page 4: Safety Instructions And Symbols
SAFETY INSTRUCTIONS AND SYMBOLS This manual contains up to three levels of safety instructions that must be observed in order to avoid personal injury and/or damage to equipment or other property. These are: DANGER Indicates a hazard that could result in death or serious bodily harm if the safety instruction is not observed. -
Page 5: Safety Warnings And Cleaning Instructions
SAFETY WARNINGS AND CLEANING INSTRUCTIONS DANGER Opening the cover of this instrument is likely to expose dangerous voltages. Disconnect the instrument from all voltage sources while it is being opened. WARNING Using this instrument in a manner not specified by the manufacturer may impair the protection provided by the instrument. -
Page 7: Description
ORTEC MODEL 480 PULSER 1. DESCRIPTION 1.1. GENERAL 1.2. BASIC FUNCTION The ORTEC 480 is a modular pulse generator provides output pulses that designed to simulate the detection of a nuclear characterized by a fast rise time and a slow particle reaction in a solid-state or scintillation exponential decay time. -
Page 8: Specifications
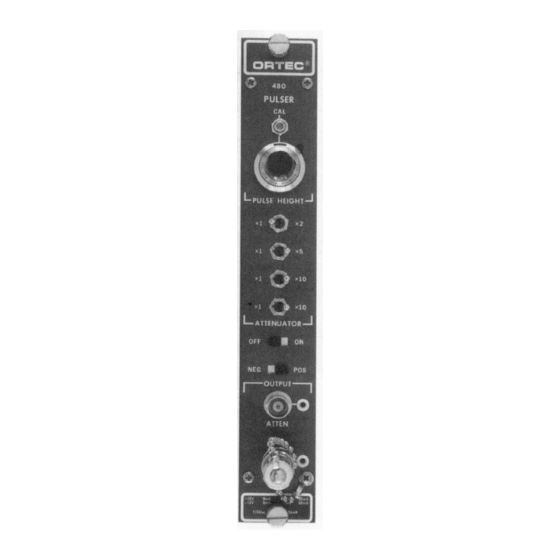
2. SPECIFICATIONS Neg/Pos Front panel slide switch, determines 2.1. PERFORMANCE polarity of the output signal. Temperature Stability 0.01%/ C, 0 to 50 C. 2.3. OUTPUTS Line Voltage Stability 0.005% per 10% change in line voltage. Atten Front panel BNC connector provides positive or negative dc-coupled output with an impedance of Ripple and Noise 0.003% of pulse amplitude. -
Page 9: Operation
feedback into the Power Supply, and these must be Always turn off the Bin Power Supply when inserting preserved in remote installations. Care must also be removing modules. The 4001/4002 has test exercised to avoid ground loops when the module is Points on the Power Supply control Panel to monitor operated outside the Bin. -
Page 10: Typical Operating Considerations
BNC connector CN2. This test point has a 470Ù 4. Set the pulser Pulse Height potentiometer at the series resistor connecting it to CN2. energy of the alpha particles striking the detector (e.g., for a 5.1-MeV alpha particle, set the dial at 510 4.4. - Page 11 the linear amplifier and biased amplifier gain and Using a Pulse Height Analyzer Probably the most bias level controls so that the energy is in a c onvenient method making resolution measurements is with a pulse height analyzer as convenient channel of the analyzer. shown by the setup illustrated in Fig.
- Page 12 Fig. 4.5. Measuring Linearity by the Null-Balance Method. 3. Then obtain the amplifier noise resolution spread ground via point C should be equal to the by measuring the FWHM of the pulser spectrum. impedance seen from point A to ac, or signal, The detector noise resolution spread for a given ground via point B.
-
Page 13: Maintenance
resolution of the null measurement. Pulser calibrated to read directly in terms of energy as described earlier in this section, the calibration of actual meas urement linearity a complete spectrometry system from preamplifier accomplished by dialing the Pulse Height dial to 0, to multichannel analyzer, i.e., analog to digital resulting in the amplifier output being reduced to converter (ADC), can readily be accomplished by... -
Page 14: Adjustment Of Decay Time Of Output Pulse
b. polarity switch to Pos, c. Cal set to full clockwise and Pulse Height control to 1000, d. all Attenuator switches set to X1 position, e. Direct Output terminated in 100Ù and kept terminated in 100Ù throughout the test. 2. Apply power to the Bin and listen for running of relay. -
Page 15: Suggestions For Troubleshooting
imperative that testing not be performed with any amplifier system until Pulser performs satisfactorily by itself. The testing instructions of Section 6.1 of this manual and the circuit description in Section 5 are intended to provide assistance in locating the region of trouble and repairing the malfunction. - Page 16 Bin/Module Connector Pin Assignments For Standard Nuclear Instrument Modules per DOE/ER-0457T. Function Function +3 V Reserved - 3 V Reserved Spare bus Reserved Reserved bus Spare Coaxial Spare Coaxial *28 +24 V Coaxial *29 - 24 V 200 V dc Spare bus Spare Spare...
Need help?
Do you have a question about the ORTEC 480 and is the answer not in the manual?
Questions and answers