Table of Contents
Advertisement
Advertisement
Table of Contents

Subscribe to Our Youtube Channel
Related Manuals for Hanna Instruments Edge HI2002


Summary of Contents for Hanna Instruments Edge HI2002
- Page 1 ®...
- Page 2 If you need additional technical information, do not hesitate to e‑mail us at tech@hannainst.com or view our worldwide contact list at www.hannainst.com. All rights are reserved. Reproduction in whole or in part is prohibited without the written consent of the copyright owner, Hanna Instruments Inc., Woonsocket, Rhode Island, 02895, USA.
-
Page 3: Table Of Contents
Included ..........................Safety Measures ......................... Description ......................... Diagram ..........................Product Diagram ......................Probe Diagram ......................Keypad Function ......................Guide to Indicators ..................... Setup/Installation ....................... Setting Up edge ....................® pH Electrode & Probe Connections ..................General Setup ......................Basic Mode ........................ Logging Function ....................... -
Page 4: Included
Remove the instrument from the packing material and examine it carefully to make sure that no damage has occurred during shipping. If there is any damage, please contact your local Hanna Instruments Office. Each instrument edge (HI2002) is supplied with: ®... -
Page 5: Description
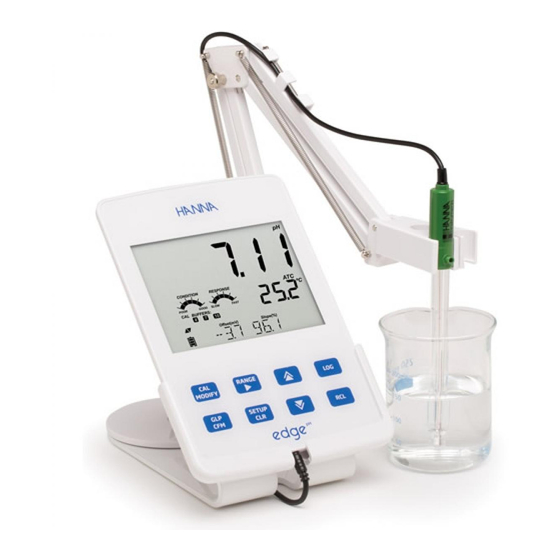
® pH parameters using the Hanna Instruments edge digital sensors for pH. Each digital sensors has ® pH a unique serial number. Once connected to the meter, the sensor(s) are ready to measure their parameter along with temperature. - Page 6 Liquid Crystal Display (LCD) Standard USB host connection for data Capacitive Touch Keypad transfer to a USB thumb‑drive 3 mm jack input for edge digital ® pH probes Top mounted ON/OFF button Micro USB device connection for power or PC interface...
-
Page 7: Probe Diagram
PROBE DIAGRAM Probe pH Electrode • Probes process signal directly for noise free measurements • Auto sensor recognition • Store calibration specific data from the last calibration • Are built with materials suitable for use in chemical analysis • Have integrated temperature measurement •... -
Page 8: Keypad Function
KEYPAD FUNCTION 1. CAL/MODIFY ‑ Used to enter and exit calibration mode. In SETUP, used to initiate changes of a configuration settinng. 2. GLP/CFM ‑ Used to display GLP calibration information. In SETUP, used to confirm change made. In calibration, used to accept calibration points 3. -
Page 9: Guide To Indicators
GUIDE TO INDICATORS Mode tags Third LCD line, message area Confirm tag 10. Labels USB connection status 11. Second LCD line, temperature pH electrode diagnostics measurement Probes symbol 12. Temperature units Battery symbol 13. Temp. Compensation status Arrow tags, displayed when they are 14. -
Page 10: Setup/Installation
SETTING UP edge ® pH The main operating modes of edge are setup, calibration, measurement, data logging, and data ® pH export. Follow this general outline of steps to get you started. The following topics are expanded upon in the sections that follow in this manual. Familiarize yourself with the design features of this unique meter. - Page 11 Slide edge into the cradle while positioning the probe cable behind the cradle. Put the ® pH probe/sensor into the electrode holder and secure cable in clips. Connect the power adapter cable to the rear socket of the bench cradle. Connect the other end to the power adapter and plug into line power.
- Page 12 Connect the power adapter cable to the bottom socket of the wall cradle. Connect the other end to the power adapter and plug into line power. Connect the 3 mm probe jack to the socket located at the bottom of edge ®...
-
Page 13: Electrode & Probe Connections
ELECTRODE & PROBE CONNECTIONS Connect the 3 mm probe jack to the probe input located on the bottom of edge . Make sure the ® pH probe is completely connected. If the probe is recognized, “CONNECTING” message is displayed along with sensor model. If the probe is not connected or not recognized, “NO PROBE”... -
Page 14: General Setup
GENERAL SETUP The following General Setup options are displayed regardless of the sensor being used. These settings remain when switching to another probe type or when no probe is attached. Options are tabulated in the table below with choices and default values. Options are accessed by pressing SETUP/CLR key. Loop through the options by using the keys. - Page 15 Option Description Choices Default Basic mode Used to save battery life by automatically turning off when no key 5, 10, 30, Set Auto Off press is detected for time set and meter 10 MIN Available 60 Min or Off is not in active logging or calibration mode.
-
Page 16: Basic Mode
BASIC MODE edge offers a basic operation mode that streamlines measurement configuration for pH ® pH measurements and is useful for many routine applications. Basic pH SETUP reduces parameter selection to the basic set. The meter limits calibration to 5 standard pH buffers: pH 6.86, 7.01, 4.01, 9.18 and 10.01 buffers. -
Page 17: Logging Function
LOGGING FUNCTION Each time an Interval log is initiated, a new lot is created. The maximum number of Interval lots that may be stored is 100. If a 101 lot is attempted, “MAX LOTS” will be displayed. Some lots will need to be deleted. - Page 18 A complete set of GLP information including date, time, range selection, temperature reading, calibration information and probe serial number is stored with each log made. Interval Logging Select Interval and sampling period in the SETUP menu (Not available in Basic mode). To start Interval logging, press the LOG key while the instrument is in measurement mode.
-
Page 19: Viewing Logged Data
Stability Logging Select Stability and choose measurement stability criteria in the SETUP menu. Only Stability Medium is available in Basic mode. To initiate the Stability log, press the LOG key while the instrument is in measurement. The “PLEASE WAIT” screen will be displayed briefly followed by a screen showing the stability tag, “LOG”... - Page 20 Press GLP/CFM key to enter inside lot information to view recorded data. Use the keys to toggle between different records. Use RANGE/ key to display GLP data including calibration information, date, time, etc. Press SETUP/CLR key then GLP/CFM key when deleting records or lots. Press RCL key to exit the logging type.
- Page 21 Select the Manual (Stability) lot and press SETUP/CLR key. The ”CLEAR” message will be displayed along with ”MANUAL” or “STABILITY” and “CFM” tag blinking on the LCD. Press the GLP/CFM key to confirm the deleting of the selected lot (MANUAL or STABILITY) or all records.
-
Page 22: Pc & Storage Interface
PC & STORAGE INTERFACE Logged data on edge can be transferred from the meter to a USB flash drive by using the log ® pH recall function. The minimum requirement for the drive is USB 2.0. Select the pH record you wish to export and follow the simple steps below. - Page 23 Logged data on the edge can be transferred from the meter to a PC by following these simple ® pH directions. Suitable operating systems include Windows (XP minimum), OS X or Linux. Connect edge to the PC using the supplied micro USB cable. ®...
-
Page 24: Operational Guide
BASIC VS STANDARD pH MODE The “Standard” pH operation includes up to a 5‑point buffer calibration, use of custom buffers, choice of displaying 0.001 pH resolution, use of the full diagnostic features of Calibration Check™ (that includes buffers used, probe condition, response time and messages indicating a contaminated buffer or pH sensor requiring maintenance during calibration). -
Page 25: Ph Meter Configurations
pH METER CONFIGURATIONS edge’s pH meter operation is configured by using the SETUP/CLR key with a pH probe connected to the meter. The parameter‑specific options will be seen inserted into the menu. If Basic mode is “On”, the pH parameter list will not be displayed. See Basic mode for a description of this operation before choosing how to SETUP the meter. -
Page 26: Ph Calibration
pH CALIBRATION Calibration in Standard Mode pH operation in standard mode offers full function of edge . This includes seven standard buffers ® pH and two custom ones. Five pH buffers may be used for calibration. The instrument should be recalibrated whenever: •... - Page 27 The custom buffers allow the user to calibrate in a buffer solution different from a standard one. Two custom buffers can be set in SETUP menu. See page 28 for more information about using custom buffers. The instrument will automatically skip custom buffers which are in a ±0.2 pH window of an already calibrated buffer.
- Page 28 When the reading is stable and close to the selected buffer, “CFM” tag will blink. Press GLP/CFM key to confirm calibration. Repeat procedure with additional pH buffers. A total of five pH buffers can be utilized. After confirming the last desired buffer calibration points, press CAL/MODIFY key (or if all five buffer values were calibrated) the instrument will automatically display “SAVING”...
- Page 29 First Calibration Point When performing a new calibration, or adding to an existing one, the user has a choice of how the first new calibration point will be treated in reference to the existing calibration point. This is selected in SETUP by the option FIRST CALIBRATION POINT. The two SETUP selectable options are “POINT” or “OFFSET”.
- Page 30 If the instrument is not calibrated the calibration history has been deleted, or it has been calibrated only at one point, the electrode condition and the electrode response gauges will be empty. For a continuous display of the electrode’s condition and response, daily calibration is necessary. This information can also be viewed in the GLP data.
- Page 31 The “ ” along with “STIR” tag will be displayed and “WAIT” will blink on the LCD until the reading is stable. When the reading is stable and close to the selected buffer, the “CFM” tag will blink. Press GLP/CFM key to confirm calibration. After confirming the first calibration point, the calibrated value will be displayed on the first LCD line and the second expected buffer value on the third LCD line.
-
Page 32: Calibration Messages
If the value measured by the instrument is not close to the selected buffer, “WRONG BUFFER” will blink. Check if the correct buffer has been used, or clean the electrode by following the Cleaning Procedure. If necessary, change the buffer or the electrode. If the buffer temperature exceeds the temperature limits of the buffer, “WRONG BUFFER TEMPERATURE”... - Page 33 Wrong Buffer This message appears when the difference between the pH reading and the value of the selected buffer is too great. If this error message is displayed, check if you have selected the proper calibration buffer and have poured the desired buffer. Wrong Old Points Inconsistency “WRONG OLD POINTS INCONSISTENCY”...
-
Page 34: Ph Glp Information
Bad Electrode “BAD ELECTRODE” appears if the cleaning procedure performed as a result of the above two messages is found to be unsuccessful. In this case it is advised to replace the electrode. Wrong Buffer Temperature “WRONG BUFFER TEMPERATURE” appears if the temperature of the buffer is outside the defined buffer temperature range. - Page 35 If calibration has not been performed, the instrument displays a blinking “NO CAL” message. After the calibration has been performed the instrument displays offset and slope. The GLP slope is the average of the calibration slopes; the percentage is referenced to the ideal slope value at 25 ºC. Additionally the condition and response indicators displayed are from the last calibration.
-
Page 36: Ph Measurement
If a buffer is not from the last calibration, the buffer tag will be displayed blinking. In Standard Mode, Condition and Response gauges are visible on the day of calibration (See Electrode Condition And Electrode Response Time page 29). If configured in SETUP, a countdown message displays the number of days remaining until a new Calibration is due. -
Page 37: Relative Mv Calibration
Error Messages During Measurement If the pH or temperature exceeds the limits of the sensor, the message “ELECTRODE OUT OF SPEC” will scroll on the third LCD line. The temperature will continue to be displayed. If temperature exceeds the meter specification of 120 ºC, then “120 ºC” will blink on the display. If interval logging, the message “OUT OF SPEC.”... - Page 38 Submerse the ORP electrode approximately 3 cm (1¼”) into the solution and stir gently. Press CAL/MODIFY key when the instrument is in RELATIVE mV measurement mode. The “CAL” tag will appear and the Absolute mV is displayed on the primary LCD line and “AbS” message on the secondary LCD line.
-
Page 39: Relative Mv Glp Information
Press GLP/CFM key to confirm the relative mV value. The display will show “SAVING“ and returns to measurement mode. Note: The relative mV value can be changed only inside the relative mV offset window (± 2000 mV). RELATIVE mV GLP INFORMATION Good Laboratory Practice (GLP) refers to a quality control function used to ensure uniformity of sensor calibrations and measurements. -
Page 40: Relative Mv Measurement
If disabled, “EXPIRATION WARNING DISABLED” is displayed. Or if enabled the number of days until the calibration alarm “CAL DUE” will be displayed. (i.e. “CAL EXPIRES IN 2 DAYS”) The number of days since the calibration expired. (i.e. “CAL EXPIRED 2 DAYS AGO”). - Page 41 The Relative mV value is displayed on the first LCD line and the temperature on the second LCD line. Using the keys, date, time, battery status and offset can be displayed on the third LCD line. If the reading is out of measurement range, the closest full scale value will be displayed blinking on the first LCD line.
-
Page 42: Maintenance
pH PROBE MAINTENANCE... - Page 43 Remove the protective cap of the pH electrode. DO NOT BE ALARMED IF SALT DEPOSITS ARE PRESENT. This is normal with electrodes. They will disappear when rinsed with water. During transport, tiny bubbles of air may form inside the glass bulb affecting proper functioning of the electrode.
- Page 44 This interference is called alkaline error and causes the pH to be underestimated. Hanna Instruments’s glass formulations have the indicated characteristics. Sodium Ion error for various glass types at ambient temperature: Alkali Error with 0.1 mol /L Na...
-
Page 45: Orp Probe Maintenance
ORP PROBE MAINTENANCE Remove the protective cap off the ORP electrode. Wash off any SALT DEPOSITS. This generally confirms the reference junction is free flowing. If the storage cap is dry, the reference junction may be dry also. Soak the electrode in HI70300 HI80300 storage solution for at least one hour. - Page 46 Storage Procedure To minimize clogging and ensure a quick response time, protect the ORP sensor by using the storage cap. Add a few drops of HI70300 storage solution to the cap to keep the reference junction wetted. Periodic Maintenance Inspect the sensor and cable. The cable used for connection to the edge must be intact and with no points of broken insulation.
-
Page 47: Troubleshooting Guide
Check the keyboard or contact your local Hanna displays all LCD tags stuck. Instruments Office. permanently. Instrument was not CAL “Prod” message at factory calibrated or Contact your local Hanna Instruments Office for help. startup. lost factory calibration. 47 47... -
Page 48: Specifications
pH, mV in pH, mV in ORP Temperature ‑2.00 to 16.00 pH ‑2.000 to 16.000 pH* Range ‑20.0 to 120.0 ºC ; ‑4.0 to 248.0 °F** ±1000.0 mV in pH ±2000.0 mV in ORP 0.01 pH 0.001 pH* Resolution 0.1 ºC; 0.1 ºF 0.1 mV in pH 0.1 mV in ORP ±0.01pH... - Page 49 Electrodes/Probes Triple ceramic, double junction, low temperature glass body, refillable pH HI10530 electrode with conical tip and temperature sensor Triple ceramic, double junction, high temperature glass body, refillable pH HI10430 electrode with temperature sensor HI11310 Glass body, double junction, refillable pH/temperature electrode Glass body, double junction, refillable pH/temperature electrode with HI11311 enhanced diagnostics...
-
Page 50: Accessories
HI8009L pH 9.18 Buffer Solution in FDA approved bottle, 500 mL HI8010L pH 10.01 Buffer Solution in FDA approved bottle, 500 mL Electrode Storage Solutions HI70300L Storage Solution, 500 mL HI80300L Storage Solution in FDA approved bottle, 500 mL Electrode Cleaning Solutions HI70000P Electrode Rinse Sachets, 20 mL (25 pcs.) HI7061L... - Page 51 Technical Service department and then send it with shipping costs prepaid. When shipping any instrument, make sure it is properly packed for complete protection. Hanna Instruments reserves the right to modify the design, construction or appearance of its products without advance notice.
- Page 52 World Headquarters Hanna Instruments Inc. Highland Industrial Park 584 Park East Drive Woonsocket, RI 02895 USA www.hannainst.com Local Office Hanna Instruments USA 270 George Washington Highway Smithfield, RI 02917 Phone: 800.426.6287 Fax: 401.765.7575 e‑mail: tech@hannainst.com MANEDGEPH Printed in ROMANIA...
Need help?
Do you have a question about the Edge HI2002 and is the answer not in the manual?
Questions and answers