PIONEER DJ DDJ-1000 Operating Instructions Manual
Dj controller
Hide thumbs
Also See for DDJ-1000:
- Operating instructions manual (33 pages) ,
- Firmware update manual (9 pages)
Table of Contents
Advertisement
Available languages
Available languages
Quick Links
DDJ-1000
pioneerdj.com/support/
rekordbox.com
For FAQs and other support information for this product, visit the above site.
Pour les FAQ et autres informations de support sur ce produit, consultez le site ci-dessus.
Häufig gestellte Fragen und weitere Support-Informationen für dieses Produkt finden Sie auf der oben
genannten Seite.
Per la sezione FAQ e altre informazioni di supporto per questo prodotto, visitare il sito indicato sopra.
Bezoek de bovenstaande website voor vaak gestelde vragen en andere informatie over ondersteuning voor dit
product.
Para consultar las preguntas más frecuentes y otras informaciones de asistencia para este producto, visite el
sitio indicado anteriormente.
Para obter informações sobre as FAQs e outras informações de apoio relativas a este produto, consulte o site
indicado acima.
О
а а
а а а
а
а а
а
.
Operating Instructions (Quick Start Guide)
Mode d'emploi (Guide de démarrage rapide)
Bedienungsanleitung (Kurzanleitung)
Istruzioni per l'uso (Guida di avvio veloce)
Handleiding (Snelstartgids)
Manual de instrucciones (Guía de inicio rápido)
Manual de instruções (Guia de início rápido)
И
(К а
DJ Controller
Contrôleur pour DJ
DJ Controller
DJ Controller
DJ Controller
Controlador DJ
Controlador para DJ
а а
а
а
а
.
)
Advertisement
Table of Contents

Related Manuals for PIONEER DJ DDJ-1000


Summary of Contents for PIONEER DJ DDJ-1000
- Page 1 DJ Controller Contrôleur pour DJ DJ Controller DDJ-1000 DJ Controller DJ Controller Controlador DJ Controlador para DJ pioneerdj.com/support/ rekordbox.com For FAQs and other support information for this product, visit the above site. Pour les FAQ et autres informations de support sur ce produit, consultez le site ci-dessus.
-
Page 2: Operating Environment
Thank you for buying this Pioneer product. Please read through these operating instructions so you will know how to operate your model properly. After you have finished reading the instructions, put them away in a safe place for future reference. In some countries or regions, the shape of the power plug and power outlet may sometimes differ from that shown in the explanatory drawings. -
Page 3: Before Start
Before start How to read this manual Viewing the manuals ! Thank you for purchasing this Pioneer DJ product. This manual provides brief descriptions of the connection between the unit and your computer, and the audio output. For more instruc-... -
Page 4: Preparing Rekordbox
rekordbox Preparing rekordbox ! rekordbox Install the software by following the procedure below when you use rekordbox is music management software for DJs to prepare tracks rekordbox for the first time or if you are using rekordbox 4.x or an earlier and perform DJ play. -
Page 5: Part Names
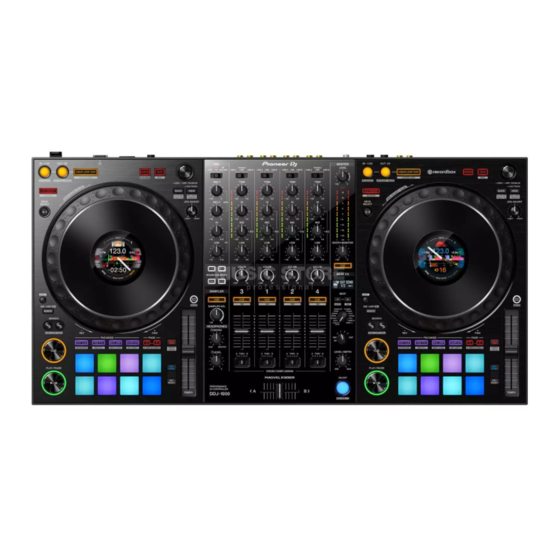
Part names For details on the buttons and controls, see Part names and functions in the Operating Instructions. 1 Browser section 3 Mixer section 2 Deck sections Browser section 1 Rotary selector 2 BACK button 3 VIEW button... -
Page 6: Deck Sections
Deck sections The deck sections are used to control the four decks. The buttons and controls for operating decks 1 and 3 are located on the left side of the controller, and those for operating decks 2 and 4 are located on the right side of the controller. 1 Jog dial display section m DECK selector button 2 Jog dial... -
Page 7: Mixer Section
Mixer section 1 Microphone indicator n MIC1 LEVEL control 2 OFF, ON, TALK OVER selector switch o Channel level indicator 3 USB A, PHONO/LINE, USB B selector switch p TRIM control 4 USB A, LINE, USB B selector switch q EQ (HI, MID, LOW) control 5 MASTER LEVEL control r COLOR control 6 CLIP indicator... -
Page 8: Rear Panel
Rear panel 1 Kensington security slot 9 USB terminals (USB B) 2 MASTER 1 output terminal a USB terminals (USB A) 3 MASTER 2 output terminal b MIC2 input terminals 4 BOOTH output terminals c MIC1 input terminals 5 SIGNAL GND terminal d u switch This switch is used to switch between standby and on. -
Page 9: Operation
Operation ! Connect the power cord to a power outlet after all the connections are completed. Turn off this unit and disconnect the power cord from the power outlet before connecting components or changing the connections. Refer to the operating instructions for the components to be connected. ! Be sure to use the included power cord and AC adapter. -
Page 10: Connecting Output Terminals
Connecting output terminals Rear panel Component, amplifier, powered speaker, etc. Power amplifier, Power amplifier powered speakers, etc. (for booth monitor), powered speakers, etc. Front panel Headphones Be sure to use the [MASTER 1] output terminals for a balanced output. If they are connected to an unbalanced input (such as RCA) using an XLR to RCA converter cable (or converter adapter), etc., the sound quality may be lowered or noise may occur. - Page 11 For more information on how to use this product with rekordbox dj, 5 Connect the AC adapter. refer to this product's Operating Instructions that is available on the Pioneer DJ site. To power outlet 1 Connect headphones to the [PHONES] output terminals.
-
Page 12: Starting The System
For Windows [Audio]: [DDJ-1000 ASIO] [Output channels]: [Master Output]: [DDJ-1000 ASIO: MASTER] [Headphones Output]: [DDJ-1000 ASIO:HEADPHONE] ! If PC MASTER OUT is enabled, the “+ Name of audio device in computer” information will also be displayed after [MASTER] of the [Master Output] item in the [Audio] settings. -
Page 13: Playing A Music File
2 Press the [PLAY/PAUSE f] button to play the track. Playing a music file The following describes the procedure for outputting the sound of deck 1 (left side) as an example. 3 Rotate the [TRIM] control. Adjust the [TRIM] control to confirm that the channel level indicator lights up in orange at the highest volume. -
Page 14: Additional Information
! For details on changing the settings of this unit, see Changing the settings in the Operating Instructions. ! Pioneer DJ is a trademark of the PIONEER CORPORATION and is used under license. rekordbox and KUVO are trademarks or regis- tered trademarks of the Pioneer DJ Corporation. -
Page 15: Specifications
— The specifications and design of this product are subject to Specifications change without notice. ! © 2017 Pioneer DJ Corporation. All rights reserved. AC adapter Power requirements ........AC 220 V to 240 V, 50 Hz/60 Hz Rated current ..................0.9 A Rated output ................ -
Page 16: Milieu De Fonctionnement
Nous vous remercions d’avoir acquis un produit Pioneer. Veuillez lire attentivement ce mode d’emploi afin de connaître la manière d’utiliser l’appareil comme il convient. Cela fait, conservez le mode d’emploi de façon à pouvoir vous y référer en cas de nécessité. Dans certains pays ou certaines régions, la forme de la fiche et de la prise d’alimentation est un peu différente de ce qui est montré... -
Page 17: Informations Préliminaires
Informations préliminaires Comment lire ce manuel Affichage des manuels ! Merci d’avoir acheté ce produit Pioneer DJ. Ce manuel décrit brièvement le branchement entre l’appareil et votre ordinateur, et de la sortie audio. Pour plus d’instructions sur l’utilisa- Affichage du mode d’emploi de cet tion de ce produit, consultez le mode d’emploi de ce produit. - Page 18 rekordbox Préparation de rekordbox ! rekordbox Installez le logiciel en procédant de la façon suivante lorsque vous utili- rekordbox est un logiciel de gestion musicale permettant aux DJ de sez rekordbox pour la première fois ou si vous utilisez rekordbox 4.x ou préparer des morceaux et d’exécuter des prestations DJ.
-
Page 19: Noms Des Éléments
Noms des éléments Pour des instructions détaillées sur les touches et commandes, reportez-vous à Noms des éléments et fonctions dans le mode d’emploi. 1 Section d’exploration 3 Section Mixeur 2 Sections Platines Section d’exploration 1 Sélecteur rotatif 2 Touche BACK 3 Touche VIEW... - Page 20 Sections Platines Les sections Platines permettent de contrôler les quatre platines. Les touches et commandes d’utilisation des platines 1 et 3 se trouvent sur le côté gauche du contrôleur, et celles des platines 2 et 4 se trouvent sur le côté droit du contrôleur. 1 Section d’affichage de la molette jog m Touche de sélecteur DECK 2 Molette jog...
-
Page 21: Section Mixeur
Section Mixeur 1 Indicateur du microphone n Commande MIC1 LEVEL 2 Sélecteur OFF, ON, TALK OVER o Indicateur de niveau de canal 3 Sélecteur USB A, PHONO/LINE, USB B p Commande TRIM 4 Sélecteur USB A, LINE, USB B q Commande EQ (HI, MID, LOW) 5 Commande MASTER LEVEL r Commande COLOR 6 Indicateur CLIP... -
Page 22: Panneau Arrière
Panneau arrière 1 Fente de sécurité Kensington 9 Prises USB (USB B) 2 Prise de sortie MASTER 1 a Prises USB (USB A) 3 Prise de sortie MASTER 2 b Prises d’entrée MIC2 4 Prises de sortie BOOTH c Prises d’entrée MIC1 5 Prise SIGNAL GND d Commutateur u Sert à... -
Page 23: Exemple De Raccordements
Fonctionnement ! Branchez le cordon d’alimentation à une prise électrique lorsque tous les raccordements sont terminés. Éteignez cet appareil et débranchez le cordon d’alimentation de la prise électrique avant de raccorder des appareils ou de changer les branchements. Reportez-vous au mode d’emploi des appareils à raccorder. ! Veillez à... - Page 24 Raccordement des prises de sortie Panneau arrière Composants, amplificateurs, enceintes alimentées, etc. Amplificateur de puissance, Amplificateur de puissance enceintes amplifiées, etc. (pour le moniteur de cabine), enceintes amplifiées, etc. Face avant Casque Veillez à utiliser les prises de sortie [MASTER 1] pour une sortie symétrique.
-
Page 25: Raccordez L'adaptateur Secteur
Pour plus d’informations sur l’utilisation de ce produit avec 5 Raccordez l’adaptateur secteur rekordbox dj, reportez-vous au mode d’emploi du produit qui est dispo- nible sur le site de Pioneer DJ. À une prise d’ alimentation 1 Raccordez le casque aux prises de sortie [PHONES]. - Page 26 Pour Windows [Audio] : [DDJ-1000 ASIO] [Voies de sortie] : [Master Output] : [DDJ-1000 ASIO : MASTER] [Headphones Output] : [DDJ-1000 ASIO :HEADPHONE] ! Si PC MASTER OUT est activé, les informations “+ Nom du dispositif audio sur l’ordinateur” seront également affichées après [MASTER] de l’élément [Master Output] dans les réglages [Audio].
-
Page 27: Fermeture Du Système
2 Appuyez sur la touche [PLAY/PAUSE f] pour lire le Lecture d’un fichier de musique morceau. La restitution du son de la platine 1 (à gauche) par exemple s’effectue de la façon suivante. 3 Tournez la commande [TRIM]. Réglez la commande [TRIM] pour vérifier que l’indicateur de niveau de canal s’allume en orange au volume maximum. -
Page 28: Informations Supplémentaires
“En cas de panne” dans le mode d’em- États-Unis et dans d’autres pays. ploi de cet appareil et accédez au site de support Pioneer DJ puis ! Mac, macOS, OS X et Finder sont des marques commer- consultez [FAQ]. -
Page 29: Spécifications
! © 2017 Pioneer DJ Corporation. Tous droits de reproduction et de Spécifications traduction réservés. Adaptateur secteur Alimentation ..........CA 220 V à 240 V, 50 Hz/60 Hz Courant nominal ..................0,9 A Sortie nominale ................CC 12 V, 3 A Consommation (en veille) .............. - Page 30 Vielen Dank, dass Sie sich für dieses Pioneer-Produkt entschieden haben. Bitte lesen Sie diese Bedienungsanleitung gründlich durch, um sich mit der Bedienung des Geräts vertraut zu machen. Nachdem Sie die Bedienungsanleitung gelesen haben, legen Sie sie griffbereit zum Nachschlagen ab. In manchen Ländern oder Regionen können sich die Formen von Netzstecker und Netzsteckdose von denen in den Erklärungszeichnungen unterschei- den.
-
Page 31: Vor Der Inbetriebnahme
Vor der Inbetriebnahme Zum Lesen dieser Anleitung Anzeige der Anleitungen ! Vielen Dank, dass Sie sich für dieses Pioneer DJ-Produkt entschie- den haben. Diese Anleitung enthält kurze Beschreibungen der Verbindung Anzeigen der Bedienungsanleitung für zwischen dem Gerät und Ihrem Computer sowie der Audioausgabe. - Page 32 rekordbox Einrichten von rekordbox ! rekordbox Installieren Sie die Software bei der erstmaligen Verwendung von rekord- Bei rekordbox handelt es sich um eine Musikverwaltungssoftware für box oder bei Verwendung von rekordbox 4.x oder einer früheren Version DJs für die Vorbereitung von Tracks und für DJ-Auftritte. wie unten beschrieben.
-
Page 33: Bezeichnungen Der Teile
Bezeichnungen der Teile Details zu den Tasten und Reglern finden Sie in der Bedienungsanleitung unter Teilebezeichnungen und Funktionen. 1 Browser-Sektion 3 Mixer-Sektion 2 Deck-Sektionen Browser-Sektion 1 Drehregler 2 BACK-Taste 3 VIEW-Taste... - Page 34 Deck-Sektionen Die Deck-Sektionen dienen zur Steuerung der vier Decks. Die Tasten und Regler für die Bedienung der Decks 1 und 3 befinden sich auf der linken Seite des Controllers und die für die Bedienung der Decks 2 und 4 befinden sich auf der rechten Seite des Controllers. 1 Jog-Dial-Anzeige-Abschnitt m DECK-Wahltaste 2 Jog-Scheibe...
- Page 35 Mixer-Sektion 1 Mikrofonanzeige n MIC1 LEVEL-Regler 2 OFF, ON, TALK OVER-Wahlschalter o Kanalpegelanzeige 3 USB A, PHONO/LINE, USB B-Wahlschalter p TRIM Regler 4 USB A, LINE, USB B-Wahlschalter q EQ-Regler (HI, MID, LOW) 5 MASTER LEVEL Regler r COLOR-Regler 6 CLIP-Anzeige s CUE-Kopfhörertaste 7 Master-Pegelanzeige t Kanalfader...
- Page 36 Rückseite 1 Kensington-Diebstahlsicherung 9 USB-Buchsen (USB B) 2 MASTER 1-Ausgangsbuchse a USB-Buchsen (USB A) 3 MASTER 2-Ausgangsbuchse b MIC2-Eingangsbuchsen 4 BOOTH-Ausgangsbuchsen c MIC1-Eingangsbuchsen 5 SIGNAL GND-Buchse d u Schalter Dies schaltet die Stromversorgung dieses Geräts zwischen ein und 6 LINE/PHONO-Schalter Standby um.
-
Page 37: Bedienung
Bedienung ! Schließen Sie den Netzstecker an die Netzsteckdose an, nachdem Sie alle Anschlüsse hergestellt haben. Schalten Sie das Gerät aus und ziehen Sie das Netzkabel aus der Steckdose, bevor Sie Komponenten anschließen oder Anschlüsse ändern. Beachten Sie die Bedienungsanleitungen der angeschlossenen Komponenten. ! Verwenden Sie immer das mitgelieferte Netzkabel und Netzteil. -
Page 38: Anschließen Der Ausgangsbuchsen
Anschließen der Ausgangsbuchsen Rückseite Komponenten, Verstärker, aktive Lautsprecher usw. Endstufenverstärker, Endstufenverstärker aktive Lautsprecher usw. (für einen Kabinenmonitor), aktive Lautsprecher usw. Frontplatte Kopfhörer Achten Sie für eine symmetrische Ausgabe darauf, die [MASTER 1]-Ausgangsbuchsen zu verwenden. Beim Anschluss an einen unsymmetrischen Eingang (wie zum Beispiel Cinch) mit einem XLR/Cinch-Wandlerkabel (oder Wandleradapter) usw. - Page 39 Weitere Informationen zur Verwendung dieses Produkts mit rekord- 5 Schließen Sie das Netzteil an box dj finden Sie in der Bedienungsanleitung des Produkts, die auf der Pioneer DJ-Website verfügbar ist. Netzsteckdose 1 Schließen Sie Kopfhörer an die [PHONES]- Ausgangsbuchsen an.
-
Page 40: Starten Des Systems
[Headphones Output]: [DDJ-1000: HEADPHONE] Für Windows [Audio]: [DDJ-1000 ASIO] [Ausgangskanäle]: [Master Output]: [DDJ-1000 ASIO: MASTER] [Headphones Output]: [DDJ-1000 ASIO:HEADPHONE] ! Wenn PC MASTER OUT aktiviert ist, werden die Informationen “+ Name des Audiogeräts im Computer” auch nach [MASTER] des Punkts [Master Output] in den [Audio]-Einstellungen angezeigt. -
Page 41: Ausschalten Des Systems
2 Drücken Sie die [PLAY/PAUSE f]-Taste zum Abspielen einer Musikdatei Abspielen des Tracks. Das folgende Beispiel beschreibt das Verfahren zur Ausgabe von Sound von Deck 1 (linke Seite). 3 Drehen Sie den [TRIM]-Regler. Stellen Sie den [TRIM]-Regler ein, um zu bestätigen, dass die Kanalpegelanzeige bei der höchsten Lautstärke orange leuchtet. -
Page 42: Zusätzliche Informationen
Markenzeichen oder eingetragene Markenzeichen der Pioneer DJ Corporation. Störungssuche ! rekordbox ist eine Marke oder eingetragene Marke der Pioneer DJ Corporation. ! Windows ist ein eingetragenes Markenzeichen der Microsoft ! Wenn Sie den Eindruck haben, dass eine Störung dieses Geräts vor- Corporation in den USA und anderen Ländern. -
Page 43: Technische Daten
! © 2017 Pioneer DJ Corporation. Alle Rechte vorbehalten. Technische Daten Netzteil Stromanforderungen ..220 V bis 240 V Wechselspannung, 50 Hz/60 Hz Nennstrom ..................... 0,9 A Nenn-Ausgang .............Gleichspannung 12 V, 3 A Leistungsaufnahme (Standby) ............. 0,4 W Allgemein – Haupteinheit Leistungsaufnahme ............ -
Page 44: Condizioni Ambientali Di Funzionamento
Vi ringraziamo per avere acquistato questo prodotto Pioneer. Vi preghiamo di leggere queste queste istruzioni per l’uso in modo da sapere usare corret- tamente il proprio modello. Dopo aver letto queste istruzioni, riporle in un luogo sicuro per poterle consultare di nuovo al momento del bisogno. In alcuni paesi o regioni, la forma della spina di alimentazione e della presa di corrente possono non essere quelle delle illustrazioni. -
Page 45: Prima Di Cominciare
Prima di cominciare Come leggere questo manuale Visualizzazione dei manuali ! Vi ringraziamo per avere acquistato questo prodotto Pioneer DJ. Questo manuale fornisce brevi descrizioni relative ai collegamenti tra l’unità, il computer e l’uscita audio. Per ulteriori istruzioni sull’uso Visualizzazione delle Istruzioni per l’uso di questo prodotto, vedere le Istruzioni per l’uso di questo prodotto. -
Page 46: Installazione Di Rekordbox
rekordbox Preparazione di rekordbox ! rekordbox Quando si utilizza rekordbox per la prima volta o se si utilizza rekordbox rekordbox è un software di gestione musicale per DJ che consente di 4.x o versione precedente, installare il software seguendo la procedura preparare i brani ed eseguire performance DJ. -
Page 47: Nome Delle Varie Parti
Nome delle varie parti Per i dettagli sulle funzioni dei pulsanti e dei controlli, vedere Nomi delle parti e funzioni nelle istruzioni per l’uso. 1 Sezione browser 3 Sezione mixer 2 Sezioni deck Sezione browser 1 Manopola selettrice 2 Pulsante BACK 3 Pulsante VIEW... - Page 48 Sezioni deck Le sezioni deck sono utilizzate per controllare i quattro deck. I pulsanti e i controlli utilizzati per i deck 1 e 3 si trovano sulla sinistra del controller, quelli per i deck 2 e 4 sulla destra. 1 Sezione display della manopola m Selettore DECK 2 Jog dial n Pulsante SLIP REVERSE...
-
Page 49: Sezione Mixer
Sezione mixer 1 Indicatore del microfono n Comando MIC1 LEVEL 2 Selettore OFF, ON, TALK OVER o Indicatore del livello del canali 3 Selettore USB A, PHONO/LINE, USB B p Controllo TRIM 4 Selettore USB A, LINE, USB B q Comando EQ (HI, MID, LOW) 5 Controllo MASTER LEVEL r Controllo COLOR 6 Indicatore CLIP... -
Page 50: Pannello Posteriore
Pannello posteriore 1 Slot di sicurezza Kensington 9 Terminali USB (USB B) 2 Terminale di uscita MASTER 1 a Terminali USB (USB A) 3 Terminale di uscita MASTER 2 b Terminali di ingresso MIC2 4 Terminali di uscita BOOTH c Terminali di ingresso MIC1 5 Terminale SIGNAL GND d Interruttore u Attiva o porta in standby questa unità. -
Page 51: Esempio Di Collegamenti
Impiego ! Collegare il cavo di alimentazione alla presa di corrente dopo che tutti i collegamenti sono stati completati. Spegnere questa unità e scollegare il cavo di alimentazione dalla presa di corrente prima di collegare i componenti o modificare i collegamenti. Vedere le istruzioni per l’uso dei componenti da collegare. -
Page 52: Collegamento Dei Terminali Di Uscita
Collegamento dei terminali di uscita Pannello posteriore Componenti, amplificatori, diffusori attivi, ecc. Amplificatore di potenza, Amplificatore di potenza diffusori autoalimentati, ecc. (di monitoraggio in cabina), diffusori autoalimentati, ecc. Pannello anteriore Cuffia Accertarsi di utilizzare i terminali di uscita [MASTER 1] per un’uscita bilanciata. - Page 53 Collegamenti Per ulteriori informazioni sull’uso di questo prodotto con rekordbox dj, 5 Collegare l’adattatore di CA vedere le Istruzioni per l’uso disponibili sul sito Pioneer DJ. Ad una presa 1 Collegare le cuffie ai terminali di uscita [PHONES]. Cavo di...
-
Page 54: Avvio Del Sistema
[Headphones Output]: [DDJ-1000: HEADPHONE] In Windows [Audio]: [DDJ-1000 ASIO] [Canali di uscita]: [Master Output]: [DDJ-1000 ASIO: MASTER] [Headphones Output]: [DDJ-1000 ASIO:HEADPHONE] ! Se è attivata l’uscita PC MASTER OUT, vengono visualizzate anche le informazioni “+ Nome del dispositivo audio del computer” dopo [MASTER] della voce [Master Output] nelle impostazioni [Audio]. -
Page 55: Riproduzione Di Un File Musicale
2 Premere il pulsante [PLAY/PAUSE f] per riprodurre Riproduzione di un file musicale il brano. Di seguito viene descritta come esempio la procedura per trasmettere il segnale audio dal deck 1 (sinistro). 3 Ruotare il comando [TRIM]. Regolare il controllo [TRIM] per verificare che l’indicatore di livello del canale si illumini in arancione al volume massimo. -
Page 56: Informazioni Aggiuntive
Marchi e marchi registrati ! Per istruzioni dettagliate sulla modifica delle impostazioni dell’unità, ! “Pioneer DJ” è un marchio di PIONEER CORPORATION e viene ripor- vedere Modifica delle impostazioni nelle istruzioni per l’uso. tato su licenza. rekordbox e KUVO sono marchi di fabbrica o marchi di fabbrica depositati della Pioneer DJ Corporation. -
Page 57: Dati Tecnici
! © 2017 Pioneer DJ Corporation. Tutti i diritti riservati. Dati tecnici Adattatore di CA Requisiti di alimentazione ....... CA da 220 V a 240 V, 50 Hz/60 Hz Corrente dichiarata ................0,9 A Uscita dichiarata .................CC 12 V, 3 A Consumo di corrente (in attesa) ............ - Page 58 Hartelijk dank voor uw aankoop van dit Pioneer product. Lees deze gebruiksaanwijzing aandachtig door om bekend te raken met de juiste bediening van uw apparaat. Na het doorlezen van de gebruiksaanwijzing dient u deze te bewaren op een veilige plaats, voor latere naslag. In bepaalde landen of gebieden kan de vorm van de netsnoerstekker en het stopcontact verschillen van de afbeeldingen bij de onderstaande uitleg.
-
Page 59: Alvorens Te Beginnen
Alvorens te beginnen Opmerkingen over deze handleiding De handleidingen raadplegen ! Hartelijk dank voor uw aankoop van dit Pioneer DJ product. In deze handleiding vindt u korte beschrijvingen van de verbinding tussen het toestel en uw computer en de audio-uitgang. Raadpleeg... - Page 60 rekordbox rekordbox voorbereiden ! rekordbox Installeer de software aan de hand van de onderstaande procedure rekordbox is muziekbeheersoftware voor DJ’s om muziekstukken wanneer u rekordbox voor het eerst gebruikt of als u gebruik maakt van voor te bereiden en als DJ op te treden. rekordbox 4.x of een eerdere versie.
-
Page 61: Benaming Van De Onderdelen
Benaming van de onderdelen Raadpleeg Overzicht van de bedieningstoetsen in de gebruiksaanwijzing voor informatie over de toetsen en instellingen. 1 Bladergedeelte 3 Mengpaneel-gedeelte 2 Deckgedeelten Bladergedeelte 1 Draaiknop 2 BACK-toets 3 Toets VIEW... - Page 62 Deckgedeelten Met de deckgedeelten worden de vier decks bediend. De toetsen en instellingen voor de bediening van decks 1 en 3 bevinden zich aan de linkerzijde van de controller en die voor de bediening van decks 2 en 4 aan de rechterzijde van de controller. 1 Instelknop-aanduidingsdeel m Keuzetoets DECK 2 Jog-draaiknop...
- Page 63 Mengpaneel-gedeelte 1 Microfoonindicator n Regelaar MIC1 LEVEL 2 OFF, ON, TALK OVER-keuzeschakelaar o Kanaalniveau-aanduiding 3 USB A, PHONO/LINE, USB B-keuzeschakelaar p TRIM-instelling 4 USB A, LINE, USB B-keuzeschakelaar q Bedieningselement EQ (HI, MID, LOW) 5 MASTER LEVEL instelling r COLOR instelling 6 Indicator CLIP s Hoofdtelefoon CUE knop 7 Hoofdniveau-aanduiding...
- Page 64 Achterpaneel 1 Kensington-beveiligingsgleuf 9 USB-aansluitingen (USB B) 2 MASTER 1-uitgangsaansluiting a USB-aansluitingen (USB A) 3 MASTER 2-uitgangsaansluiting b Ingangsaansluitingen MIC2 4 BOOTH-uitgangsaansluitingen c Ingangsaansluitingen MIC1 5 SIGNAL GND-aansluiting d u-schakelaar Hiermee wordt dit toestel aan en uit gezet. 6 LINE/PHONO-schakelaar e DC IN-aansluiting 7 Ingangsaansluitingen LINE/PHONO f Snoerhaak DC...
- Page 65 Bediening ! Steek de stekker pas in het stopcontact nadat alle aansluitingen zijn voltooid. Zet dit toestel uit en haal het stroomsnoer uit het stopcontact voordat u componenten aansluit of aansluitingen wijzigt. Raadpleeg de bedieningshandleiding voor de aan te sluiten componenten. ! Gebruik uitsluitend het netsnoer en de netstroomadapter die bij het toestel zijn geleverd.
- Page 66 Aansluiten van uitgangsaansluitingen Achterpaneel Apparatuur, versterkers, luidsprekers met eigen stroomvoorziening enz. Eindversterker, Eindversterker luidsprekers met eigen (voor de booth monitor), stroomvoorziening enz. luidsprekers met eigen stroomvoorziening enz. Voorpaneel Hoofdtelefoon Gebruik de uitgangsaansluitingen [MASTER 1] voor een gebalan- ceerde uitgang. Bij aansluiting op een ongebalanceerde signaalbron (bijv.
- Page 67 Aansluitingen Raadpleeg de bedieningshandleiding voor dit product, beschikbaar op 5 Sluit de netstroomadapter aan de website van Pioneer DJ, voor meer informatie over het gebruik van dit product met rekordbox dj. Naar stopcontact 1 Sluit een hoofdtelefoon aan op de uitgangsaansluitingen [PHONES].
-
Page 68: Opstarten Van Het Systeem
[Headphones Output]: [DDJ-1000: HEADPHONE] Voor Windows [Audio]: [DDJ-1000 ASIO] [Uitgangskanalen]: [Master Output]: [DDJ-1000 ASIO: MASTER] [Headphones Output]: [DDJ-1000 ASIO:HEADPHONE] ! Als PC MASTER OUT is ingeschakeld, wordt de informatie “+ Naam van audioapparaat in computer” ook weergegeven na [MASTER] van het item [Master Output] in de instellingen [Audio]. -
Page 69: Het Systeem Uitschakelen
2 Druk op de toets [PLAY/PAUSE f] om het Een muziekbestand afspelen muziekstuk af te spelen. Hieronder wordt als voorbeeld de procedure beschreven voor het weer- geven van het geluid van deck 1 (linkerzijde). 3 Draai aan de [TRIM]-regelaar. Pas de [TRIM]-instelling aan zodat de oranje kanaalniveau-aanduiding alleen bij het piekniveau oplicht. -
Page 70: Aanvullende Informatie
! Zie Instellingen aanpassen in de Handleiding voor gedetailleerde instructies over het wijzigen van instellingen van dit toestel. ! Pioneer DJ is een handelsmerk van PIONEER CORPORATION en wordt in licentie gebruikt. rekordbox en KUVO zijn handelsmerken of geregistreerde handelsmerken van de Pioneer DJ Corporation. - Page 71 — De technische gegevens en het ontwerp van dit product kunnen Specificaties vanwege voortgaande verbetering zonder voorafgaande kennis- geving worden gewijzigd. ! © 2017 Pioneer DJ Corporation. Alle rechten voorbehouden. Netstroomadapter Stroomvereisten ......220 V tot 240 V wisselstroom, 50 Hz/60 Hz Opgegeven stroomsterkte ..............0,9 A Opgegeven uitgangsvermogen .........
-
Page 72: Entorno De Funcionamiento
Le damos las gracias por la adquisición de este producto Pioneer. Lea a fondo estas instrucciones de utilización para que aprenda a utilizar correcta- mente su modelo. Después de haber terminado de leer estas instrucciones, guárdelas en un lugar seguro para, en caso de ser necesario, consultarlas en el futuro. -
Page 73: Antes De Empezar A Usar La Unidad
3 Haga clic en [Tutoriales, manuales y documentación]. y de hardware que se describen en este manual se basan en el pro- ducto que todavía está en desarrollo y pueden diferir de las especifi- 4 Haga clic en [DDJ-1000] en la categoría caciones finales. [CONTROLADORES DJ]. - Page 74 rekordbox Preparación de rekordbox ! rekordbox Siga el procedimiento que se indica a continuación para instalar el rekordbox es el software de gestión de música que permite a los DJ software cuando utilice rekordbox por primera vez o bien si está usando preparar pistas y realizar actuaciones de DJ.
-
Page 75: Nombres De Las Partes
Nombres de las partes Para obtener más información sobre los botones y los controles, consulte Nombres de las partes y funciones en el Manual de instrucciones. 1 Sección del navegador 3 Sección de mezclador 2 Secciones del deck Sección del navegador 1 Selector giratorio 2 Botón BACK 3 Botón VIEW... -
Page 76: Botón Cue
Secciones del deck Las secciones del deck se utilizan para controlar los cuatro decks. Los botones y los controles para utilizar los decks 1 y 3 se encuentran en el lado izquierdo del controlador y los que controlan los decks 2 y 4 se encuentran en el lado derecho del controlador. 1 Sección de visualización del dial jog m Botón selector DECK 2 Dial jog... - Page 77 Sección de mezclador 1 Indicador de micrófono n Control MIC1 LEVEL 2 Conmutador selector OFF, ON, TALK OVER o Indicador de nivel de canal 3 Conmutador selector USB A, PHONO/LINE, USB B p Control TRIM 4 Conmutador selector USB A, LINE, USB B q Control EQ (HI, MID, LOW) 5 Control MASTER LEVEL r Control COLOR...
-
Page 78: Panel Trasero
Panel trasero 1 Ranura de seguridad Kensington 9 Terminales USB (USB B) 2 Terminal de salida MASTER 1 a Terminales USB (USB A) 3 Terminal de salida MASTER 2 b Terminales de entrada MIC2 4 Terminales de salida BOOTH c Terminales de entrada MIC1 5 Terminal SIGNAL GND d Conmutador u Esto cambia la alimentación de la unidad entre conectada y espera. -
Page 79: Operación
Operación ! Conecte el cable de alimentación a una toma de corriente cuando se hayan completado todas las conexiones. Apague esta unidad y desconecte el cable de alimentación de la toma de corriente antes de conectar componentes o cambiar las conexiones. Consulte el manual de instrucciones de los componentes que se van a conectar. -
Page 80: Conexión De Terminales De Salida
Conexión de terminales de salida Panel trasero Componentes, amplificadores, altavoces con amplificador, etc. Amplificador de potencia, Amplificador de potencia altavoces activos, etc. (para monitor de cabina), altavoces activos, etc. Panel frontal Auriculares Asegúrese de utilizar los terminales de salida [MASTER 1] para una salida equilibrada. - Page 81 Para obtener más información sobre cómo usar este producto con 5 Conecte el adaptador de CA rekordbox dj, consulte el Manual de instrucciones de este producto, que está disponible en el sitio de Pioneer DJ. A la toma de corriente 1 Conecte los auriculares a los terminales de salida [PHONES].
-
Page 82: Inicio Del Sistema
Para Windows [Audio]: [DDJ-1000 ASIO] [Canales de salida]: [Master Output]: [DDJ-1000 ASIO: MASTER] [Headphones Output]: [DDJ-1000 ASIO:HEADPHONE] ! Si se habilita PC MASTER OUT, la información de “+ Nombre del dispositivo de audio en el ordenador” también se mostrará después de [MASTER] del elemento [Master Output] en las configuraciones de [Audio]. -
Page 83: Apagado Del Sistema
2 Pulse el botón [PLAY/PAUSEf] para reproducir la Reproducir un archivo de música pista. A continuación, se describe como ejemplo el procedimiento para dar salida al sonido en el deck 1 (lado izquierdo). 3 Gire el control [TRIM]. Ajuste el control [TRIM] para confirmar que el indicador de nivel de canal se encienda de color naranja en el volumen más alto. -
Page 84: Información Adicional
KUVO son marcas comerciales o marcas registradas de Pioneer DJ Corporation. Solución de problemas ! rekordbox es una marca comercial o marca registrada de Pioneer DJ Corporation. ! Si cree que hay algún problema con esta unidad, compruebe los ! Windows es una marca registrada de Microsoft Corporation en los elementos en la sección “Solución de problemas”... -
Page 85: Especificaciones
! © 2017 Pioneer DJ Corporation. Todos los derechos reservados. Especificaciones Adaptador de CA Requisitos de potencia ......... CA 220 V a 240 V, 50 Hz/60 Hz Corriente nominal .................. 0,9 A Salida nominal ................CC 12 V, 3 A Consumo de energía (modo de espera) ..........0,4 W General –... - Page 86 Obrigado por adquirir este produto da Pioneer. Leia atentamente estas instruções de funcionamento de modo a saber como utilizar correctamente o seu modelo. Após terminar de ler as instruções, coloque-as num local seguro para futura referência. Em alguns países ou regiões, a forma da ficha de alimentação e da tomada por vezes podem diferir das apresentadas nos desenhos explicativos. Contudo, o método para ligar e utilizar a unidade é...
-
Page 87: Antes De Começar
Antes de começar Como ler este manual Visualizar os manuais ! Obrigado por adquirir este produto da Pioneer DJ. Este manual descreve brevemente as ligações entre a unidade e o computador, e a saída de áudio. Para obter mais instruções Visualizar o Manual de instruções desta... -
Page 88: Ambiente Operativo
rekordbox Preparar o rekordbox ! rekordbox Quando utilizar o rekordbox pela primeira vez ou se estiver a utilizar o O rekordbox é um software de gestão de música para DJs que per- rekordbox 4.x ou uma versão anterior, instale o software de acordo com mite preparar faixas e efetuar atuações de DJ. -
Page 89: Nome Das Peças
Nome das peças Para obter mais informações sobre os botões e controlos, consulte Nomes de peças e funções no Manual de instruções. 1 Secção do browser 3 Secção do misturador 2 Secções dos decks Secção do browser 1 Seletor rotativo 2 Botão BACK 3 Botão VIEW... - Page 90 Secções dos decks As secções dos decks são utilizadas para controlar os quatro decks. Os botões e controlos para utilizar os decks 1 e 3 encontram-se no lado esquerdo do controlador e os botões e controlos para utilizar os decks 2 e 4 encontram-se no lado direito do controlador. 1 Secção de exibição do jog dial m Botão seletor DECK 2 Jog dial...
- Page 91 Secção do misturador 1 Indicador do microfone n Controlo MIC1 LEVEL 2 Interruptor seletor OFF, ON, TALK OVER o Indicador do nível dos canais 3 Interruptor seletor USB A, PHONO/LINE, USB B p Controlo TRIM 4 Interruptor seletor USB A, LINE, USB B q Controlo EQ (HI, MID, LOW) 5 Controlo MASTER LEVEL r Controlo COLOR...
-
Page 92: Painel Posterior
Painel posterior 1 Ranhura de segurança Kensington 9 Terminais USB (USB B) 2 Terminal de saída MASTER 1 a Terminais USB (USB A) 3 Terminal de saída MASTER 2 b Terminais de entrada MIC2 4 Terminais de saída BOOTH c Terminais de entrada MIC1 5 Terminal SIGNAL GND d Interruptor u Alterna a alimentação desta unidade entre ligada e em espera. -
Page 93: Exemplo De Ligações
Funcionamento ! Uma vez concluídas todas as ligações, ligue o cabo de alimentação a uma tomada de corrente. Antes de ligar componentes ou alterar as ligações, desligue a unidade e retire a ficha do cabo de alimentação da tomada de corrente. Consulte o manual de instruções dos componentes que vai ligar. - Page 94 Ligar terminais de saída Painel posterior Componente, amplificador, altifalante amplificado, etc. Amplificador alimentado, Amplificador alimentado altifalantes alimentados, etc. (para monitor da cabine), altifalantes alimentados, etc. Painel frontal Auscultadores Certifique-se de que utiliza os terminais de saída [MASTER 1] para uma saída balanceada. Uma ligação a uma entrada não balanceada (tal como RCA) com um cabo conversor XLR para RCA (ou adapta- dor conversor), etc., pode diminuir a qualidade do som ou provocar ruído.
- Page 95 Para obter mais informações sobre como utilizar este produto com o 5 Ligue o transformador de CA rekordbox dj, consulte o respetivo Manual de instruções disponível no site da Pioneer DJ. Para a saída de alimentação 1 Ligue auscultadores aos terminais de saída [PHONES].
-
Page 96: Iniciar O Sistema
Para o Windows [Áudio]: [DDJ-1000 ASIO] [Canais de Saída]: [Master Output]: [DDJ-1000 ASIO: MASTER] [Headphones Output]: [DDJ-1000 ASIO:HEADPHONE] ! Se a definição PC MASTER OUT estiver ativada, também é apresen- tada a informação do “+ Nome do dispositivo de áudio do computa- dor”... -
Page 97: Desligar O Sistema
2 Prima o botão [PLAY/PAUSE f] para reproduzir a Reproduzir um ficheiro de música faixa. Descreve-se abaixo o procedimento para emitir o som do deck 1 (lado esquerdo), como exemplo. 3 Rode o controlo [TRIM]. Ajuste o controlo [TRIM] para confirmar que o indicador do nível dos canais se acende a cor de laranja no volume mais alto. -
Page 98: Informações Adicionais
! Para obter instruções detalhadas sobre como alterar as definições desta unidade, consulte Alterar as configurações no Manual de ! Pioneer DJ é uma marca comercial da PIONEER CORPORATION e é instruções. utilizada sob licença. rekordbox e KUVO são marcas comerciais ou marcas comerciais registadas da Pioneer DJ Corporation. - Page 99 — As especificações e design deste produto estão sujeitos a altera- Especificações ções sem aviso prévio. ! © 2017 Pioneer DJ Corporation. Todos os direitos reservados. Transformador de CA Requisitos de energia ........CA 220 V a 240 V, 50 Hz/60 Hz Corrente nominal ...................
- Page 100 Благодарим вас за покупку данного изделия Pioneer. Пожалуйста, внимательно изучите данные инструкции по эксплуатации для надлежа- щего использования данной модели. По завершению изучения инструкций, храните их в надежном месте для справок в будущем. В некоторых странах или регионах форма вилки питания и розетки может иногда отличаться от того, что отображено на иллюстрациях. Однако...
- Page 101 До начала Просмотр руководств Как следует читать данное руководство ! Благодарим Вас за покупку этого изделия компании Pioneer DJ. Данное руководство содержит краткое описание подключения устройства к вашему компьютеру и аудиовыходу. Более под- Просмотр инструкций по эксплуатации робные инструкции по использованию этого продукта содер- жатся...
- Page 102 rekordbox Подготовка rekordbox ! rekordbox Установите программное обеспечение, следуя описанной ниже rekordbox – это программное обеспечение для управления процедуре, при первом использовании rekordbox или в случае музыкой, предназначенное для диджеев и позволяющее подго- использования rekordbox 4.x или более ранней версии. тавливать...
-
Page 103: Названия Частей
Названия частей Подробные сведения о кнопках и регуляторах см. в разделе Названия компонентов и функций инструкции по эксплуатации. 1 Раздел браузера 3 Раздел микшера 2 Области дек Раздел браузера 1 Поворотный селектор 2 Кнопка BACK 3 Кнопка VIEW... - Page 104 Области дек В областях дек расположены элементы управления четырьмя деками. Кнопки и регуляторы для управления деками 1 и 3 находятся в левой части контроллера, а кнопки и регуляторы для управления деками 2 и 4 – в правой. 1 Раздел дисплея поворотного переключателя m Кнопка...
- Page 105 Раздел микшера 1 Индикатор микрофона n Ручка MIC1 LEVEL 2 Селекторный переключатель OFF, ON, TALK OVER o Индикатор уровня канала 3 Переключатель USB A, PHONO/LINE, USB B p Ручка TRIM 4 Переключатель USB A, LINE, USB B q Ручка EQ (HI, MID, LOW) 5 Ручка...
-
Page 106: Задняя Панель
Задняя панель 1 Слот замка Кенсингтона 9 Разъемы USB (USB B) 2 Выходной терминал MASTER 1 a Разъемы USB (USB A) 3 Выходной терминал MASTER 2 b Входные разъемы MIC2 4 Выходные разъемы BOOTH c Входные разъемы MIC1 5 Терминал SIGNAL GND d Переключатель... - Page 107 Управление ! По завершении всех подключений между устройствами включите вилку силового кабеля в розетку. Перед подключением компонентов и изменением подключения выключите данный аппарат и отключите силовой кабель от розетки. См. инструкции по эксплуатации подключаемого компонента. ! Используйте только поставляемый силовой кабель и адаптер переменного тока. ! Используйте...
- Page 108 Подключение выходных терминалов Задняя панель К а У а У а а а а Фронтальная панель На Для симметричного выхода используйте выходные разъемы [MASTER 1]. Подключение к несимметричному входу (напри- мер, RCA) через преобразующий кабель XLR на RCA (или преобразующий адаптер) и т. п. может привести к снижению качества...
- Page 109 Подключения 5 Подключите адаптер переменного тока Подробную информацию об использовании данного изделия с rekordbox dj см. в инструкциях по эксплуатации данного изделия, опубликованных на сайте Pioneer DJ. К 1 Подключайте наушники к выходным разъемам [PHONES]. А а а а 2 Подключите устройства, такие как...
-
Page 110: Запуск Системы
[Headphones Output]: [DDJ-1000: HEADPHONE] Для Windows [Аудио]: [DDJ-1000 ASIO] [выходные каналы]: [Master Output]: [DDJ-1000 ASIO: MASTER] [Headphones Output]: [DDJ-1000 ASIO:HEADPHONE] ! При включении функции PC MASTER OUT после параме- тра [MASTER] пункта [Master Output] в настройках [Аудио] отобразится информация “+ название аудиоустройства в... -
Page 111: Выключение Системы
2 Нажмите кнопку [PLAY/PAUSE f], чтобы Воспроизведение музыкального файла запустить воспроизведение дорожки. Далее в качестве примера описан порядок вывода звука через деку 1 (левая сторона). 3 Вращайте ручку [TRIM]. Установите регулятор [TRIM] в такое положение, при котором индикатор уровня канала засветится оранжевым цветом с макси- мальной... -
Page 112: Дополнительная Информация
! Подробные указания по изменению настроек данного устрой- знаки ства см. в разделе Изменение настроек Инструкции по эксплуатации. ! Pioneer DJ является зарегистрированным товарным знаком корпорации PIONEER CORPORATION и используется по Возможные неисправности и лицензии. rekordbox и KUVO являются торговыми марками или... -
Page 113: Технические Характеристики
— Технические характеристики и конструкция данного изделия Технические характеристики могут изменяться без уведомления. ! © Pioneer DJ Corporation 2017. Все права защищены. Адаптер переменного тока Требования к питанию ........220 В до 240 В переменного тока, 50 Гц/60 Гц Номинальный ток ................0,9 А... - Page 115 П а К а Па Д а а а а а а а Р а А а П а а Д а ( а . .): 5 D3-7-10-6b_B1_Ru Да а а а. С Да а а P1 - Г Г 2011 2012 2013...
- Page 116 © 2017 Pioneer DJ Corporation. All rights reserved. © 2017 Pioneer DJ Corporation. Tous droits de reproduction et de traduction réservés. PIONEER ELECTRONICS (THAILAND) CO., LTD. 17th Fl., KPN Tower, 719 Rama 9 Road, Bangkapi, Huaykwang, Bangkok 10310 6F, Yokohama i-Mark Place, 4-4-5 Minatomirai, Nishi-ku, Yokohama, Kanagawa 220-0012 JAPAN TEL: +66-2-717-0777 PIONEER TECHNOLOGY (MALAYSIA) SDN.
Need help?
Do you have a question about the DDJ-1000 and is the answer not in the manual?
Questions and answers