
Related Manuals for KC 13.540

Summary of Contents for KC 13.540
- Page 1 Gravity corer Model 13.540 Manual Denmark A/S Research Equipment Limnology Oceanography Hydrobiology ...
- Page 2 The gravity corer is very dangerous in unskilled hands and you must take serious precautions to avoid accidents and injury. KC Denmark A/S is not, and cannot be held, responsible for any damage(s) made to equipment or to operators who ignore safety precautions or because of misuse or wrong operation.
- Page 3 Ensure the black rubber (B) is free of dirt. Open the fastening device and push the tube with the mechanical stop into the bottom. Lock the handles, C and D, and secure with a bolt. 13.540 - Manual for Gravity corer...
- Page 4 The gravity corer is now ready, to be lowered into the sea. You must control the speed and lower at a reasonable speed, otherwise the corer may tilt over, and you will get no sample. 13.540 - Manual for Gravity corer...
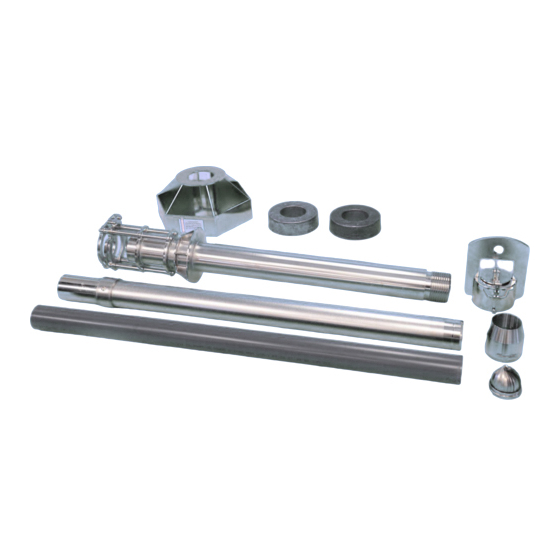
- Page 5 5 – Lock for corer tube 6 – Wire (Ø5 mm) for Kullenberg releaser and 30 kg weight station 7 – 30 kg weight station 8 – Piston 9 – Corer tube 14 – Safety split 13.540 - Manual for Gravity corer...
- Page 6 The extension kit consists of: 1. Weight station, 30 kg 2. Top lid 3. Wire set with 2 wires 4. Piston with leather seals 5. Kullenberg release Remove the upper part (shown as item 2) from the main rack and mount the upper part for piston corer.
- Page 7 Mount the security lock for the Kullenberg to avoid any unattended release. Lift the release arm until the lock fits for the square hole, insert and lock. The wire from the weight station is attached to the end of the arm of the Kullenberg releaser A wire-tightener (i.e.
- Page 8 Dismount the piston from the wire, see item 6, pos. 2. Guide the wire to the main rack and the core tube and mount the piston again. To ensure the piston will be in right position during the sample taking, adjust the wire-tightener, so the wire can be moved easily by hand, but the piston will remain in the core tube.
- Page 9 Mount the wire end with its steel thimble to the KULLENBERG releaser (pos. 1) by the steel bolt. (Do not forget to make a control check). You may attach the liners into the steel tube adding the orange peel system and the carver. Fasten with two spikes.
- Page 10 Emptying the corer tubes Requires the following items: 13.548 – Piston rod + 13.559 extension 13.549 – Drum with ratchet device 13.569 – Detacher for the tube 13.904 – Trestles, see item 32, alternatively the ship’s deck Photo shows the tube detacher for removal and handling of the core tubes.
- Page 11 Insert piston B at the end of the sample tube and then slide adapter A down the steel tube. The smallest part of the adapter must point towards the sample tube. Insert the tube with the wheel at opposite end of the steel tube;...
-
Page 12: Maintenance
Research Equipment Limnology Oceanography Hydrobiology kc@kc-denmark.dk http://www.kc-denmark.dk/ E-mail: website: Holmbladsvej 17-19, DK 8600 Silkeborg. Denmark. Tel. +45 86 82 83 47. Fax +45 86 82 49 50 Bank: Sydbank. SWIFT: SYBKDK22 IBAN DK5070460000104832 VAT no. DK 29 61 96 62...
Need help?
Do you have a question about the 13.540 and is the answer not in the manual?
Questions and answers