Advertisement
STANDS
REVIEW THE MATERIALS
Remove item from box. Compare the contents against the Parts List below. If any parts are missing, do not attempt to assemble
this guitar system. Instead, contact the Customer Service Department at cs@MusicPeopleInc.com or call us at (800) 289-8889.
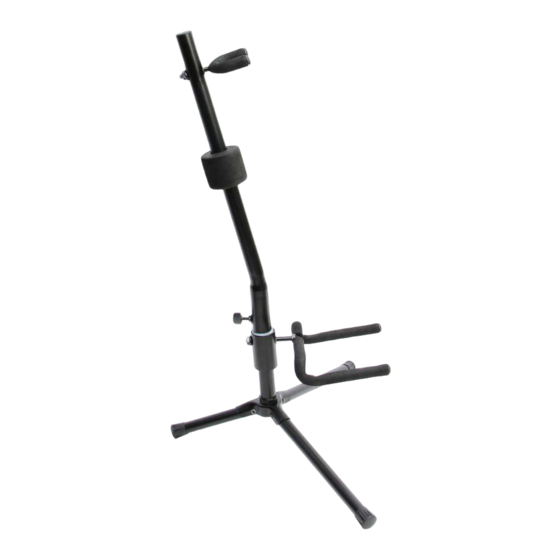
A. Leg Assembly
B. Spring Loaded Lower Shaft
C. Lower Yoke
D. Upper Shaft
E. Upper Yoke w/nut
F.
Washer
G. Screw
H. Hex Wrench
ASSEMBLING THE GS7141
1.
Open the three legs on the Leg Assembly and
place it on a flat surface. The short leg provides
backward tilt and represents the back of the
stand.
2.
Holding the Lower Shaft steady, screw the
Lower Yoke onto the Lower Shaft by turning the
yoke clockwise until it is tight. Now
position the Lower Yoke evenly over the
two front legs.
3.
Turn the Leg Housing with the Lower Shaft
upside down and place the washer between the
3 legs, then insert the hex bolt and tighten the
bolt with the Hex Wrench.
4.
Place the Leg Assembly with Lower Shaft upright
on a flat surface. Place the Upper Shaft over the
Lower Shaft, with the knob on the backside lined
up with the short leg. Loosely tighten the knob
at the highest position.
5.
Remove nut from back of upper yoke. Insert
the upper yoke into the lower hole and
completely through the tubing. (Use the upper
hole if you have a large acoustic guitar or bass
that will exceed the lower position of the yoke by
½" or more.) Thread the nut onto the threading
at the back side of the yoke.
For more detailed instructions, visit our site: On-Stage.com
GS7141
Push Down-Spring-Up Guitar stand
Assembly Instructions
A.
1. + 2.
Short Leg
(Back of stand)
3.
B.
C.
F.
G.
H.
Front of stand
D.
E.
4.
Advertisement
Table of Contents

Related Manuals for on stage GS7141

Summary of Contents for on stage GS7141
- Page 1 Washer G. Screw H. Hex Wrench 1. + 2. ASSEMBLING THE GS7141 Open the three legs on the Leg Assembly and place it on a flat surface. The short leg provides backward tilt and represents the back of the stand.
- Page 2 Tighten the knob on the upper shaft. It is now safe to let go of your guitar. Your GS7141 is now set for this particular guitar. If you will be using larger or smaller guitars, the height of the Upper Shaft will need to be adjusted accordingly.
- Page 3 STANDS Tel.: (800) 289-8889 | Fax: (860) 828-1353 E-mail: cs@MusicPeopleInc.com James R. Hennessey President The Music People, Inc. Makers of On-Stage A Word From The Designer… Dear Customer, Thank you for purchasing this new concept for your guitar stand. I wanted to go where no one had gone before with this stand! Most small stands do not have a locking device and after designing many unique guitar stands over the last 36 years, it came to me one day to look for a new way to lock a guitar into a smaller stand.
Need help?
Do you have a question about the GS7141 and is the answer not in the manual?
Questions and answers