Table of Contents
Advertisement
Quick Links
www.areca.com.tw
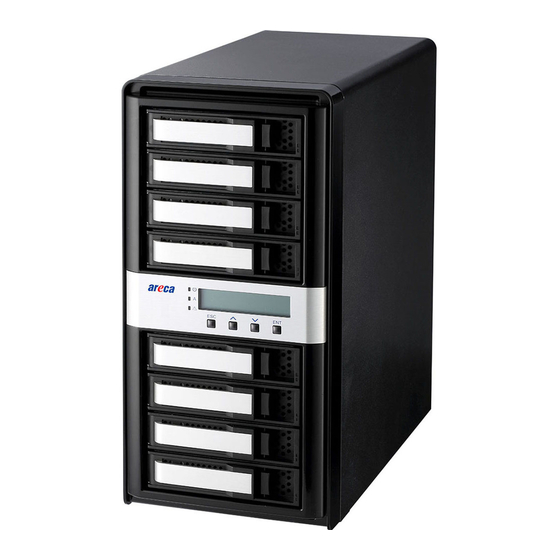
ARC-8050T3 series
(4/6(M)/8/12-bays Thunderbolt
Step 1: Unpack the ARC-8050T3 Unit
Inspect ARC-8050T3 enclosure. If it appears damaged, or if
any items of the contents listed below are missing or
damaged, please contact your dealer or distributor.
Checklist
1 x ARC-8050T3 4/6(M)/8/12-bay RAID storage unit
•
1 x Power cord
•
16/24/32/48 x drive mounting screws (4 per drive tray)
•
1 x ARC-8050T3 series quick installation quide
•
Step 2: Install SAS/SATA Drives
Secure the drive to the tray by four of the mounting screws.
Step 3: Slide the Drives into Enclosure
After all drives are in the drive tray, slide all of them back
into the ARC-8050T3 RAID storage and make sure you latch
the drive trays.
Step 4: Connect Thunderbolt Cable to Host Computer
There are two Thunderbolt ports on the rear of ARC-8050T3
series RAID storage for connecting the array to Thunderbolt
host and next Thunderbolt devices.
Host Port Connection
Connect ARC-8050T3 RAID storage and Thunderbolt technology
capable computer port as shown below:
3 RAID Storage
TM
Quick Installation Guide
Daisy Chain Typologies
Connect the cable to one of the interface ports on the back of
your ARC-8050T3 RAID storage and to your Thunderbolt
capable computer. The additional port may be used to daisy
chain compatible computer peripherals, such as hard drives,
monitors, and much more. A single Thunderbolt port supports
hubs as well as a daisy chain of up to seven Thunderbolt
devices on, including the Thunderbolt capable computer.
Step 5: Expansion Port Connection (Optional)
The ARC-8050T3-6M/6/12 12Gb/s SAS RAID storages contain
one SFF-8644 expansion port that can connect up to 7
expander enclosures. The maximum drive no. is 256 through
this RAID storage with 7 expander enclosures.
Step 6: Connect Monitor Port - LAN Port (Optional)
User can remote manage the RAID enclosure without adding
any user specific software (platform independent) via standard
web browsers directly connected to the 10/100Mbit RJ45 LAN
port. Connect LAN port of the ARC-8050T3 using the included
Ethernet cable and then to a LAN port or LAN switch.
Advertisement
Table of Contents

Related Manuals for Areca ARC-8050T3 Series


Summary of Contents for Areca ARC-8050T3 Series
- Page 1 1 x Power cord • 16/24/32/48 x drive mounting screws (4 per drive tray) • 1 x ARC-8050T3 series quick installation quide • Step 2: Install SAS/SATA Drives Secure the drive to the tray by four of the mounting screws.
- Page 2 Step 9: Launch Manager ※ Method 1: Web Storage Manager from LAN Port User can remote manage the ARC-8050T3 series without adding any user specific software (platform independent) via standard web browsers directly connected to the Gigabit Ethernet RJ45 LAN port.
Need help?
Do you have a question about the ARC-8050T3 Series and is the answer not in the manual?
Questions and answers