Advertisement
Quick Links
SPC189/SPC193 IM pg1 8/3/2018
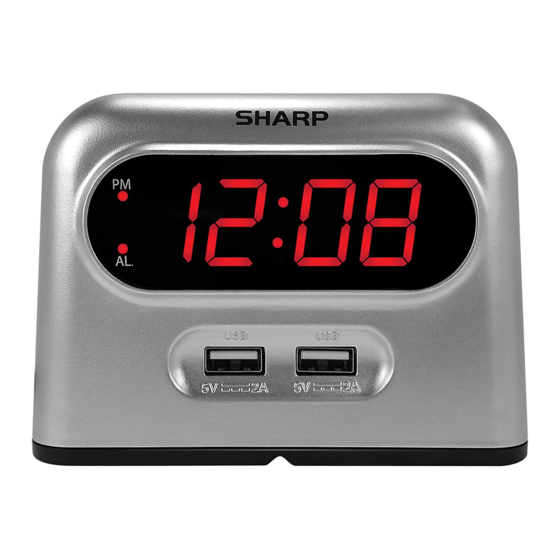
LED Alarm Clock with USB Port
Instruction Manual & Warranty
Thank you for your purchase of this quality clock. The utmost care has gone into the design and manufacture
of your clock. Please read these instructions and store them in a safe place for future reference.
FEATURES:
1. PM indicator Dot
2. ALARM indicator Dot
3. USB charging port (2 AMP)
4. USB charging port (2 AMP)
5. TIME button
6. ALARM button
7. ALARM ON/OFF button
8. HOUR button
9. MINUTE button
10. BATTERY door
11. SNOOZE button
12. SNOOZE button
1
2
3
POWER SUPPLY
• Begin by plugging in the power cord into a standard household outlet. The display will flash indicating it needs to be set.
SETTING THE TIME
• Press and hold the TIME button down to activate time setting.
• While holding down the TIME button, press the HOUR button to advance to the correct hour. The PM indicator
will light when the hour is advanced into the PM time.
• While holding down the TIME button, press the MINUTE button to advance to the correct minute.
• Release the TIME button when the correct time is shown on the display.
SETTING THE ALARM
• Press and hold the ALARM SET button down to activate alarm setting.
• While holding down the ALARM button, press the HOUR button to advance to the correct hour. The PM
Indicator will light when the hour is advanced into the PM time.
• While the holding down the ALARM button, press the MINUTE button to advance to the correct minute.
• Release the ALARM button when the correct alarm time is shown on the display.
USING THE ALARM
• Press the ALARM ON/OFF button, the ALARM indicator dot will be lit and the alarm will sound at the preset time.
• Press the ALARM ON/OFF button again, the ALARM Indicator dot will no longer be visible.
NOTE: The default is OFF setting.
USING THE SNOOZE
• Slightly pressing the cabinet down, will activate the snooze function. Pressing the snooze when the wake up
alarm is sounding will cause the alarm to stop and the alarm will sound again in nine minutes. This will
happen each time when the SNOOZE button is pressed.
11
7
5
6
4
USB CHARGING FUNCTION
• Conveniently charge your Smartphone.
• To charge, connect your USB device to the USB port of this alarm.
• Use only with devices that require 5V USB power. USB port provides 2000mA recharging current.
• Devices requiring more than 2000mA should not be used. Charging time may vary for different devices.
NOTE: Charging function may not be supported for all phones or electronic devices. When both of the USB ports are being
used, both can provide 2000mA output. The USB power will raise up to 4000mA if onlyone USB is connected.
BATTERY BACK UP
• Remove the BATTERY DOOR and insert two new "AAA" batteries (not included) in the direction of the polarity symbols.
• Please make sure the batteries are new and inserted correctly.
• The battery will hold the ALARM and TIME settings if the power is interuppted. There will be no display under battery
12
power and the ALARM will sound at the correct time. If there is no battery and the power is interrupted, the display will
flash 12:00 and the ALARM / TIME will need to be reset.
BATTERY WARNING
• Clean the battery contacts and also those of the device prior to battery installation.
Follow the polarity (+) and (-) to place battery.
• Do not mix old and new batteries.
• Do not mix Alkaline, Standard (Carbon - Zinc), or Rechargeable (Nickel - Cadmium) batteries.
• Incorrect battery placement will damage the clock movement and battery may leak.
• Exhausted battery is to be removed from the product.
• Remove batteries from equipment which is not to be used for an extended period of time.
• Do not dispose of batteries in fire. Batteries may explode or leak.
8
CARE OF YOUR CLOCK
9
• Replace the back up battery annually, or store the clock without a battery when not in use. A soft cloth or a
paper towel may be used to clean your clock. Do not use any corrosive cleaner or chemical solutions on the
clock. Keep the clock clean and dry to avoid any problems.
10
6
Model SPC189/SPC193
Advertisement

Related Manuals for Sharp SPC189


Summary of Contents for Sharp SPC189
- Page 1 SPC189/SPC193 IM pg1 8/3/2018 USB CHARGING FUNCTION • Conveniently charge your Smartphone. LED Alarm Clock with USB Port • To charge, connect your USB device to the USB port of this alarm. • Use only with devices that require 5V USB power. USB port provides 2000mA recharging current.
- Page 2 SPC189/SPC193 IM pg2 8/3/2018 IMPORTANT SAFETY INSTRUCTIONS DIGITAL ALARM CLOCK 1. Read these instructions – All the safety and operating instructions should be read before this product is operated. 2. Keep these instructions – The safety and operating instructions should be retained for future reference.