Advertisement
Aervoe® LED Baton Road Flare Kit #1156 & 1157
IMPORTANT SAFEGUARDS
•
Read all instructions before operating
•
Do not look directly at the light; may cause injury to your eyes
•
Never use if wiring or circuits are exposed or damaged
•
Turn off all lights before charging
•
Do not use alcohol, flammable solutions, or other solvents on or near this unit. Only clean with
warm water and a soft cloth.
•
Administer close supervision when using around children
•
Waterproof only when used in accordance with manufacturer's instructions
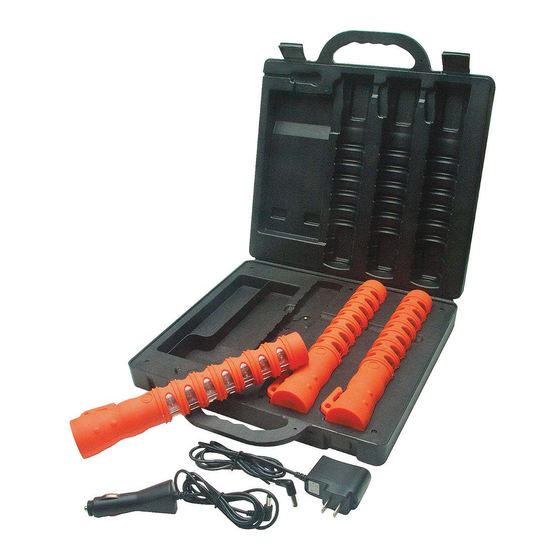
PARTS IDENTIFICATION
CORD SLOT
2 FLEX FIT TRIPODS
DIS-ASSEMBLED
12V DC CHARGING
ADAPTER (STORED)
120V CHARGING
ADAPTER STORAGE
FRONT
LED BATON
ROAD FLARE
CHARGING INPUT CONTACTS
BACK
STORING AND
CHARGING CASE
SINGLE
LED BATON
ROAD FLARE
CHARGING POCKET
AND CHARGING
OUTPUTS
POWER
INPUT
PORT
120V AC/DC
CHARGING ADAPTER
ON/OFF BUTTON
HOOK
MAGNET IN
HANDLE BASE
MAGNET
CHARGING
1.
Place from 1 to 3 flares into the
POckeTs in the chARgiNg cAse with the flat side facing down.
When placed correctly the (+) and (-) TeRmiNAl symbOls will be aligned. The flares are held inside
of the pocket by the magnet.
2.
Depending on your application, plug male end of the appropriate 12V or 120V
into the POWeR iNPuT PORT in the charging case.
3.
Plug the 12V or 120V c
hARgiNg ADAPTeR into either a 12V power receptacle or 120V wall outlet.
•
Red Power Adapter indicator light = will illuminate on either power adapter when plugged into a
power source
•
green/yellow charging indicator light = charge in process. light will go from green to yellow
during the charging process.
•
Red charging indicator light = fully charged OR there are no flares present to charge
NOTe: it is normal for the charging adapters to become warm during use.
4.
The lid to the charging case may be closed during charging. To close completely make sure the cord
sits within the slOT provided.
NOTE: stand-by charging feature allows flares to be kept plugged in when not in use without damage to the
battery or unit. ensures the flares will be charged and ready for use when needed.
OPERATION
Press the ON/OFF buTTON on each flare to rotate through the following 5 light patterns:
#1 - Rotate
#2 - Quad Flash
#3 - Alternating blinks
#4 - sOs Rescue (morse code)
#5 - steady on - high
#6 - Off
Alternate Operation:
To turn off the flare without cycling through the 5 light patterns, press and hold the ON/OFF buTTON for 2
seconds. One leDs will flash five times and then turn off. When ready to operate again, press the ON/OFF
buTTON and it will return to the last flash pattern that was selected before turning off.
RANGE OF USE
1.
emergency Road Flare
•
Replaces standard incendiary flares
•
use to alert drivers to potential roadside danger, mark detours, signal for help,
2.
safety Wand
•
use as a hand-held signaling device to direct traffic (vehicle, crowds, aviation, marine), signal for
help
•
used by emergency services, airport ground crews, road construction crews and personal
vehicle safety
3.
Features
•
safer and ecologically better for our environment than flame style emergency road flares. No
spark, open flame, fumes or toxic chemicals are produced when using as a road flare.
•
shock resistant construction makes it very durable and can withstand the impact of roadside
traffic. can even be run over by a truck and still operate. used by fire, police, and other
emergency responders.
•
Waterproof so it may be used for marine applications and safely in wet environments, including
submerged to a depth of 50 feet. Will float unless secured.
•
using the magnet on the back or handle end, attach to any ferrous metal surface. Place on a
vehicle, fence, or other metal surface.
•
lie flat or upright on it's handle end for vertical placement. Place on the road, at construction
sites, vehicle bumper or other surface, and anywhere needing emergency signaling.
•
Optional Flex-Fit Tripod #1159 is available to hold Flares in a vertical position for greater visibility,
even on uneven ground. contact your local retailer or www.aervoe.com.
NOTe: it is not recommended that you disassemble the Flare. if it is not reassembled correctly it may result
in failure of the waterproof seal and damage to the unit.
chARgiNg ADAPTeR
Advertisement
Table of Contents

Related Manuals for Aervoe 1156


Summary of Contents for Aervoe 1156
- Page 1 Aervoe® LED Baton Road Flare Kit #1156 & 1157 IMPORTANT SAFEGUARDS CHARGING • Read all instructions before operating Place from 1 to 3 flares into the POckeTs in the chARgiNg cAse with the flat side facing down. • Do not look directly at the light; may cause injury to your eyes When placed correctly the (+) and (-) TeRmiNAl symbOls will be aligned.
- Page 2 13.23” l x 13.62” W x 2.52” h RePlAcemeNT FlARes Replacement flares may be purchased using P/N 1154 (yellow) or 1155 (red) from your local retailer or go to www.aervoe.com. POWER DURATION RuN Time The battery will be fully charged with either charger within 8-10 hours.
Need help?
Do you have a question about the 1156 and is the answer not in the manual?
Questions and answers