Table of Contents
Advertisement
Quick Links
Advertisement
Table of Contents

Related Manuals for Samsung YP-F1X


Summary of Contents for Samsung YP-F1X
- Page 1 AH68-01755B (Rev 0.0)
-
Page 2: Table Of Contents
Contents Before You Begin Safety Instructions ...4 Features ...6 Components ...8 Location of Controls ...9 Charging the Battery ...11 Connection Procedures Connecting the Player to Your PC ...12 Manual Installation of the USB Driver ...16 Using the Player as a Removable Disk ...19 Downloading/Uploading Files ...19 Disconnecting the USB Cable ...20 Formatting the Player on Your PC ...21... -
Page 3: Safety Instructions
Safety Instructions Read and understand all the instructions to avoid injury to yourself and damage to the equipment. Do not expose to extreme temper- Be careful not to subject the Do not expose to direct sunlight atures (above 35°C or below -5°C). player to excessive pressure or heat sources. -
Page 4: Features
Maximum data speed transfer of 18Mbps Upgradable You can upgrade the built-in programs when available. Please check the home page (www.samsung.com) for upgrades. Built-In Rechargeable Li-Polymer Battery The built-in rechargeable lithium battery provides up to 10 hours of play time. -
Page 5: Components
Components Necklace Player Cover Earphones Player Installation CD User Manual USB Cable Model YP-F1 V YP-F1 X YP-F1 Z Built-in memory 256MB 512MB The capacity of the useable built-in memory is less than indicated as the internal firmware uses part of the memory as well. The accessories' design is subject to change for the purpose of improvement, without notice. -
Page 6: Charging The Battery
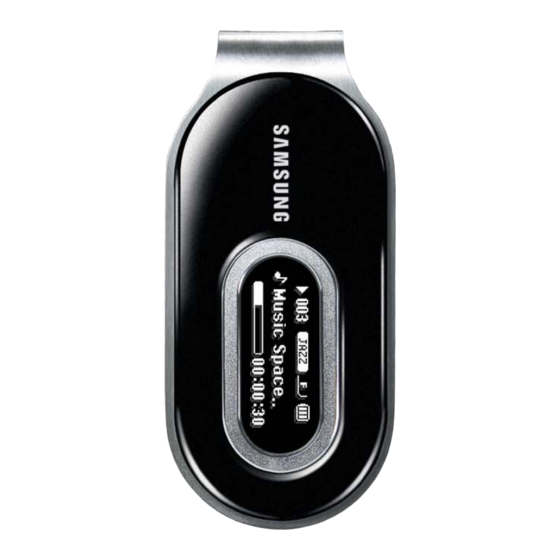
Components Volume Control Menu/Navigation Button USB Cable Connection Port, Earphone Port Skip Track/Speed Search Button Skip Track/Speed Search Button Display Microphone (Long) Record Button, (Brief) Loop Repeating Button Play/Pause Button Display Equalizer, SRS Indicator Track Number Play Mode Remaining Battery Power Indicator Play/Stop/Pause Indicator Title (Track Title and Artist) Track Progress Indicator... -
Page 7: Connecting The Player To Your Pc
Connecting the Player to Your PC Make sure to install the USB driver before connecting the player to your PC. If 'Add Hardware wizard' appears, click the [Cancel] button and install the USB driver. System Requirements. - Install the operating system in Administrator Account The PC system must meet the (main user) for Windows 2000 or XP. - Page 8 You may not see the display screen during installation. Go to the Device Manager to check that installation has been successfully completed. When the USB driver is successfully installed, "Samsung YP-F1 USB Device" will appear in the [System Properties] [Device Manager].
-
Page 9: Manual Installation Of The Usb Driver
Manual Installation of the USB Driver If the USB driver has successfully installed, go to "Downloading/Uploading Files"(P19). If the USB driver is not automatically installed, follow the procedures below. When an error occurs during installation of the USB driver Check the device manager. Windows 98SE: Control Panel System... -
Page 10: Using The Player As A Removable Disk
Manual Installation of the USB Driver In Windows 98 Follow the instructions in the window to complete the installation. USB driver location ROM]ÍUSB DriverÍDrivers : You must reboot your computer to complete the installation. - You cannot use it as a removable disc in Windows 98 if the YP-F1 program is not installed. Make sure to install the USB driver file first. -
Page 11: Formatting The Player On Your Pc
Using the Player as a Removable Disk Disconnecting the USB Cable After completing the file transfer, you must disconnect the cable in the following way: Double-click on the green arrow in the taskbar on the bottom right of the Desktop. Select the USB device and click the [Stop] button. -
Page 12: To View Help On Music Studio
Music Studio is a program that enables you to play back music files on your PC. Insert the Installation CD into CD-ROM drive. Select language. Select [Install Samsung Music Studio]. Follow the instructions in the window to complete the installation. Please refer to Help for more in formation on how to use Music Studio. -
Page 13: Recording Voice
Playing Music Turning Power On and Off Power On : Press and hold the button to turn on the power. Power Off : Press and hold the button to turn off the power. Playing Music (Power On) Press the button. Playback starts automatically. -
Page 14: Searching For Music/Voice Files
Searching for Music/Voice Files To Search for Specific Parts During Play Press and hold the button during playback to search for the part you want to listen to. Release the button to resume play normally. To Change Tracks During Play Press the button briefly during playback to play the next track. -
Page 15: Loop Repeating
Listening to FM Radio Searching Stored Frequencies Press the “M” key in the FM mode. PRESET screen appears. Use the button to move to the frequency you want. Deleting Stored Frequencies After moving to the PRESET number you want to delete, press the A B button. -
Page 16: Using Navigation
MENU Options Press and hold the “M” key to switch to the Menu mode. to move and press the “M” key briefly to select the menu you want. Press and hold the “M” key again to exit the MENU mode. Music FM Radio Playlist... -
Page 17: Changing Mode
Using Navigation Changing Mode You can change the mode in the following method. Ex) To change from the Voice mode to the Music mode Press the “M” key in the Voice mode. Use the button to move to the upper folder. to move to the music file you want and press the As it is changed to the Music mode, the selected file will be played. -
Page 18: Setting Playlist
Setting Playlist Setting Playlist - Move to the file you want in Navigation mode and press the “M” key. The selected file will be marked. To exit the playlist setting, move to the marked file in Navigation mode and press the “M” again. -
Page 19: Selecting The Play Mode
Selecting the Play mode Select Play Mode in Settings. In Play mode, use to move to the mode you want and press the “M” key to select. Normal Shuffle All Repeat One Intro Repeat All Return Normal : To play all the files in order one time. Repeat One : To repeat one file. -
Page 20: Display Settings
Sound Settings WOW Set to select the SRS function you want, and then press the “M” key. The SRS function is applied only when you select the SRS, TruBass or WOW in the Preset EQ. SRS : You will hear 3D surround sound. to adjust SRS from 0 to 10. -
Page 21: Screen Saver
Display Settings Screen Saver to set Screen Saver. You can set Screen Saver to Clock, Screen Saver1 or Screen Saver2. When the LCD light is turned off, the Screen Saver screen appears. When you make a recording, the Recording Screen Saver appears regardless of the set screen saver. -
Page 22: Fm Radio Settings
FM Radio Settings Select FM Radio in Settings. Auto Preset If you select Auto Preset, frequencies within the range of 87.5MHz to 108.0MHz are automatically selected and stored. Frequencies are automatically stored, starting from 1. FM Region to select the FM region. Other Country : Search FM frequency between 87.50MHz to 108.00MHz in increments of 50 KHz. -
Page 23: Intro Time
Time Settings Time Set Select the Time Set to set the current time. If you have selected Clock for Screen Saver, you can view the current time on the screen when the Screen Saver is set. to set the clock time, and then press the button to move to the next stage. -
Page 24: Setting The System
Setting the System Select System in Settings. Resume to select Resume On or Off. On: Playback will resume from the point it was previously stopped. Off: Playback will resume from the beginning of the track. Default Vol to set the default volume to a level between 0 and 30. -
Page 25: Menu Table
MENU Table Navigation Playlist Settings Music FM Radio Display Play Mode Sound Effect Language FM Radio Time Normal Preset EQ Scroll Auto Preset Auto Off Time Repeat One Bass Booster FM Region LCD Time Auto Sleep WOW Set Repeat All Screen Saver FM Search Level Time Set... -
Page 26: Specifications
Troubleshooting The player is automatically turned off. In Stop mode, the power may automatically be turned off depending on settings. Check to see if there are files saved in it. Play Time is not displayed correctly during playback. Check to see if the file is a VBR(Variable Bit Rate) file. LCD display is dark. - Page 27 Specifications The product unit accompanying this user manual is licensed under certain intellectual property rights of certain third parties. This license is limited to private non-commercial use by end-user consumers for licensed contents. No rights are granted for commercial use. The license does not cover any product unit other than this product unit and the license does not extend to any unlicensed product unit or process conforming to ISO/IEC 11172-3 or ISO/IEC 13818-3 used or sold in combination with this product unit.
Need help?
Do you have a question about the YP-F1X and is the answer not in the manual?
Questions and answers