Advertisement
Quick Links
Handheld Multi Gas Detector Operating Instructions
Model: ZG9
Product Overview
Thank you for selecting ZG9 handheld multi gas detector. The ZG9 is designed to simultaneously measure
multiple gas concentrations in the ambient environment. With long-term data storage, the user can assess the
environmental friendliness. When ZG9 measures the gas concentration reaching the alarm setting or higher,
the data display and alarm functions are activated. ZG9 is equipped with an RS485 interface for connecting to
a computer for remote monitoring so as to reduce the risk of exposure to high concentrations of harmful
gases and avoid harm to human health. ZG9 can be used in a wide range of industries, which include
paint-related industries, wineries, related industries of CO2, food industry, laboratory, construction industry,
etc.
Features:
□ V Dual beam NDIR (Non-Dispersive-Infrared) technology is used to measure CO
improve the long term stability.
□ V Measure CO
, CO, VOC, PM2.5, PM10, RH, DP, AMB, Barometer
2
□ V Large LCD for easy reading of gas concentration and temperature and humidity.
□ V Audible alarm
□ V Data logging with SD card
□ V Through the RS485 interface connection, multiple ZG9 units can be connected to the back-end computer
system as a security monitoring application.
□ V Built in the LCD backlight for easy reading in the dark.
□ V This device is supplied with Li- ion 18650 3.7V rechargeable batteries, can be used for a long time.
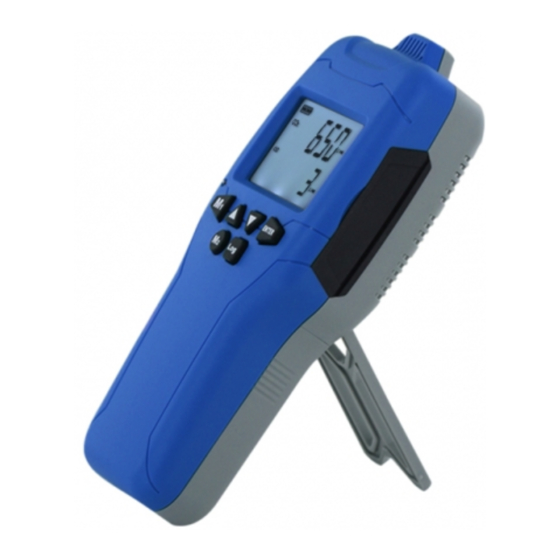
A. Power Key
B. Humidity Sensor
C. Temperature Sensor
E. Charge Lamp
F. M1 (Zone 1 Mode Key)
G. UP\TWA\STEL\Max\Min
I. Enter
J. DOWN\ALTI
K. Log (Data Logger)
M. SD Card Slot
N. RS485 Jack
O. Battery Cover
Q. Screw Position
R. Tripod Screw
Key description:
Zone 1 sensor selection (CO
, CO, VOC, AMB)
M1 (○
)
F
2
M2 (○
)
Zone 2 sensor selection (CO
, CO, VOC, RH, DP, AMB, PM2.5, PM10)
H
2
▲ (○
TWA (CO
, 8-hr time weighted average), STEL (CO
G
)
2
▼ (○
)
ALTI (Atmospheric pressure)
J
Execute a command or select options.
Enter (○
)
I
Data logger
Log (○
)
K
LCD display symbol description:
Symbol
Description
CO
concentration, parts per million (ppm)
2
CO concentration, parts per million (ppm)
VOC concentration, parts per billion (ppb)
PM2.5 dust concentration (µg/m
3)
PM10 dust concentration (µg/m
3)
concentration and
2
Operation Instructions
Power on:
Switch the Power Key (○
(Display Features and Modes)
Measurement:
After power on, the device starts to measure and update the data every second.
D. LCD
Press the "M1" key (○
H. M2 (Zone 2 Mode Key)
Press the "M2" key (○
(CO
CO VOC RHDPAMBPM2.5PM10)
L. USB Socket
2
P. Stand
Backlight:
The backlight appears on the screen during startup and operation. After the device is idle for 30 seconds, the
backlight is automatically turned off to extend battery life.
Display all sensor readings
Press the "M2" key (○
of all sensors sequentially in time intervals. If you need to increase the display interval time, long press the
, 15 min. weighted average), MAX, MIN
2
"M2" key (○
).The interval time will automatically increase (1+0.5+0.5..... max. 10 seconds) , and release
H
the "M2" key (○
), the readings will be displayed according to the last set interval. If press the "M2" key (○
H
again for more than 3 seconds, the
Basic○ Optional△
○
Real-time setting:
○
Long press the "M1" key (○
"▲(○
)/▼(○
)" key to edit the parameters, and press the "Enter" key (○
G
J
○
setting sequence is: yearmonthdatehourminute. After finishing the real-time setting, press the "M1"
key (○
) to continue the alarm setting.
F
○
○
Battery capacity
Atmospheric pressure
Time weighted average (8 hours)
ShortTerm Exposure Limit
(15 min. weighted average)
Maximum value
Minimum value
Ambient temperature
Relative humidity
Dew point
Real-time setting display
Year display
High/low gas concentration calibration
High/low gas concentration alarm
Display cycle
SD card
) on.
A
) to switch the Zone 1 sensor display. (CO
COVOCAMB)
F
2
) o switch the Zone 2 sensor display.
H
) for more than 3 seconds and the screen displays
. Zone 2 displays readings
H
function can be cancelled.
) to proceed the date and time setting. The default format is 24-hour. Press the
F
) to proceed the next setting. The
I
○
Alarm settings:
The setting order of the sensors is CO
COVOCPM2.5PM10. Press the "Enter" key (○
○
2
the high/low gas concentration alarm setting. Press "▲(○
○
press the "M1" key (○
) to proceed the next sensor alarm value settings. After settings, press and hold the
F
"M1" key (○
) to return to the main screen.
F
○
○
○
○
Sensor warm-up time and logging Interval:
○
No.
Sensor
Warm-up time
After powering on and standby time,
○
data logging can be operated.
○
<1 minute
1
CO
After power on 5 minutes
2
2
CO
5 minutes
After power on 5 minutes
○
3
VOC
5~15 minutes
After power on 20 minutes
PM2.5
<1 minute
○
4
After power on 5 minutes
PM10
○
Data logging:
Press the "Log" key (○
) for 3 seconds and the screen displays
K
○
press the "Log" key (○
),this function can be canceled. When
K
broken or full; when
remains stationary, it indicates normal operation.
○
Data logging interval time setting:
The default interval time is 00:02 (2 seconds). Press the "Log" key (○
interval time will automatically increase. The interval time, loop display, ranges from 00:02 seconds to 60:00
minutes and then back to 00:02 seconds.
The interval time
by the "Enter" key (○
)
; the interval time is
≧
I
°C/°F switch:
)
When the temperature is displayed on the screen, press the "▲" key (○
H
Atmospheric pressure display:
Press "▼" key (○
), and then press "▲" key (○
J
(mmHg). The display returns to the main screen after 10 seconds.
Atmospheric pressure compensation:
Press and hold the "▼" key (○
) to turn the compensation function on/off. The gas compensation is only for
J
CO
2.
Buzzer on/off:
Press the "Enter" key (○
) to turn the buzzer on/off. During
I
sounds,
stops to operate. At this time, press the "Enter" key (○
continue
. In addition, the buzzer will be automatically turned off when the data logging interval time
is ≧5 minutes.
Buzzer AL L/AL H:
When AL L is on, the buzzer sounds "Ta Ta Ta"; when AL H is on, the buzzer sounds "Bi Bi Bi".
) to switch
I
)/▼(○
)" key to edit the parameters, and then
G
J
Data logging interval time setting
Data logging interval
time setting
2 seconds~60 minutes
2 seconds~60 minutes
2 seconds~10 minutes
2 seconds~60 minutes
to start the data logging function. If long
flashes, it means that the SD card is
) for more than 3 seconds and then the
K
5 minutes, the buzzer on/off switch is controlled
≦
5 minutes, the buzzer is off.
) to switch °C/°F.
G
) to select Altitude (M) Altitude (ft) Barometer
G
operation, if AL L or AL H buzzer
) to turn off the buzzer and
I
Advertisement

Related Manuals for ZyAura ZG9

Summary of Contents for ZyAura ZG9
- Page 1 ○ a computer for remote monitoring so as to reduce the risk of exposure to high concentrations of harmful gases and avoid harm to human health. ZG9 can be used in a wide range of industries, which include Minimum value ○...
- Page 2 Note: During battery charging, the temperature of the device will rise by 5°C~10°C. At this time, the 2. Please note the following when hanging it on the wall. Choose a suitable location to install ZG9, fix a screw quality. The wiring method is as below: measurements of temperature and humidity will be affected by temperature rise.
Need help?
Do you have a question about the ZG9 and is the answer not in the manual?
Questions and answers