
Related Manuals for AV Costar ConteraIP Omni LX


Summary of Contents for AV Costar ConteraIP Omni LX
- Page 1 ConteraIP ® Omni LX Installation Manual 20MP AV8476DN-28 AV8476DN-NL AV20476DN-28 AV20476DN-NL +1.818.937.0700 www.avcostar.com avsales@arecontvision.com...
-
Page 2: Table Of Contents
Page 1 of 54 Table of Contents About Our Warranty ............................2 Global (3 Year) Limited Warranty ......................2 Camera Overview ............................3 Package Contents ............................4 Installation ..............................5 Surface Mount ............................5 Pendant Mount ............................11 Wall Mount .............................. 12 Pole Mount .............................. -
Page 3: About Our Warranty
Notwithstanding the preceding provisions, AV COSTAR™ shall have no obligation or responsibility with respect to any Product that (i) has been modified or altered without AV COSTAR™’s written authorization; (ii) has not been used in accordance with applicable documentation; (iii) has been subjected to unusual stress, neglect, misuse, abuse, improper storage, testing or connection;... -
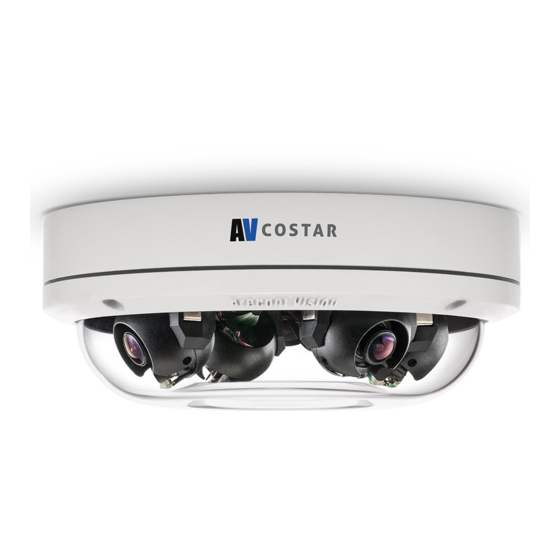
Page 4: Camera Overview
IP66 rating. The rugged dome housing is IK-10 rated to withstand the equivalent of 55 kg (120 lbs) of force for vandal-prone applications. AV Costar™ was the first to bring H.264 to the mainstream market and recently developed SNAPstream+™ (Smart Noise Adaptation and Processing) technology for reducing bandwidth without impacting image quality. -
Page 5: Package Contents
Page 4 of 54 Package Contents AV8476DN / AV20476DN • Description AV8476DN / AV20476DN IP camera Mounting Template Accessory Pack... -
Page 6: Installation
Page 5 of 54 Installation Surface Mount The ConteraIP ® Omni LX can be directly attached onto hard ceilings or walls including wood, plastic, metal, and concrete. 1. Use the template, anchors, and screws provided to prepare the mounting provisions for the camera installation. - Page 7 Page 6 of 54 If mounting the camera outside or in a wet environment, thread the camera cable through the hole on the supplied rubber gasket and align with the three holes on the top of the housing. Ensure the gasket is properly seated flush with the camera housing.
- Page 8 Page 7 of 54 Reference # Description Install 3 supplied dry wall anchors using the supplied mounting template Attach supplied (optional) tether plate Attach supplied rubber gasket to the camera housing by threading the camera cable through the hole in the gasket (ensure the gasket is seated properly) Align 3 supplied screws with the dry wall anchors and screw camera into place Attach the dome cover, ensuring the rubber gasket is properly seated, with the tamper resistant screws...
- Page 9 Page 8 of 54 In-ceiling Mount / Flush Mount To properly flush mount the ConteraIP ® Omni LX to a drop ceiling or similar surface, a flush mount adapter kit (SO-FMA) is required (sold separately). Reference # Flush Mount Components Required SO-FMA flange plate support arm SO-FMA flush mount bracket assembly Lever screw...
- Page 10 Page 9 of 54 1. Cut a 9” diameter hole in the ceiling with the provided template. 9” 2. Remove existing Dome cover from Omni LX camera and remove gasket from Bubble. 3. Attach Flush mount bracket assembly to Omni LX camera as shown and fasten a safety cable to one of the 3 holes in the bracket assembly.
- Page 11 Page 10 of 54 5. The “Support Arm” will ride down the screw to compress the mounting surface. NOTE: Do not over-torque the lever screws 6. Snap bubble (without gasket) into flush mount trim ring. 7. Attach the trim ring to the flush mount adapter by rotating until it magnetically snaps in place. And then tighten four trim ring screws.
-
Page 12: Pendant Mount
Page 11 of 54 Pendant Mount For a proper pendant mount installation, the AV-PMJB-W pendant mount and SO-CAP-W mount cap are required (sold separately). A pendant mount should only be attached onto hard ceilings including wood, plastic, metal, and concrete. 1. -
Page 13: Wall Mount
Page 12 of 54 Wall Mount For a proper wall mount installation, the AV-WMJB-W wall mount and SO-CAP-W wall mount cap are required (sold separately). A wall mount should only be attached onto hard ceilings including wood, plastic, metal, and concrete. 1. -
Page 14: Pole Mount
Page 13 of 54 Pole Mount For a pole mount installation, the AV-WMJB-W wall mount, AV-PMA-W pole mount, and SO-CAP-W mount cap are required (sold separately). A pole mount should only be attached onto hard ceilings including wood, plastic, metal, and concrete. 1. - Page 15 Page 14 of 54 Figure 2: Attach wall mount adapter to pole mount adapter Reference # Description Steel straps with compression screws AV-WMJB-W wall mount SO-CAP-W mount cap Conduit AV-PMA-W pole mount AV-JBA-W Junction box Apply Teflon water seal tape to the thread of ¾” NPT pipe to avoid water leakage 7.
-
Page 16: Corner Mount
Page 15 of 54 Corner Mount For a corner mount installation, the AV-WMJB-W wall mount, AV-CRMA-W corner mount, and SO-CAP- W mount cap are required (sold separately). A corner mount should only be attached onto hard corner surfaces including wood, plastic, metal, and concrete. 1. - Page 17 Page 16 of 54 Figure 2: Attach corner mount adapter to exterior corner wall Reference # Description Attach corner mount adapter to exterior 90° corner wall AV-WMJB-W wall mount SO-CAP-W mount cap Conduit AV-CRMA-W corner mount adapter AV-JBA-W Junction box Apply Teflon water seal tape to the thread of ¾”...
- Page 18 Ensure every threaded hole is matched with a mounting hole. 2. Attach the electrical box adapter to the user supplied electrical box. Figure 1: Attach AV-EBAR-W adapter to common electrical box Reference Description 4S box 4-11/16” square box Single gang box Double gang box ConteraIP Omni LX Series...
-
Page 19: Camera Power Up
Page 18 of 54 Camera Power Up 1. Connect the camera to a PoE+ port on 1000Mbps network PoE+ switch using an Ethernet cable. 2. If the camera is powered by an external power supply12-48V DC or 24V AC must be supplied. - Page 20 Page 19 of 54 3. Connect the PoE+ switch to your computer’s network port by using an ethernet cable. Status Description Green Quick Flashing Link has been established Slow Flashing Normal operation None None No Connection NOTE: Wiring methods shall be in accordance with the National Electrical Code/NFPA 70/ANSI, and with all local codes and authorities having jurisdiction.
-
Page 21: Setting Up The Cameras
Page 20 of 54 Setting up the Cameras The ConteraIP ® Omni LX is user configurable. Prior to installing the camera, thought should be given to the sensor positions. It is always easier to make adjustments before the camera is installed. The camera lenses are shipped in a 360º... - Page 22 Page 21 of 54 Reference # Description 180° configuration Random configuration 270º configuration Assembly line configuration Random configuration...
-
Page 23: Aligning The Cameras
Page 22 of 54 Aligning the Cameras Properly aligning each camera is essential during setup. Each camera must be placed in a clockwise sequence on the circumference of the track to ensure proper viewing of each camera. Figure 1: Place cameras in clockwise position on the track Reference # Description Sensor 1... -
Page 24: Adjusting The Pan, Tilt And Focus
Page 23 of 54 Adjusting the Pan, Tilt and Focus 1. Remove the dome cover by loosening the captive fasteners with the supplied Philips head screwdriver. 2. Power on the camera to adjust the pan, tilt and focus. NOTE: Ensure not to press the remote focus motor against the sides of the camera module when adjusting the field of view (Figure 1) Figure 1: Remote focus motor 3. -
Page 25: Changing The Lens
Page 24 of 54 Changing the Lens 1. Remove the dome cover by loosening the captive fasteners with the supplied L-key. 2. Manually unscrew the lens counterclockwise, this may take several seconds. 3. Screw the replacement lens clockwise until you feel some resistance and hit a hard stop. Lens Options NOTE: Spacers are required for some lens options. -
Page 26: Alarm I/O Functions
Page 25 of 54 Alarm I/O Functions Connect the Alarm In (DI) connector to the alarm input sensor, and then connect the Alarm Out (DO) connector to the alarm output signal. To avoid any damage, please follow the specification of the part as below: Alarm In (Wet Contact) Alarm Out (Wet Contact) 3.5-12 VDC... -
Page 27: Reset To Factory Default
2. Press and hold the reset button for more than 5 seconds, then release the reset button. This resets the camera to the factory default, and this resets the network settings to the factory default. 3. The user can also reset the camera to factory default via the camera web interface or AV Costar Utility. -
Page 28: Audio/Sd Card Info
Page 27 of 54 Audio/SD Card Info • SD Card Slot • Audio Connector... -
Page 29: Camera Discovery, Setup, And Configuration
The AV Costar™ Utility tool is efficient and convenient for mass or single camera uploads whether used for large installations that require an update to multiple settings, or smaller installations where only one camera needs to be changed. -
Page 30: Camera Discovery
Page 29 of 54 Camera Discovery 1. Locate and double click the AV Costar™ Utility shortcut on the desktop. 2. When the AV Costar™ Utility is launched, it will automatically search the ConteraIP ® cameras on the network. Also, you can manually search the camera by clicking “Discovery (Multicast)”... -
Page 31: Web Interface Navigation
Page 30 of 54 Web Interface Navigation The entire menu is located on the top of the web interface. following camera settings are available on the top of the menu in the web interface, and the user will be directed to the page that they click on the menu. •... - Page 32 Page 31 of 54 • Event • Motion Detection Alarm Handler • • Digital I/O Tamper Detection • • Network Failure SD Card • • FTP Upload SMTP (Simple Mail Transfer Protocol) Notification • • Network Storage System • Maintenance •...
- Page 33 Page 32 of 54 1. In the upper left hand corner, there is a Flip button that allows you to rotate images up-side-down (180 degrees) with reorienting the channel order. 2. You will be able to see the Channel number when you move the mouse over the image of the channel. 3.
-
Page 34: Focus
Page 33 of 54 Focus Menu Feature Description Select Channel Number indicates the level of focusing in order to adjust the field-of-view. NOTE: For supporting H.264 streaming on a webpage, the recommended browsers are Internet Explorer and Firefox. Manual Focus: Number indicate the level of focusing in order to adjust the field-of-view. -
Page 35: Image
Page 34 of 54 Image Menu Feature Description Select Channel Select desired channel, 1-4. Click Sync All Channels to apply settings to all four channels. Brightness Controls the overall brightness of the camera image and works in conjunction with the exposure controls to maintain the image brightness. - Page 36 Page 35 of 54 Auto Enhances the dark areas by adjusting the gamma value. Will not combine long and short exposures into one frame, resulting in better low light performance. Auto Exposure Automatically adjusts illumination and exposure values. Stream Profiles: Balanced Mode: Limits exposure time from Balance Mode 0.1ms to 66ms.
- Page 37 Page 36 of 54 Day/Night Mode Automatic: Enables the camera to Automatic automatically switch from day mode to night mode. User can define the switching level from Night Day to Night or Night to Day. Schedule Day Day: Forces the camera to stay in day mode. Mode Night: Forces the camera to stay in night mode.
- Page 38 Page 37 of 54 ROI (Regions of ROI (Regions of Interest) is used to select Interest) which areas will be monitored and recorded with higher image quality while using lower image quality for other non-ROI zones in order to save bandwidth and storage. To setup the ROI: Select the desired channel Select Main Stream or Sub Stream...
-
Page 39: Video & Audio
Page 38 of 54 Video & Audio Menu Feature Description Select channel Select the desired channel to change video settings or select Sync All Channels to change video settings for all four channels at once. Video Compression: H.264 image quality setting for variable bit H.265 / H.264 rate control. - Page 40 Page 39 of 54 Frames Per Seconds Frame rate adjustment for the camera video stream. Quality: Adjusts the compression level for JPEG Low / Mid / High images Video Compression: The third stream is designed for the live MPJEG view on web interface, and the only option of Video Compression is MPJEG.
-
Page 41: Network
Page 40 of 54 Network Menu Feature Description IP Assignment: DHCP: If checked, the camera will • attempt to obtain its IP address from DHCP the DHCP server available on the • IP Address network. • Subnet Mask IP Address: Sets the current IP •... - Page 42 Page 41 of 54 QoS Video Sets DSCP value for video traffic. Management DSCP Sets DSCP value for non-video traffic. Enable UPnP Enables Universal Plug and Play function. Select channel Select the desired channel to change RTSP settings Enable RTSP Unicast Enables RTSP Unicast for stream 1 Stream (Main stream), stream 2 (Sub Stream),...
- Page 43 Page 42 of 54 Configures the time-to-live threshold of the multicast datagram before it is discarded by the router. Enable DDNS Enables DDNS service Host Name Specifies the Host name registered with the DDNS server DDNS Sever Selects one of the pubic DDNS severs from the dropdown menu.
- Page 44 Page 43 of 54 Install New Certificate Locate Key PEM file and Key PEM file Certificate PEM file and click Certificate PEM file Upload. Click Install New Certificate to upload the Certificate. Enable Enables FTP access to the camera. NOTE: This function is only available when a SD card is installed.
-
Page 45: Privacy Mask
Page 44 of 54 Privacy Mask Menu Feature Description Enable Privacy Mask Creates a privacy mask on the image so the selected areas will not be visible. Select Channel Select the desired channel to add privacy masks. Drag mouse to: Select Mask to add privacy masks or Select Mask Unmask to remove privacy masks. -
Page 46: Event
Page 45 of 54 Event Menu Feature Description Enable motion Turn on and off on-camera motion detection detection. Enable extended Enables the extended motion detection motion detection and motion detection zones with an increase from default 64 to 1024 for enhanced motion detection sensitivity. - Page 47 Page 46 of 54 clicking the time block to enable the schedule settings on the selected time. A light blue color on the time block indicates that the alarm schedule is enabled, while a light grey color indicates that the alarm schedule is disabled.
- Page 48 Page 47 of 54 Sensitivity Configures the sensitivity level of Tamper Detection: High, Medium, and Low. Enable Network Failure Enable network failure detection. SD Record Handler Enables and selects a desired trigger Enable source. The options are Trigger Alarm Detection, Trigger Motion Detection, Trigger Tampering Alarm, Trigger Network Failure, and Manual Record.
- Page 49 Page 48 of 54 Trigger Motion Detection, and Trigger Tampering Alarm. SMTP Server Host Address: Specifies the host Host Address name or IP address of the SMTP server. Port Port: Specifies the port number of the SMTP server. Username Username: Specifies the login username of the SMTP server.
- Page 50 Page 49 of 54 Mount Network Mount: Sets up a network connection Storage with the network storage server. All the video recordings or snapshots from event triggers will be uploaded to the network storage server. After the setting is complete, the Network Storage Status field will display “ok”.
-
Page 51: System
Page 50 of 54 System Menu Feature Description Firmware Upgrade Click “Choose File” to choose the firmware upgrade file, and then click Upgrade. Download Log Records all the status information of the camera in list format. Downloads the log file to the computer as a text file. NOTE: The log file is protected by a password. - Page 52 Page 51 of 54 Date/Time NTP Server: Synchronizes the date/time • Get Time from information with defined NTP server. • NTP Server After setting up the desired Time zone • Computer System and NTP Server, click “Apply NTP Server Configuration”. NOTE: Please make sure to set up appropriate gateway before configuring the NTP server.
-
Page 53: Administration
NOTE: If admin password was set but has been lost, it can be erased by AV Costar Utility using the key file. Please contact AV Costar™ technical support to obtain the key file required to perform this function. Or, if the camera... -
Page 54: Support
Page 53 of 54 Support Menu Feature Description Support Provides several hyperlinks to get more information on the camera. - Page 55 220.00 8.66 220.00 8.66 CABLE POSITION Paper Size: Tabloid 196.00 7.72...
- Page 56 © 2020 AV Costar™ All rights reserved. No part of this publication may be reproduced by any means without written permission from AV Costar™. The information in this publication is believed to be accurate in all respects. However, AV Costar™ cannot assume responsibility for any consequences resulting from the use thereof.
Need help?
Do you have a question about the ConteraIP Omni LX and is the answer not in the manual?
Questions and answers