
Related Manuals for APTO PJ Production & Hans Thyge & Co 6000-0039


Summary of Contents for APTO PJ Production & Hans Thyge & Co 6000-0039
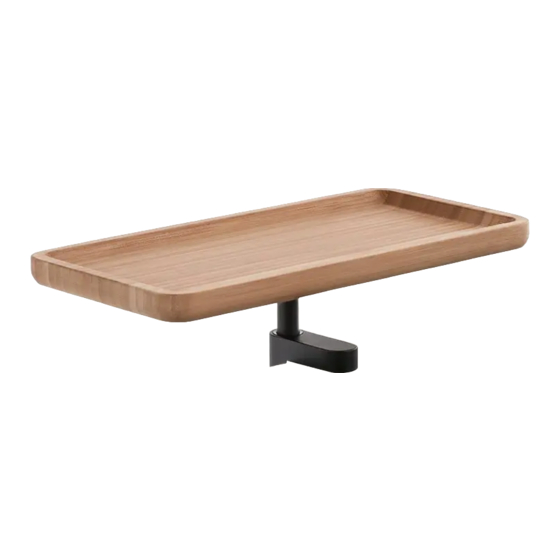
- Page 1 INSTRUCTION MANUAL TABLE SHELF - BAMBOO DESIGNED BY PJ PRODUCTION & HANS THYGE & CO Designed by PJ Production & Hans Thyge & Co // Hårup Skovvej 2, 8600 Silkeborg, Danmark // + 45 86 81 23 75 // www.aptocollection.dk Copyright ©...
- Page 2 INSTRUCTION MANUAL PARTS 1 x bamboo table tray 5 x self-tapping screws 1 x tube 1 x mount 1 x socket screw TABLE SHELF - BAMBOO Bamboo with Scandinavian Matte Black tube: 6000-0039 Designed by PJ Production & Hans Thyge & Co // Hårup Skovvej 2, 8600 Silkeborg, Danmark // + 45 86 81 23 75 // www.aptocollection.dk Copyright ©...
-
Page 3: What You Will Need
INSTRUCTION MANUAL WHAT YOU WILL NEED 1 x MULTI CLAMP 1 x SCREWDRIVER 1 x ALLEN WRENCH Nordic Dark Blue: 6000-0000-5008 One screwdriver. Please note that this is not The Allen wrench is included in the multi Danish Dusty Green: 6000-0000-7033 included! clamp box Scandinavian Matte Black: 6000-0000-9000... - Page 4 INSTRUCTION MANUAL STEP 1 Start by aligning the mount and the reserved side of the table shelf top before continuing. Now connect the mount and bamboo table shelf with the five included self-tapping screws. When these are connected, carefully insert the tip of the screwdriver into the hexogon cross section of the self-tapping screw and turn the screwdriver in a clockwise fashion until the screw has been sufficiently tightened.
- Page 5 INSTRUCTION MANUAL STEP 2 Now carefully connect the mount and the tube manually by hands in a clockwise fashion until the tube has been sufficiently tightened. Designed by PJ Production & Hans Thyge & Co // Hårup Skovvej 2, 8600 Silkeborg, Danmark // + 45 86 81 23 75 // www.aptocollection.dk Copyright ©...
- Page 6 INSTRUCTION MANUAL STEP 3 Carefully lead the socket screw through the hole in order to fastened and stabilize the bamboo table shelf Designed by PJ Production & Hans Thyge & Co // Hårup Skovvej 2, 8600 Silkeborg, Danmark // + 45 86 81 23 75 // www.aptocollection.dk Copyright ©...
- Page 7 INSTRUCTION MANUAL STEP 4 Carefully lead the tube through the hole at the top of the multi clamp Designed by PJ Production & Hans Thyge & Co // Hårup Skovvej 2, 8600 Silkeborg, Danmark // + 45 86 81 23 75 // www.aptocollection.dk Copyright ©...
- Page 8 INSTRUCTION MANUAL STEP 5 The finger screw must be open entirely before continuing. Now carefully insert the tip of the Allen wrench into the hexagon cross section of the socket screw and turn the wrench in a clockwise fashion until the socket screw has been sufficiently tightened. Designed by PJ Production &...
- Page 9 INSTRUCTION MANUAL STEP 6 The table shelf can now be attached to the prefered surface. Designed by PJ Production & Hans Thyge & Co // Hårup Skovvej 2, 8600 Silkeborg, Danmark // + 45 86 81 23 75 // www.aptocollection.dk Copyright ©...
- Page 10 INSTRUCTION MANUAL STEP 7 When the placement of the table shelf is correctly, then tighten the finger screw completely. Designed by PJ Production & Hans Thyge & Co // Hårup Skovvej 2, 8600 Silkeborg, Danmark // + 45 86 81 23 75 // www.aptocollection.dk Copyright ©...
- Page 11 Hårup Skovvej 2, 8600 Silkeborg, Danmark + 45 86 81 23 75 // www.aptocollection.dk D A N I S H D E S I G N Copyright ©...
Need help?
Do you have a question about the PJ Production & Hans Thyge & Co 6000-0039 and is the answer not in the manual?
Questions and answers