Table of Contents
Advertisement
Quick Links
MODEL: HD Dumpster Tug Electric (TT-HD-EA-8) 5,000 Lbs
Airtug, LLC is not responsible for damage sustained when
proper clearance is not maintained by the operator
between the tug and its surroundings.
Caution:
Braking too abruptly from a higher speed can
seriously damage the differential ring gear. This is
considered abuse and will not be covered by the transaxle
warranty.
Note: All reference to "right" and "left" orientation is made
while standing behind the tug, looking forward.
Recommendations: Ensure the rear wheels of the dumpster are
fixed in place and DO NOT caster or rotate. The front wheels can
and should rotate or caster for ease of movement when not using
the Airtug®. At least 15% of length of dumpster needs to be
beyond rear caster (ie - 100 inch long dumpster - need at least 15
inches from center of fixed caster to rear edge of dumpster). For
dumpsters with a gross weight over 3,000 pounds, the rear fixed
caster should be placed such that 20% of the dumpster is beyond
the fixed caster (ie. - 100 inch long dumpster - need at least 20"
from center of fixed caster to rear edge of dumpster).
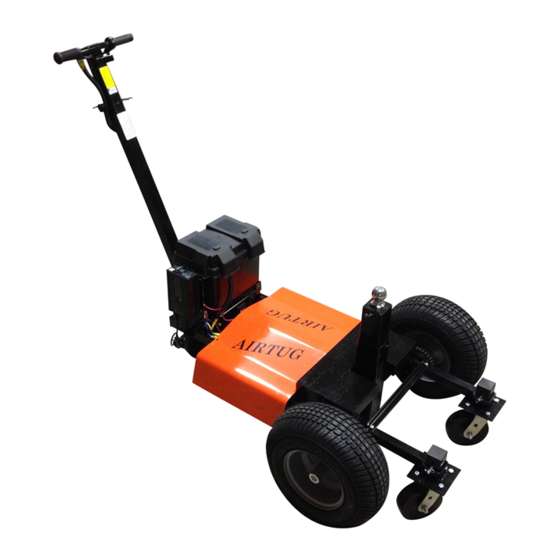
Components that come with the HD Dumpster Attachment:
Hardware
a.
3/8-16 x 1.5" bolts - 4 pcs
b.
3/8-16 Nylon Lock Nuts - 4 pcs
c.
3/8 washers - 8 pcs
d.
1/2 x 3" clevis pin and hairpin - 1 pc each
SAVE THIS DOCUMENT AND ENSURE ALL OPERATORS READ IT PRIOR TO MOVING ANY DUMPSTERS
AIRTUG
®
Assembly & Operating Instructions
Dumpster Tugs
1
100%
15%
Advertisement
Table of Contents

Related Manuals for AIRTUG HD Dumpster Tug Electric


Summary of Contents for AIRTUG HD Dumpster Tug Electric
- Page 1 100% the Airtug®. At least 15% of length of dumpster needs to be beyond rear caster (ie - 100 inch long dumpster - need at least 15 inches from center of fixed caster to rear edge of dumpster). For dumpsters with a gross weight over 3,000 pounds, the rear fixed...
- Page 2 Assembly Instructions Step 1: HANDLE Slide the handle through the “U” bolt (take care while sliding the wires through as well) (leave the nuts loose for now to allow the handle to slide into the “U” bolt). Insert second U bolt as shown Tighten the “U”...
- Page 3 Step 4: Connect red wire with fuse holder from the handle to the mating fuse holder on the side of the batteries Step 5: Connect the yellow in line fuse holder(25A- red wire) and black with male bullet from the handle to the corresponding wire coming out the front of the battery box.
- Page 4 We recommend welding it to the dumpster, if possible. If you are bolting it, mark the holes and drill 3/8” holes and secure it in place using the hardware supplied. Airtug® / 1350 Chester Industrial Parkway, Avon OH 44011 / 216-941-9781 / www.airtug.com...
- Page 5 There is a sticker on the handle that lists recommendations to improve traction. Lowering the tire pressure on the tug could improve traction. Airtug® sells additional weight packs if you are having problems with traction and have tried all the recommendations on the handle. For best practice, safety, and for the best traction, begin movement as slowly as possible to put the dumpster in motion.
- Page 6 Tire Pressure: The tire pressure can range from 30 psi to the maximum tire pressure of 70 psi. It should be reduced for added traction for lighter dumpsters. Lower pressures improve traction. Batteries: Keep the batteries fully charged. The battery performance will diminish measurably as the ambient air temperature drops.
Need help?
Do you have a question about the HD Dumpster Tug Electric and is the answer not in the manual?
Questions and answers