Table of Contents
Advertisement
TM
iSM1080
INSTRUCTION MANUAL/MANUAL DE INSTRUCCIONES
/MODE D'EMPLOI
www.singingmachine.com
The Singing Machine® is a registered trademark of The Singing Machine Co., Inc.
The Singing Machine® es marca registrada de The Singing Machine Co., Inc.
The Singing Machine® est une marque déposée de The Singing Machine Co., Inc.
Advertisement
Table of Contents

Related Manuals for The Singing Machine iSM1080


Summary of Contents for The Singing Machine iSM1080
- Page 1 /MODE D’EMPLOI www.singingmachine.com The Singing Machine® is a registered trademark of The Singing Machine Co., Inc. The Singing Machine® es marca registrada de The Singing Machine Co., Inc. The Singing Machine® est une marque déposée de The Singing Machine Co., Inc.
- Page 2 Warnings FCC WARNING: This equipment may generate or use radio frequency CAUTION energy. Changes or modifications to this equipment may cause harmful interference unless the modifications are expressly approved in the RISK OF ELECTRIC SHOCK instruction manual. The user could lose the authority to operate this DO NOT OPEN equipment if an unauthorized change or modification is made.
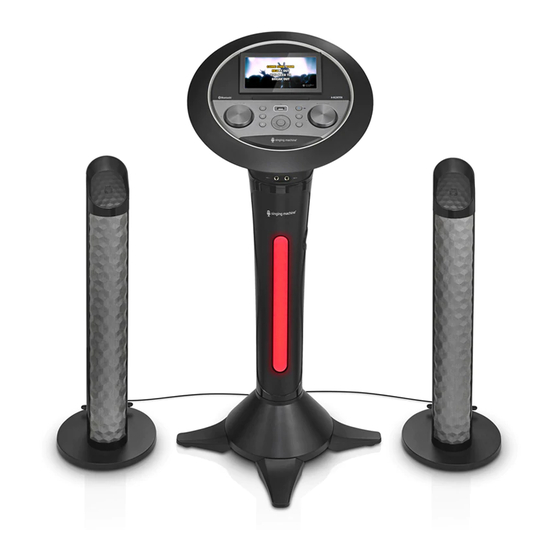
- Page 3 Included Please make sure that the following items are included. Main Unit Pedestal Feet x 4 Tower Speaker x 2 Pedestal Speaker Stand x 2 Pedestal jack cover Wired Microphone x 2 Speaker Stand Screws x 4 Pedestal Manual Screws x 5 AC Adapter —...
- Page 4 Assembly Install the four pedestal feet u into the pedestal base and secure each with one screw v. Insert the main unit into the pedestal u and then gently rotate clockwise v until the screw hole on the base aligns with the screw hole on the pedestal.
- Page 5 Assembly Connect to AC power, HDMI (if desired) and speakers as shown on page 7. Put the pedestal jack cover onto the rear of the main unit. You will hear a "click" sound when locked. Place the tower speaker on the speaker stand while aligning the screw holes u.
- Page 6 Location of Controls (Top) 1. Bluetooth Indicator 9. MUSIC VOLUME Control (RECORD) Button 2. Bluetooth Button HOME Button MIC VOLUME/ECHO Control 3. FUNCTION Indicator (Back / Navigation Left) Button 4. USB Port (PLAY/PAUSE)/ 5. Touch Screen ENTER button (Navigation Up) (Navigation Down) Button Button...
- Page 7 Location of Controls 1. Mic 1 Jack 8. Left Tower Speaker Jack 2. Mic 2 Jack 9. Right Tower Speaker Jack 3. Retractable MIC holders 10. Subwoofer Jack 4. Cord management clamps 11. DC IN Jack 5. Lights 12. HDMI Jack (Video only) 6.
- Page 8 Connections Connecting the Microphone(s) Microphones: Connect a microphone into Mic jack 1 u as well as Mic jack 2 v (when desired). Note: Do not drop or tap the Mic as damage to the Mic or speakers may occur. Do not twirl the microphone cord as it will cause damage to the encased wiring.
- Page 9 Connections Connecting to Line Out Jack This unit can be connected to another audio system for greater audio output via 3.5mm AUX cord (not included). Plug one end of AUX cord into the LINE OUT jack located on the rear of the machine.
- Page 10 Connections TFT Touch Screen The TFT touch screen will be switched on automatically when the unit is powered on. To turn the screen off, press and hold (LIGHTS) button. Repeat the same step to turn the screen on again. Lights Mode There are three Light modes.
- Page 11 Operation WiFi & Settings Connect the unit as described previously. Press the (ON/ STANDBY) button to turn the unit on. The set up Wi-Fi connection window will pop up. Select SET UP icon on the touch (PLAY/PAUSE/ screen or ENTER) button on the control panel.
- Page 12 Operation WiFi & Settings You can always change the Wi-Fi network, by selecting the WiFi & SETTINGS icon on the touch screen or by using the navigation buttons then press (PLAY/PAUSE/ENTER) button on the control panel to enter the WiFi settings mode. Select Wi-Fi and connect as previously described, if you want Settings...
- Page 13 Operation Accessing the Singing Machine Karaoke Catalog Connect the unit as described previously. Press the (ON/ STANDBY) button to turn the unit on. The function indicator will light up. Singing Machine Karaoke icon using the touch screen or / /...
- Page 14 Operation Accessing the Singing Machine Karaoke Catalog (Continued) Adjust the MUSIC VOLUME control as desired. Connect the microphone(s) and slide the ON/OFF switch on the microphone to the ON position. Adjust the MIC VOLUME/ECHO control as desired. Increasing this control will increase the volume of both microphones.
- Page 15 Operation Accessing Singing Machine Karaoke Catalog (Continued) RECORD YOUR VOCAL PERFORMANCE: To record your singing as well as the music, press the (RECORD) button. Recording will begin and the recording indicator will display on-screen and the function indicator will begin flashing red. When done recording, press (RECORD) button again;...
- Page 16 Operation Applications Connect the unit as described previously. Press the (ON/ STANDBY) button to turn the unit on. The function indicator will light up. Select APPLICATIONS icon using the touch screen or / / / (PLAY/ navigation and PAUSE/ENTER) buttons on the control panel.
- Page 17 Operation Using a Bluetooth Device Connect the unit as described (ON/ previously. Press the STANDBY) button to turn the unit on. The function indicator will light blue. Select BLUETOOTH icon using the touch screen or / / / (PLAY/ navigation and PAUSE/ENTER) buttons to enter the bluetooth mode.
- Page 18 Your Music Device is connected Your Music Device is connected Operation Using a Bluetooth Device (Continued) The screen will show that your Bluetooth device is connected successfully followed by a paired sound. Notes: • If your Bluetooth prompts you for a passcode during the pairing process, please enter “0000”...
- Page 19 Operation Using a Bluetooth Device (Continued) MIC VOLUME/ECHO Adjust the control as desired. Increasing this control will increase the volume of both microphones. Press then rotate the VOLUME/ECHO control as desired to add an echo effect to your voice. Rotate towards MAX to increase the echo.
- Page 20 Operation Using the LINE IN Jack Connect the unit as described (ON/ previously. Press the STANDBY) button to turn the unit on. The function indicator will light up. Connect the external device by using an appropriate cable (3.5mm audio cable not included) to the LINE IN Jack on the rear of this unit as previous described.
- Page 21 Operation Using the LINE IN Jack (Continued) Adjust the MUSIC VOLUME control as desired. Connect microphone(s) and slide the ON/OFF switch on the microphone to the ON position. Adjust the MIC VOLUME/ECHO control as desired. Increasing this control will increase the volume of both microphones.
- Page 22 Operation Using the LINE IN Jack (Continued) RECORD YOUR VOCAL PERFORMANCE: To record your singing as well as (RECORD) the music, press the button. Recording will begin and the recording indicator will show on-screen and the function indicator will start flashing red. When done recording, press (RECORD) button again;...
- Page 23 Operation Playing Songs from the Recorded Files Connect the unit as described (ON/ previously. Press the STANDBY) button to turn the unit on. The function indicator will light up. Insert a USB flash drive into the USB port on the unit. Select RECORDINGS icon using the touch screen or / / / Navigation and...
- Page 24 Operation Playing Songs from the Recorded Files (Continued) Adjust the MUSIC VOLUME control as desired. Connect microphone(s) and slide the ON/OFF switch on the microphone to the ON position. MIC VOLUME/ECHO Adjust the control as desired. Increasing this control will increase the volume of both microphones.
- Page 25 Operation Playing Songs from the Recorded Files (Continued) SKIP: Advance or go back one track by pressing the (navigation) button. RECORD YOUR VOCAL PERFORMANCE: To record your singing as well as (RECORD) the music, press the button. Recording will begin and the recording indicator will display on-screen and the function indicator will begin flashing red.
- Page 26 Troubleshooting Guide Should this unit exhibit a problem, check the following before seeking service: No Power • Power is not on; press the ON/STANDBY button to turn power on. • Confirm that the AC adapter is connected securely to the rear of the unit. •...
- Page 27 The Bluetooth® word mark and logos are registered trademarks owned by Bluetooth SIG, Inc. and any use of such marks and logos by The Singing Machine Company, Inc. is under license. Other trademarks and trade names are those of their respective owners.
- Page 28 The Singing Machine Company, Inc. 4060 E Jurupa Street, Unit B Ontario, CA 91761-1413 USA U.S. Representative Company Name : The Singing Machine Company, Inc. Address : 6301 NW 5th Way, Suite 2900, Fort Lauderdale, FL33309, USA PRINTED IN CHINA...
Need help?
Do you have a question about the iSM1080 and is the answer not in the manual?
Questions and answers
How can I order replacement microphones for this unit