
Related Manuals for Avitech Pacific DA-204

Summary of Contents for Avitech Pacific DA-204
- Page 1 User Manual Pacific DA-204 12G/6G/3G/HD/SD-SDI Reclocking Distribution Amplifier Revision 1.0.0, (Oct, 2015)
-
Page 2: About This Manual
Hardware Configuration discusses the steps to install/remove modular cards of the Pacific DA-204. System Setup and DIP Switch Configuration covers signal routings of the Pacific DA-204 via DIP switches. The following conventions are used to distinguish elements of text throughout this manual. -
Page 3: Table Of Contents
1.1 Package Contents ........................1 1.2 Product Features........................2 1.3 Specifications ......................... 3 1.4. Connections to the Pacific DA-204 ..................4 2. Hardware Configuration....................6 2.1 Installing a New Card on Blank Slot ................... 6 2.2 Removing a Previously Installed Card ................7... -
Page 4: Warranty
Properly shielded and grounded cables and connectors must be used in order to meet FCC emission limits. Avitech is not responsible for any radio or Limitation of Liability television interference caused by using other than recommended Avitech’s liability under this warranty shall not exceed the purchase... -
Page 5: Getting Started
This chapter introduces the features, specifications, as well as the external components of Avitech Pacific DA-204. 1.1 Package Contents For the modular 1RU Pacific DA-204, the following standard items are included in the shipping package: Avitech Pacific DA-204 Utility Disc (user manual) -
Page 6: Product Features
DIP switch. Automatically detecting input signal absence, the Pacific DA-204 manages to reroute and switch to the backup source upon signal loss (less than 60 milliseconds to detect and complete signal rerouting). Incorporating adaptive cable equalizer, reclocker and low-jitter cable driver, the Pacific DA-204 ensures long cable runs while maintaining signal integrity for high-resolution videos with up to 4K clarity. -
Page 7: Specifications
(BNC connector) 3Gbps Card / 3Gs supports data rates up to 2.97 Gbps (3G-SDI) 2 × BNC per card / standalone Pacific DA-204 Output Follows SDI input (non-configurable) 12G / 6G / 3G / HD / SD-SDI ... -
Page 8: Connections To The Pacific Da-204
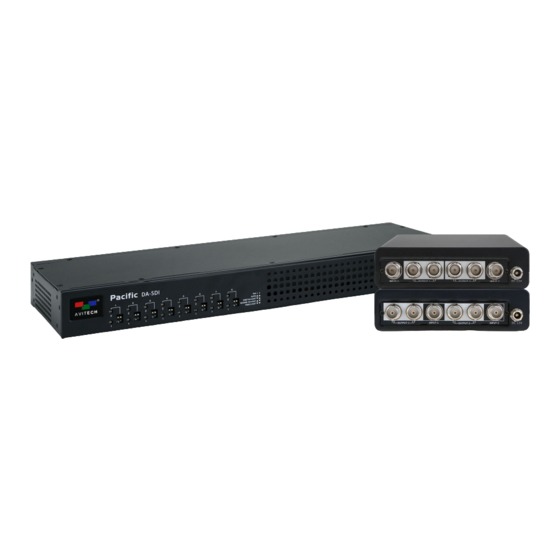
1.4. Connections to the Pacific DA-204 Figure 1-1 Pacific DA-204 (1RU) Components: 12Gbps Card (right) and 3Gbps Card (left) Front Panel 1 / 2 Glows amber when in standby mode (no signal is present at Indicators INPUT-1/2). Glows green when signal is present at INPUT-1/2. - Page 9 Figure 1-2 Pacific DA-204 (standalone) Components: 12Gs (left) and 3Gs (right) Front Panel 1 / 2 Glows amber when in standby mode (no signal is present at Indicators INPUT-1/2). Glows green when signal is present at INPUT-1/2.
-
Page 10: Hardware Configuration
2. Hardware Configuration This chapter discusses the process of installing and removing a card of the 1RU Pacific DA-204. 2.1 Installing a New Card on Blank Slot The Pacific DA-204 1RU chassis accepts the following cards: 12Gbps Card 3Gbps Card To install a card on a blank slot, perform the following steps: Step 1. -
Page 11: Removing A Previously Installed Card
Step 2. Pull the card to be removed away from the chassis. Figure 2-6 Remove the Modular Card Step 3. Install another card (or a back plate cover) to the chassis and secure both screws. All cards are hot-swappable and can be installed or removed without powering down the Pacific DA-204. -
Page 12: System Setup And Dip Switch Configuration
3. System Setup and DIP Switch Configuration This chapter covers the steps of setting up the Pacific DA-204, as well as its four routing modes configured through the front panel DIP switches. To set up the Pacific DA-204, perform the following steps: Step 1. - Page 13 INPUT-1 port. Figure 3-6 Pacific DA-204 DIP Switch Setting (FIXED 2-OUT) Both 12Gbps and 3Gbps Cards of the 1RU Pacific DA-204 as well as the standalone Pacific DA-204 (12Gs and 3Gs) utilize the same DIP switch settings for video routing configurations.
Need help?
Do you have a question about the Pacific DA-204 and is the answer not in the manual?
Questions and answers