Table of Contents
Advertisement
Quick Links
Advertisement
Table of Contents

Related Manuals for HW Group WLD2


Summary of Contents for HW Group WLD2
- Page 1 WLD2 – User manual...
-
Page 2: Safety Warning
The manufacturer is liable for the device only if it is powered by the supplied or approved power source. Should you have any problems with installation and start-up, you can contact our technical support: HW group s. r. o. http://www.hw-group.com email: support@HWg.cz... -
Page 3: Table Of Contents
E-mail tab SMS tab Alarms tab SNMP tab Time tab Portal tab System tab Technical parameters Physical dimensions WiFi Radio WiFi signal strength Connecting WLD2 to the SensDesk portal Using the mobile phone app Firmware upgrade in WLD2 units Contents WLD2... -
Page 4: Features
WLD 2 – Quad water leak detector with WiFi and Ethernet WLD2 is a WiFi / Ethernet water leak detector with support for WWW, SNMP and PoE. To detect leaking liquids, it uses sensing cables. With braided liquid-absorbing cables, it is possible to detect even the smallest volumes of liquids, such as condensation from A/C pipes or water leaks in general –... -
Page 5: Basic Features
• Powered over PoE or from an external adapter. Scalability WLD2 supports up to 4 independent sensing cables. This makes it easier to locate the source of the leak. Each detection circuit can consist of up to 85m of sensing cable + up to 100m of connecting cable. -
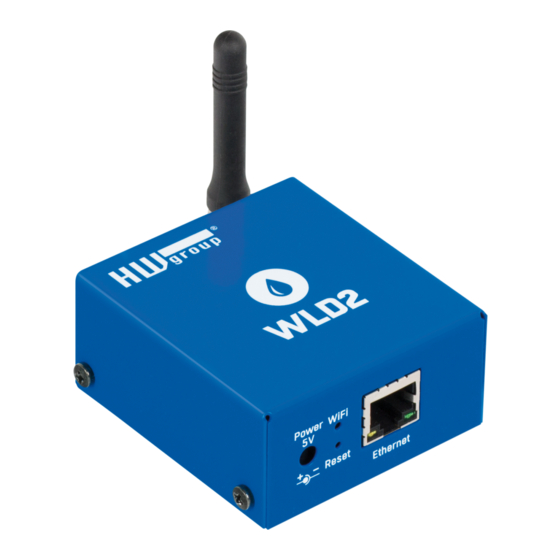
Page 6: Connectors And Connections
2. Press and hold the button. 3. Turn the device on and hold the button Antenna for another 5 seconds. WLD1 WLD2 WLD3 WLD4 4. All LEDs light up in sequence. 5. Turn the device on again, factory defaults are restored. -
Page 7: First Start-Up
• Launch the search by clicking on the Find Devices icon. • The program searches for devices in your local network. Click on the MAC address of the device to open the dialogue window for device settings. First start-up WLD2... - Page 8 Options of opening the website: • Enter the device IP address in the browser window. • Click on the IP address in the HWg-Config program. • Click on the underlined IP address in the HWg-Config application. WLD2 – User Manual HW group...
-
Page 9: Www Interface
– liquid was detected. Name • – sensor name for better identification in larger systems. The name can be set in the Sensors or Digital Input tab. • Current Value – current value including unit of measure. WWW interface WLD2... -
Page 10: General Setup Tab
General Setup tab General section • Device Name – device name (WLD2), allow you to distinguish individual the device in the network. • WWW Info Text – text at the foot of the website. • Temperature Unit – unit for displaying temperature. You can choose between Celsius / Fahrenheit / Kelvin. -
Page 11: Security Tab
Generate the SSL key and certificate Generate a private SSL key and self-signed certificate for closed networks or testing purposes. The generated certificate is self-signed and will be displayed as untrusted. Please add the certificate WWW interface WLD2... -
Page 12: Wifi Tab
Generating the key can take up to 10 minutes. Do not restart the device and do not search for sensors. Otherwise the key generation will be interrupted. WiFi tab When WiFi is off, only the enable option is shown: All the options are available after enabling: WLD2 – User Manual HW group... - Page 13 – WiFi channel on which the connection point operates. • Security – type of secured WiFi communication. Signal • – signal level in DB. The higher the value, the better. WARNING, -60 is more than -90! The highlighted row indicates the currently connected AP . WWW interface WLD2...
- Page 14 • Clicking on BSSID will prefill not only the network name (SSID), but also the MAC address of the specific AP (BSSID). The device then connects to this AP and will not try to reconnect in the case of aggregated networks. Scan AP WLD2 – User Manual HW group...
-
Page 15: Sensors Tab
Disconnect • – liquid was detected. Flooded • – sensor ID identical to ID in Poseidon2 and WLD2 units. Name • – sensor name for better identification in larger systems. The name can be set in the Sensors tab. Current Value •... -
Page 16: Outputs Tab
– ID of the controlled output at the remote device. Authentication • – username and passphrase for controlling the outputs, if set at the device. Test On a Test off • – for testing the settings. WLD2 – User Manual HW group... -
Page 17: E-Mail Tab
Email Test Log section In this section, the SMTP server settings can be tested. Click Test Email to send a test e-mail to the specified Email address. The Debug log window shows the communication with the SMTP server. WWW interface WLD2... -
Page 18: Sms Tab
Test SMS – sends a test text message to the specified Phone number. • Test Call – dials the specified Phone number. • Debug log window – shows the communication with the SMS gateway. WLD2 – User Manual HW group... -
Page 19: Alarms Tab
SMS tab. • Phone number – each field may contain only one phone number. Call • – when checked, the phone number is dialed after the text message is sent (an incoming text alone can be easy to overlook). WWW interface WLD2... -
Page 20: Snmp Tab
Community – name of SNMP community for access to the device via SNMP . 2 communities can be defined. For each Community you can define whether it has rights for: Read • Write • WLD2 – User Manual HW group... - Page 21 This function writes up the entire tree of variables with indication of the entire SNMP OID and explanations of the type of variable. For connecting the device to third-party monitoring systems, there is also an MIC file under the Download MIB file link. WWW interface WLD2...
-
Page 22: Time Tab
The Time Setup section enables filling in the current date and time manually, if synchronisation with the time server cannot be used. SNTP Log The Sync button serves to perform instant synchronisation with the time server. It can also be used to test settings. WLD2 – User Manual HW group... -
Page 23: Portal Tab
Portal tab The tab serves to set parameters for sending data to a remote portal via HWg-PUSH protocol. More about the protocol or support of portal solutions is available on the website http://www.HW-group.com. WWW interface WLD2... - Page 24 AutoPush value. This concerns only the setting of communication between the device and the online portal. The values of local alarms are set in the portal. WLD2 – User Manual HW group...
-
Page 25: System Tab
– the function will draw up the entire tree of variables with indication of the entire SNMP OID and explanations of the variable type. TXT list of common SNMP OIDs • – overview of most important OID from the MIB table. WWW interface WLD2... - Page 26 A device with this setting can be placed on the public internet with no risk of changes in its configuration. • Read available version – lists the latest version of firmware on the HW group update server. • Start Network Upgrade – launches a firmware upgrade from the HW group update server.
-
Page 27: Technical Parameters
Security WEP / WPA / WPA2 PSK / WPA2 TSK / WPS Antenna Internal External sensors Number/Connectors WLD1, WLD2, WLD3, WLD4 / terminal blocks Type Moisture sensing cable Connector Terminal block Sensor states 0 = OK, 1 = Flooded, 2 = Cable disconnected... -
Page 28: Physical Dimensions
Physical dimensions 62,3 Power WiFi Reset Ethernet 53,5 67,3 WLD2 – User Manual HW group... -
Page 29: Wifi Radio
In our case, it is the ratio of received output to an etalon of 1 mW: dBm = 10 * log _____________ 1 mW This means that if you have a signal of -54 dBm, it is higher (better) than a value of -82 dBm. Technical parameters WLD2... -
Page 30: Connecting Wld2 To The Sensdesk Portal
Connecting WLD2 to the SensDesk portal Connect the device to the computer network and set the network parameters (see the First Steps chapter). Check the device website: WLD2 – User Manual HW group... - Page 31 Then click the Manual Push button in order to activate the portal function. Instead of “Portal disabled”, a link SensDesk.com: register your IP sensor should appear in the Portal Message field. Click this link in order to get to the SensDesk.com portal. Connecting WLD2 to the SensDesk portal WLD2...
- Page 32 Register and a registration form will be shown. Enter the login details for your new account and a correct e-mail address. This e-mail address has to be unique for the server (cannot be already registered by another user). WLD2 – User Manual HW group...
- Page 33 10 seconds to show the sensors functionality. This page is active only for approximately 15 minutes after the activation, then the logging period changes to 15 minutes. Connecting WLD2 to the SensDesk portal WLD2...
- Page 34 AutoPush is a function allowing unusual measured data sending, beside the periodical logging, in case that the value change is higher than the AutoPush delta parameter. WLD2 – User Manual HW group...
-
Page 35: Using The Mobile Phone App
Using the mobile phone app The Username and PUSH Device password can also be used in the application settings on mobile phones. Using the mobile phone app WLD2... -
Page 36: Firmware Upgrade In Wld2 Units
Firmware upgrade in WLD2 units System Open the device web interface in the tab. System section contains items to identify and download the current FW version. WLD2 – User Manual HW group... - Page 37 Read available version update server. Clock on the link. Start Network Upgrade – serves to upgrade firmware to the device. The download progress Start Network Upgrade is displayed while upgrading. Click on the link. Firmware upgrade in WLD2 units WLD2...
- Page 38 After the upgrade, the user is requested to restart the device manually. Restart button. The device will not restart automatically and this must To do this, press the be done manually. Check the firmware version after restart. WLD2 – User Manual HW group...
- Page 40 HW group s. r. o. Rumunská 26/122 Prague, 120 00 Czech Republic Phone: +420 222 511 918 Fax: +420 222 513 833 www.HW-group.com...
Need help?
Do you have a question about the WLD2 and is the answer not in the manual?
Questions and answers