Advertisement
Available languages
Available languages
English - German - French - Spanish Manual for
Instant DVD 2.0 / Instant DVD + DV
Convert Home Movies into DVD Movies
User's Guide
If you have any problems or questions on this product, please call :
Technical Support 562.926.4338
North America Support Hours:
M-F : 7 am - 6 pm, PST
Email : support@adstech.com
website : www.adstech.com
European Technical Support: +353.61.702042
:
First Edition
Advertisement
Chapters

Related Manuals for ADS Technologies INSTANT DVD 2

Summary of Contents for ADS Technologies INSTANT DVD 2
-
Page 1: Technical Support
English - German - French - Spanish Manual for Instant DVD 2.0 / Instant DVD + DV Convert Home Movies into DVD Movies User's Guide First Edition If you have any problems or questions on this product, please call : Technical Support 562.926.4338... -
Page 3: Table Of Contents
Ways to Capture and Edit Video ...7 Instant DVD 2.0 Installation Guide ...9 System Requirements...9 Getting Started...9 1. Check Instant DVD 2.0 Contents ...9 2. Wire It Up! ... 11 3. Plug It In ...12 4. Install Device Drivers and Software ...12 5. -
Page 4: Copyright Notice
Copyright Notice The Instant DVD 2.0 is an innovative, hassle-free device that is designed to let you edit and archive your home movies easily. ADS Technologies respects the rights of copyright owners and asks that you do the same. The Copy Right Act gives owners of copyrights the exclusive right to reproduce and prepare derivative works as well as to publicly perform, display and distribute their works. -
Page 5: Quick Setup Steps
8.) Press Play on your video source so you have video playing. 9.) Click Preview on the CapWiz interface and video will appear. Play with CapWiz for a while and then install the other valuable software titles we have included with Instant DVD INSTANT DVD 2.0 Page 5... -
Page 6: Instant Dvd 2.0 Overview
INSTANT DVD 2.0 Page 6 Instant DVD 2.0 Instant DVD 2.0 is a fun and easy way to get DVD, SVCD and VCD video into your Windows PC so you can edit or archive your home movies. Instant DVD then lets you share the video on CD or DVD disk, publish to the Internet or send the video out through the Instant DVD unit to display on a TV or to record on a VCR or camcorder for distribution on Tape. -
Page 7: Ways To Capture And Edit Video
2 hours of DVD quality video on a 4.7 GB DVD disk. Video Studio also supports publishing SVCD (MPEG-2 at 2.4 megabits/sec.) to a CD-ROM. SVCD is playable in many home DVD players. You can fit about 35-40 minutes of SVCD content on a 700 MB CD disk. INSTANT DVD 2.0 Page 7... - Page 8 You simply give the program your video, choose any piece of music (MP3 or WAV) you like, select an editing style and it does the rest. INSTANT DVD 2.0 Page 8...
-
Page 9: Instant Dvd 2.0 Installation Guide
6. Verify Hardware Installation 7. Optimize System for Best Performance 8. Installation Summary & Diagram 9. Start Making DVD Movies! 1. Check Instant DVD 2.0 Contents Hardware: (A) Instant DVD 2.0 device (B) 5 VDC Power supply (C) 6 ft. USB Cable (D) 6 ft. -
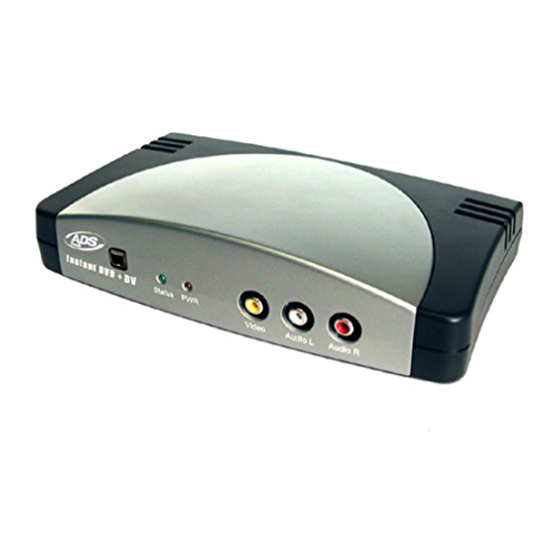
Page 10: Hardware Overview
We recommend using the USB 1.1 port on your motherboard or from a USB 1.1 add-in card. All USB 1.1 cards use the Microsoft USB drivers. If you are using Win98SE or WinME we recommend using the USB 1.1 connection on your PC for proper operation of Instant DVD. Hardware Overview: INSTANT DVD 2.0 Page 10... -
Page 11: Wire It Up
In this section we will connect audio and video cables that you will use to capture audio and video and then send audio and video back to a TV or VCR for viewing or recording. INSTANT DVD 2.0 Page 11... -
Page 12: Plug It In
Drive icon to bring back the Instant DVD Installation screen. c.) Continue installing the key bundled software on to your system; Video Studio 7 and DVD Movie Factory and Muvee AutoProducer. 2. Install VideoStudio 7 from Disk 2. INSTANT DVD 2.0 Page 12... -
Page 13: Verify Hardware Installation
5. Double click Hard Disk (labeled Generic IDE type XXX) 6. Click the settings tab 7. Enable DMA by checking the DMA box. 8. Click OK 9. Click OK Your computer will reboot with DMA enabled. INSTANT DVD 2.0 Page 13... -
Page 14: Installation Summary
America, you will select NTSC. For Users in Europe and many other countries you will select PAL. For more information on these standards, click on “Learn more about worldwide video standards” Step Two: Select Video Inputs &Outputs Choose RCA or S-Video based on your video source INSTANT DVD 2.0 Page 14... - Page 15 Now you are ready to start viewing and capturing video. You will need to start your camcorder or VCR playing. Press Play on your video source (VCR, DVD player, etc.). Click Finish and the Wizard screen will disappear and you will see the full Capture Wizard interface. INSTANT DVD 2.0 Page 15...
-
Page 16: Using Capture Wizard Video Capture/Playback Tool For The First Time
To Stop recording, press the “Stop” ( You will notice that the file name has been added to the playback list box. INSTANT DVD 2.0 Page 16 Status Indicator ) button while previewing video, the video will stop momentarily, then... - Page 17 352 x 240 NTSC / 352 x 288 PAL 480 x 480 NTSC / 480 x 576 PAL 720 x 480 NTSC /720 x 576 PAL ) button or press the “esc” key on your keyboard. INSTANT DVD 2.0 Page 17...
- Page 18 2.) Select the file you would like to play. 3.) Click the PLAY ( ) button to begin playback or double click the file name for Instant playback. 4.) To Stop Playback, Click the Stop ( INSTANT DVD 2.0 Page 18 ) button...
-
Page 19: Capture Wizard Feature And Functions
1.) Click or uncheck - Show Splash Screen to not have splash screen appear at startup 2.) Click or uncheck - Show Wizard to not have Wizard screens appear at startup. You can re-enable these features at anytime by re-selecting the options. INSTANT DVD 2.0 Page 19... -
Page 20: Menu Options
1 Mb/sec. up to 15 Mb/sec. MPEG-2 – You can select any Video capture resolution and any video capture rate from 1 Mb/sec. to 15 Mb/sec. INSTANT DVD 2.0 Page 20 Here you can choose between USB 1.1... -
Page 21: Video Resolution
480 x 576 ( SVCD) 704 x 576 (DVD) 720 x 576 (DVD) (check our web site for F.A.Q’s and other updates to this list): Audio Bit Rates 224 kbits/sec. 128-384 kbits/sec. 192 – 448 kbits/sec. INSTANT DVD 2.0 Page 21... -
Page 22: Menu Options: Brightness/Color
Instant DVD + DV version allows you to connect a digital camcorder and provides the ability to capture from Digital Video directly to MPEG-1 or MPEG-2. These controls allow you to control the camcorder via software so you have the ability to Rewind, Fast Forward, Play and Stop the camcorder via these controls. INSTANT DVD 2.0 Page 22... -
Page 23: Menu Options: For Instant Dvd + Dv Only
Click “Stop” on the CapWiz interface to stop previewing video before you click “Stop” on the DV camcorder control panel. *If you wish to upgrade your Instant DVD 2.0 unit to an Instant DVD + DV unit, contact the ADS Tech customer service department to see if there are any current upgrade offers. -
Page 24: Menu Options: Options
Instant DVD software encoder, uncheck this setting. Skins… This will bring up the Skin Chooser. Currently CapWiz includes 2 skins. You can easily choose the skin of your choice. In the future there may be lots of skins to select. INSTANT DVD 2.0 Page 24... -
Page 25: Help
This will bring up a dialog box with all of your system information. You can click the copy button and paste this information in an e-mail and send to the ADS tech support person if he/she requests it. For example if you want to start recording in 1 hour, set to one INSTANT DVD 2.0 Page 25... -
Page 26: Ulead Videostudio 7
This is an abridged version of the ULEAD VideoStudio 7 User Guide. It's contents have been customized for use with Instant DVD 2.0. The full edition of the ULEAD VideoStudio 7 User Guide, which is in the Adobe Acrobat PDF file format, can be found on the Instant DVD CD by browsing the ULEAD Software folder. -
Page 27: How Videostudio Works
MPEG-1, and can likewise be produced as single or dual- sided, and single and dual-layered. They can be played on stand-alone DVD players or on the DVD-ROM drive of your PC. INSTANT DVD 2.0 Page 27... -
Page 28: Installing And Running Videostudio 7 (Disk 2)
To run VideoStudio: • Double-click the VideoStudio icon on your Windows desktop. • Select the VideoStudio icon from the VideoStudio program group on the Windows Start menu. INSTANT DVD 2.0 Page 28 VideoStudio installation screen Running VideoStudio from Windows Start menu... -
Page 29: Setting Up For Instant Dvd
2.) Click "Change Capture Plug-in". 3.) The Change Capture Plug-in dialog box will appear. Select "ADS Instant DVD USB2 Capture Plug-in". 4.) Click "OK". 5.) If the Instant DVD capture plug-in was already selected, click "Cancel". INSTANT DVD 2.0 Page 29... -
Page 30: Getting Around Videostudio
Displays all the clips, titles, and effects included in your project. Select the media track that con- tains the clip you want to edit. INSTANT DVD 2.0 Page 30 Preview Window Shows the current clip, video filter, effect, or title. -
Page 31: The Options Panel
• Options: Displays a menu allowing you to modify your capture settings. • Capture Video: Transfers video from your source to your hard disk. • Capture Image: Captures the displayed video frame as an image. INSTANT DVD 2.0 Page 31... -
Page 32: Capture
If a confirmation dialog box appears, click OK to start the capture process. To disable this, click File: Preferences. In the Preferences dialog box, click the Capture Tab and clear Enable press OK to capture. INSTANT DVD 2.0 Page 32... -
Page 33: Video Capture Property Settings Dialog Box
Click OK and you are ready to capture video in Video Studio. Begin Video Capture: 1.) Click the Capture Video icon to begin recording. 2.) Click it once again or click the “esc” key on your keyboard to stop video capture. INSTANT DVD 2.0 Page 33... -
Page 34: Ulead Dvd Moviefactory 2
User Guide Ulead Systems, Inc. October 2002 INSTANT DVD 2.0 Page 34... -
Page 35: Welcome To Ulead Dvd Moviefactory 2
Project settings Note: The availability of the tasks on the left panel will depend on the DVD MovieFactory version that you have. Move to the next step INSTANT DVD 2.0 Page 35 The current step you are in Options for each task... -
Page 36: Which Task Should You Choose
DVD folder located in the hard drive or a disc. You can also choose Copy from - Disc image file to copy a disc image file and burn onto a disc. Click Next to go to the output step directly. (See page 19 for details.) INSTANT DVD 2.0 Page 36... -
Page 37: Working On A Project
Add/Edit Media Clip step Tip: Select Save [Ctrl+S] frequently to safeguard the latest update of your project. INSTANT DVD 2.0 Page 37 Tip: You can change the playback sequence by moving a thumbnail using the drag- and-drop method in the Media clip list. -
Page 38: Capture Settings
Tip: If you experienced dropped frames in your captured video, adjust the Quality level in the MPEG Settings dialog box to a lower value or turn on the DMA setting of your hard drive. INSTANT DVD 2.0 Page 38 . Here, you will see the menu as depicted below. The menu shows... -
Page 39: German Manual
Instant DVD Installationsanleitung ...45 Hardware Überblick...43 Software Installieren ...48 Der Capture-Wizard von USB Instant DVD...50 Wenn Sie das erste Mal mit Capture Wizard arbeiten...52 Capture Wizard - Merkmale und Funktionen ...55 Menuoptionen ...56 VideoStudio...62 DVD Movie Factory 2...71 INSTANT DVD 2.0 Page 39... -
Page 40: Schnell-Setup
8.) Drücken Sie die Play-Taste auf Ihrer Videoquelle und lassen Sie ein Video abspielen. 9.) Klicken Sie auf “Preview” (Vorschau) im CapWiz-Fenster – das Video erscheint auf dem Bildschirm. Experimentieren Sie ein wenig mit CapWiz und installieren Sie anschließend die anderen Softwareprogramme von der CD. INSTANT DVD 2.0 Page 40... -
Page 41: Instant Dvd - Überblick
Ihr Video nach Belieben bearbeiten können. All dies ist mit Instant DVD möglich: Sie haben nicht nur eine, sondern mehrere Möglichkeiten, um Video auf und von Ihrem Computer zu übertragen und auf Disk zu brennen. Instant DVD 2.0 includes several flexible and dynamic software tools for your video projects: Instant DVD 2.0 Mit Instant DVD 2.0 können Sie DVD-, SVCD- und VCD-Video mühelos und... -
Page 42: Video Aufzeichnung Und Bearbeitung
Brennen von SVCD (MPEG-2 bei einer Übertragungsrate von 2,4 Megabit/ Sek.) auf CD-ROM. SVCD lässt sich auf vielen Heim-DVD-Playern abspielen. Auf eine 700 MB CD-ROM passen etwa 35-40 Minuten SVCD-Inhalt. **NÄHERE INFORMATIONEN ZU DIESEN PRODUKTEN FINDEN SIE AUF DER CD** INSTANT DVD 2.0 Page 42... - Page 43 Mal schneller als jede andere Software zur Videobearbeitung. Sie geben dem Programm einfach Ihr Video, wählen einen Musiktitel aus (MP3 oder WAV) und entscheiden sich für einen Bearbeitungsstil. Den Rest erledigt das Programm. **NÄHERE INFORMATIONEN ZU DIESEN PRODUKTEN FINDEN SIE AUF DER CD** INSTANT DVD 2.0 Page 43...
-
Page 44: Erste Schritte
(D) 2 Meter A/V-Kabel (RCA Video und (L+R) Audio an RCA-Video und 3,5 mm Stereo) (E) Zwei (2) Installations-CDs (F) Handbuch INSTANT DVD 2.0 Page 44 Systemanforderungen - Intel Celeron 400 MHz oder AMD Athlon 600 MHZ oder besser - Windows: Win98SE, WinME, Win2000 oder WinXP... -
Page 45: Instant Dvd Installationsanleitung
Wir empfehlen, die USB 1.1-Schnittstelle zu Ihrer Hauptplatine oder zu einer USB 1.1-Add-in-Karte zu verwenden. Alle USB 1.1-Karten verwenden USB-Treiber von Microsoft. Wenn Sie Win98SE oder WinME verwenden, empfehlen wir, den USB 1.1-Anschluss Ihres PCs zu verwenden. HARDWARE - ÜBERBLICK: INSTANT DVD 2.0 Page 45... - Page 46 In diesem Abschnitt schließen wir die Audio- und Videokabel an, die benötigt werden, um Audio und Video auf den Computer zu übertragen und anschließend zur Ansicht bzw. zur Aufnahme an ein Fernseh- oder Videogerät zurückzuschicken. INSTANT DVD 2.0 Page 46...
-
Page 47: Software Installieren
Klicken Sie zweimal rasch hintereinander auf das Symbol für Ihr CD-Laufwerk, wodurch der Installationsbildschirm für Instant DVD wieder erscheint. c.) Installieren Sie als Nächstes die gebündelte Software: VideoStudio 7, DVD Movie Factory und Muvee AutoProducer. 2. Installieren Sie VideoStudio 7 von Disk 2. INSTANT DVD 2.0 Page 47... - Page 48 6. Klicken Sie auf die Registerkarte “Einstellungen” 7. Aktivieren Sie DMA, indem Sie das DMA-Kästchen mit einem Häkchen versehen. 8. Klicken Sie auf OK. 9. Klicken Sie auf OK. Ihr Computer wird neu gestartet. Nach dem Neustart ist DMA aktiviert. INSTANT DVD 2.0 Page 48...
-
Page 49: Der Capture-Wizard Von Usb Instant Dvd
Ländern ist der Videostandard PAL. Wenn Sie nähere Informationen zu diesen Videostandards wünschen, klicken Sie auf “Learn more about worldwide Video standards” Schritt Zwei: Videoeingänge & -ausgänge auswählen Wählen Sie je nach verwendeter Videoquelle entweder RCA oder S-Video aus. INSTANT DVD 2.0 Page 49... - Page 50 Video beginnen können. Dazu müssen Sie Ihren Camcorder bzw. Ihr Videogerät starten. Drücken Sie einfach die Play-Taste auf Ihrer Videoquelle (VCR, DVD-Player usw.). Klicken Sie auf “Finish” (Beenden). Das Setup-Fenster verschwindet und Sie sehen den Capture-Wizard- Programmbildschim. INSTANT DVD 2.0 Page 50...
-
Page 51: Wenn Sie Das Erste Mal Mit Capture Wizard Arbeiten
5.) Sie können den Aufnahmevorgang stoppen, indem Sie entweder die Schaltfläche “Stop” ( ) anklicken oder die Escape-Taste auf Ihrer Tastatur drücken. 6.) Sie werden feststellen, dass der Dateiname jetzt in der Playback-Liste erscheint. INSTANT DVD 2.0 Page 51 Status Indicator... -
Page 52: Aufnahme Starten
Die Statusanzeige wird grün und zeigt “Play”. 2.) Sie können das Playback stoppen, indem Sie auf die Schaltfläche “Stop” ( auf Ihrer Tastatur drücken. INSTANT DVD 2.0 Page 52 ) um die Aufnahme zu starten. 352 x 240 NTSC / 352 x 288 PAL... - Page 53 3.) Klicken Sie auf die Schaltfläche “PLAY” ( ) oder zweimal rasch hintereinander auf den Dateinamen. Letzteres bewirkt, dass das Playback sofort beginnt. 4.) Sie können das Playback jederzeit stoppen, indem Sie auf die Schaltfläche “Stop” ( ) klicken. INSTANT DVD 2.0 Page 53...
-
Page 54: Capture Wizard - Merkmale Und Funktionen
1.) Durch Auswahl bzw. Abwahl von “Show Splash Screen” können Sie festlegen, ob der Startbildschirm bei Programmstart angezeigt wird oder nicht 2.) Durch Auswahl bzw. Abwahl von “Show Wizard” können Sie festlegen, ob der Assistent bei Programmstart aufgerufen wird oder nicht. Sie können diese Optionen jederzeit neu aufrufen und ändern. INSTANT DVD 2.0 Page 54... -
Page 55: Menuoptionen
Sie können jedoch Aufzeichnungsbitraten zwischen 1 Mb/s und 15 Mb/s auswählen. MPEG-2 – Sie können jede beliebige Auflösung und eine beliebige Videoaufnahmerate zwischen 1 Mb/s und 15 Mb/s auswählen. INSTANT DVD 2.0 Page 55 USB 1.1 2,5, 3 oder 4 MB/s*... - Page 56 Bewegung im Bild wird die Bitrate automatisch erhöht, bei nur schwacher Bewegung wird die Bitrate verringert. Auf diese Weise entsteht eine insgesamt bessere Videoqualität bei geringeren Dateigrößen. Die Standardeinstellung für die Aufnahme ist “constant bit rate”, d. h. konstante Bitrate. INSTANT DVD 2.0 Page 56 352 x 288 (VCD) 352 x 576 (1/2 D1)
- Page 57 “Instant DVD + DV” gibt Ihnen die Möglichkeit, einen digitalen Camcorder an Ihren Computer anzuschließen und digitales Video direkt als MPEG-1- oder MPEG-2-Datei aufzuzeichnen. Mit diesen Schaltflächen können Sie den Camcorder über die Software steuern, d. h. vor- und zurückspulen, abspielen und stoppen. INSTANT DVD 2.0 Page 57...
- Page 58 3. Klicken Sie auf die Schaltfläche “Edit” (Bearbeiten). Daraufhin wird der Pfad zu dem Verzeichnis angezeigt, in dem die Programme standardmäßig installiert werden. 4. Sie können den Verzeichnispfad ändern, indem Sie das Kästchen “…” anklicken. Suchen Sie sich den Verzeichnispfad, in dem Sie das Programm installiert haben. INSTANT DVD 2.0 Page 58...
- Page 59 Diese Option ruft den “Skin Chooser” aus. Zurzeit enthält CapWiz 2 Skins, d. h. Layouts für die Benutzeroberfläche. Sie können das gewünschte Skin mühelos auswählen. In Zukunft werden möglicherweise eine Vielzahl von Skins zur Auswahl stehen. INSTANT DVD 2.0 Page 59...
- Page 60 Öffnet eine Adobe-Acrobat-Datei mit dem hier vorliegenden CapWiz-Handbuch. System Info (Systeminformationen) Öffnet eine Dialogbox mit Systeminformationen. Sie können die Schaltfläche “Copy” (Kopieren) anklicken, die Systeminformationen in eine E-Mail einfügen und an das ADS-Supportpersonal schicken, wenn Sie darum gebeten werden. INSTANT DVD 2.0 Page 60...
- Page 61 User Guide ULEAD Systems, Inc. January 2003 INSTANT DVD 2.0 Page 61...
-
Page 62: Videostudio
Datenmenge einer VCD oder SVCD speichern. DVDs arbeiten mit dem MPEG-2-Format, welches eine wesentlich größere Dateigröße als MPEG-1 erlaubt, außerdem können sie ein- und doppelseitig sowie ein- und doppelschichtig bespielt werden. DVDs lassen sich auf DVD-Playern bzw. auf dem DVD-ROM-Laufwerk eines Computers abgespielen. INSTANT DVD 2.0 Page 62... - Page 63 VideoStudio aufrufen: • Klicken Sie zweimal rasch hintereinander auf das VideoStudio-Symbol auf dem Windows-Desktop. ODER • Gehen Sie zum Windows-Startmenü und wählen Sie VideoStudio aus der VideoStudio-Programmgruppe aus. VIDEOSTUDIO Installationsbildschirm VideoStudio über das Windows Startmenü aufrufen INSTANT DVD 2.0 Page 63...
- Page 64 3.) Es erscheint die Dialogbox zum Ändern des Capture-Plugin. Wählen Sie “ADS Instant DVD USB2 Capture Plug-in” aus. 4.) Klicken Sie auf “OK”. 5.) Ist das Instant DVD Capture-Plugin bereits ausgewählt, klicken Sie auf “Cancel”, wodurch der Vorgang abgebrochen wird. INSTANT DVD 2.0 Page 64...
- Page 65 Effekt oder Titel an. Library Navigationsfeld Hier sind alle Ihre Mediaclips Anhand dieser gespeichert und kategorisiert. Schaltflächen können Sie sich vorwärts und rückwärts durch einen Videoclip bewegen und an der gewünschten Stelle bearbeiten bzw. zuschneiden. INSTANT DVD 2.0 Page 65...
- Page 66 • Options (Optionen): Zeigt ein Menü, in dem Sie die Einstellungen für die Videoaufzeichnung modifizieren können. • Capture Video (Video aufzeichnen): Überträgt Video von der Videoquelle auf Ihre Festplatte. • Capture Image (Bild aufzeichnen): Zeichnet den angezeigten Video-Frame als Einzelbild auf. INSTANT DVD 2.0 Page 66...
- Page 67 Sie können diese Dialogbox auch deaktivieren, indem Sie auf “File” -> “Preferences” klicken. Klicken Sie in der Dialogbox mit den Präferenzen auf die Registerkarte “Capture” und wählen Sie “Enable press OK to capture” ab. INSTANT DVD 2.0 Page 67...
- Page 68 1.) Anklicken des “Capture Video”-Symbols startet die Aufnahme. 2.) Sie können den Aufnahmevorgang stoppen, indem Sie entweder erneut auf das “Capture Video”-Symbol klicken oder die Escape-Taste auf Ihrer Tastatur drücken. **NÄHERE INFORMATIONEN ZU DIESEN PRODUKTEN FINDEN SIE AUF DER CD** INSTANT DVD 2.0 Page 68...
- Page 69 User Guide Ulead Systems, Inc. October 2002 INSTANT DVD 2.0 Page 69...
- Page 70 Projekteinstellungen Hinweis: Die Verfügbarkeit der Aufgaben im linken Bildschirmbereich hängt davon ab, mit welcher Version von DVD MovieFactory Sie arbeiten. Weiter zum nächsten Schritt INSTANT DVD 2.0 Page 70 Der aktuelle Arbeitsschritt Optionen für jede Aufgabe Eine kurze Anleitung für...
- Page 71 Option “Copy from - Disc image file” können Sie eine Disk-Image-Datei (d. h. ein genaues Abbild der Disk) kopieren und auf Disk brennen. Anklicken von “Next” bringt Sie direkt zum Ausgabeschritt. (Nähere Einzelheiten siehe Seite 19.) INSTANT DVD 2.0 Page 71...
- Page 72 Sie sich den gewünschten Ordner. • Über die Dialogbox “Capture Video” kann Video lediglich aufgezeichnet werden. Das Abspielen eines aufgezeichneten Videoclips ist nur über die Mediaclip-Liste im Hauptbildschirm möglich. INSTANT DVD 2.0 Page 72 Tipp: Zum Ändern der Reihenfolge, in der die Mediaclips gespielt werden, können Sie die...
- Page 73 Tipp: Wenn bei der Videoübertragung Frames ausgelassen wurden, sollten Sie die Videoqualität (Quality) in der Dialogbox “MPEG Settings” verringern oder DMA auf Ihrer Festplatte aktivieren. **NÄHERE INFORMATIONEN ZU DIESEN PRODUKTEN FINDEN SIE AUF DER CD** ) klicken. Dies bringt Sie zum unten abgebildeten Menü. Das Menü INSTANT DVD 2.0 Page 73...
-
Page 74: French Manual
Table of Contents Etapes d’installation rapide...75 Presentation d'Instant DVD ...76 Instant DVD 2.0 Installation Guide ...79 Presenatation Du Materiel ...80 Installation des applications logicielles ...82 CapWiz pour Instant DVD ...84 Utilisation de l'outil de capture/lecture video CapWiz pour la premiere fois ...86 Caracteristiques et fonctions de CapWiz...89... -
Page 75: Etapes D'installation Rapide
9) Cliquez sur le bouton Preview (Aperçu) de l’interface de Capture Wizard (CapWiz) pour afficher la vidéo. Expérimentez un peu avec CapWiz, puis installez les autres logiciels très utiles qui vous sont fournis avec l’Instant DVD. INSTANT DVD 2.0 Page 75... -
Page 76: Presentation D'instant Dvd
DVD vous permet de réaliser toutes ces opérations. Nous ne vous offrons pas qu’une seule méthode d’utiliser ce produit, mais de nombreuses façons d’importer et d’exporter vos vidéos et de les enregistrer sur disque. Instant DVD 2.0 includes several flexible and dynamic software tools for your video projects: INSTANT DVD 2.0 Page 76 Instant DVD 2.0... - Page 77 SVCD. Vous pouvez faire tenir environ 35 à 40 minutes de vidéo SVCD sur un CD de 700 Mo. **VEUILLEZ CONSULTER LE CD POUR EN SAVOIR PLUS SUR CES PRODUITS ** INSTANT DVD 2.0 Page 77...
- Page 78 (MP3 ou WAV) que vous aimez et de sélectionner un style de montage ; le logiciel se charge du reste. **VEUILLEZ CONSULTER LE CD POUR EN SAVOIR PLUS SUR CES PRODUITS ** INSTANT DVD 2.0 Page 78...
-
Page 79: Configuration Requise
Instant DVD 2.0 Installation Guide Prise en main Les étapes de base sont les suivantes: 1. Vérification du contenu de la boîte Instant DVD 2. Câblage. Connecteurs audio et vidéo 3. Branchement. Alimentation et connexion USB 4. Installation des pilotes du périphérique 5. -
Page 80: Presenatation Du Materiel
USB 1.1 utilisent des pilotes USB Microsoft. Si votre ordinateur tourne sous Win98SE ou WinME, nous vous conseillons d’utiliser la connexion USB 1.1 de votre PC pour assurer le bon fonctionnement de l’Instant DVD. PRESENTATION DU MATERIEL: INSTANT DVD 2.0 Page 80... - Page 81 Dans cette section, nous connecterons tous les câbles audio et vidéo dont vous aurez besoin pour la capture audiovisuelle et pour la retransmission de la séquence audiovisuelle sur une télévision pour la regarder ou sur un magnétoscope pour l’enregistrer. INSTANT DVD 2.0 Page 81...
-
Page 82: Installation Des Applications Logicielles
Double-cliquez sur l’icône du lecteur de CD pour rappeler l’écran d’installation de l’Instant DVD Continuez à installer, sur votre système, les principaux logiciels fournis : VideoStudio 7, DVD Movie Factory et Muvee AutoProducer. 2. Installez VideoStudio 7 à partir du 2 INSTANT DVD 2.0 Page 82... - Page 83 5. Double-cliquez sur Disque dur (marqué Generic IDE type XXX). 6. Cliquez sur l’onglet Paramètres. 7. Activez DMA en cochant la boîte DMA. 8. Cliquez sur OK. 9. Cliquez sur OK. Votre ordinateur se réinitialisera et DMA sera activé. INSTANT DVD 2.0 Page 83...
-
Page 84: Capwiz Pour Instant Dvd
Pour en savoir plus sur les standard de diffusion vidéo, cliquez sur "Learn more about worldwide video standards". étape : Sélectionner les entrées et sorties vidéo Choisissez RCA ou S-Video en fonction de votre source vidéo. INSTANT DVD 2.0 Page 84... - Page 85 Vous devrez démarrer la lecture de votre caméscope ou magnétoscope en appuyant sur le bouton de lecture de votre source vidéo (magnétoscope, lecteur DVD, etc.). Cliquez sur "Finish" pour faire disparaître l’assistant CapWiz et pour afficher l’interface de Capture Wizard dans son intégralité. INSTANT DVD 2.0 Page 85...
-
Page 86: Utilisation De L'outil De Capture/Lecture Video Capwiz Pour La Premiere Fois
Pour arrêter l’enregistrement, appuyez sur le bouton "Stop" ( Vous verrez que le nom du fichier a été ajouté à la fenêtre de liste de lecture "Playback list". INSTANT DVD 2.0 Page 86 Status Indicator ) ou appuyez sur la touche Echap. du clavier pour arrêter la ) pendant la prévisualisation de la... - Page 87 352 x 240 NTSC / 352 x 288 PAL 480 x 480 NTSC / 480 x 576 PAL 720 x 480 NTSC /704 x 576 PAL ) ou appuyez sur la touche Echap. du clavier. INSTANT DVD 2.0 Page 87...
- Page 88 3) Cliquez sur le bouton PLAY ( ) pour initialiser la lecture ou double-cliquez sur le nom du fichier pour une lecture instantanée. 4) Cliquez sur le bouton STOP ( ) pour arrêter la lecture. INSTANT DVD 2.0 Page 88...
-
Page 89: Caracteristiques Et Fonctions De Capwiz
CapWiz. 2) Cliquez ou désélectionnez "Show Wizard" pour empêcher l’apparition des écrans de l’assistant CapWiz lors du lancement de CapWiz. Vous pouvez revalider ces fonctions à n’importe quel moment en les sélectionnant une nouvelle fois. INSTANT DVD 2.0 Page 89... -
Page 90: Options De Menu
(PAL), mais vous pouvez sélectionner un débit binaire de capture vidéo allant de 1 Mb/s à 15 Mb/s. MPEG-2 – Vous pouvez sélectionner n’importe quelle résolution de capture vidéo et n’importe quel débit binaire entre 1 Mb/s et 15 Mb/s. INSTANT DVD 2.0 Page 90 USB 1.1 2,5, 3 ou 4 Mb/s.*... - Page 91 Par défaut, c’est le débit binaire constant qui est mis en fonction. 352 x 288 (VCD) 352 x 576 (1/2 D1) 480 x 576 ( SVCD) 704 x 576 (DVD) 720 x 576 (DVD) Débits binaires audio 224 kbits/s 128-384 kbits/s 192 – 448 kbits/s INSTANT DVD 2.0 Page 91...
- Page 92 MPEG-1 ou MPEG-2. Ces commandes vous permettent, par le biais d’un logiciel, de contrôler le caméscope en effectuant les opérations de rembobinage, d’avance rapide, de lecture et d’arrêt. INSTANT DVD 2.0 Page 92...
- Page 93 *Si vous souhaitez passer du périphérique Instant DVD 2.0 à l’Instant DVD + DV, contactez le service d’assistance clients ADS Tech pour connaître les offres de mise à niveau existantes.
- Page 94 Cette option appelle le sélecteur de "peau". Actuellement CapWiz inclut 2 peaux. Vous pouvez facilement sélectionner la peau de votre choix. A l’avenir, vous disposerez sans doute un grand nombre de "peaux" parmi lesquelles choisir. INSTANT DVD 2.0 Page 94...
- Page 95 Cette option fera apparaître une boîte de dialogue contenant toutes les informations concernant votre système. Vous pouvez cliquer sur le bouton copier, puis collez ces informations dans un e-mail pour l’envoyer au service d’assistance technique ADS sur sa demande. INSTANT DVD 2.0 Page 95...
- Page 96 User Guide ULEAD Systems, Inc. January 2003 INSTANT DVD 2.0 Page 96...
-
Page 97: Videostudio
Le DVD utilise le format MPEG-2, dont la taille de fichier est bien plus grande que celle du MPEG-1, et l’écriture est possible sur les deux faces à couche simple ou double. Il se lit sur les lecteurs de salon DVD ou sur les lecteurs DVD-ROM de votre PC. INSTANT DVD 2.0 Page 97... - Page 98 Double-cliquez sur l’icône VideoStudio situé sur le bureau Windows ; • Dans le menu Démarrer de Windows, sélectionnez l’icône VideoStudio se trouvant sous le groupe de programmes VideoStudio. INSTANT DVD 2.0 Page 98 Ecran d’installation VIDEOSTUDIO Lancement de VideoStudio à partir du menu Démarrer de Windows...
- Page 99 3.) La fenêtre " Change Capture Plug-in " apparaît. Sélectionnez " ADS Instant DVD USB2 Capture Plug-in ". 4.) Cliquez sur " OK ". 5.) Si le module d’extension de capture de l’Instant DVD était déjà sélectionné, cliquez sur " Annuler ". INSTANT DVD 2.0 Page 99...
- Page 100 Sélectionnez la piste de matériel qui contient le clip que vous souhaitez modifier. INSTANT DVD 2.0 Page 100 Fenêtre de prévisualisation Elle affiche le clip, le filtre vidéo, l’effet ou le titre actif.
- Page 101 • Capture Video (Vidéo de capture) : Pour transférer la vidéo de la source au disque dur. • Capture Image (Image de capture) : Pour capturer la trame de vidéo capturée comme une image. INSTANT DVD 2.0 Page 101...
- Page 102 • Le nombre normal de trames éliminées est zéro. En cas d’élimination de trames, vérifiez si l’option DMA est bien activée. INSTANT DVD 2.0 Page 102 Si une boîte de dialogue de confirmation apparaît, cliquez sur OK pour entamer le processus de capture.
- Page 103 1) Cliquez sur l’icône de capture vidéo pour entamer l’enregistrement. 2) Cliquez une seconde fois sur cette icône ou cliquez sur la touche Echap. du clavier pour arrêter la capture vidéo. **VEUILLEZ CONSULTER LE CD POUR EN SAVOIR PLUS SUR CES PRODUITS** INSTANT DVD 2.0 Page 103...
-
Page 104: Dvd Movie Factory 2
User Guide Ulead Systems, Inc. October 2002 INSTANT DVD 2.0 Page 104... - Page 105 Remarque : L’accessibilité des tâches situées sur le panneau de gauche dépendra de la version de DVD MovieFactory en votre possession. Passage à l’étape suivante INSTANT DVD 2.0 Page 105 Etape actuelle à laquelle vous vous trouvez Options de chaque tâches...
- Page 106 Vous pouvez également choisir « Copy from - Disc image file » pour copier un fichier image de disque et le graver sur un disque. Cliquez Next pour passer directement à l’étape de sortie (voir page 19 pour en savoir plus). INSTANT DVD 2.0 Page 106...
- Page 107 Conseil : Sélectionnez la fonction de sauvegarde Save [Ctrl+S] fréquemment pour enregistrer la dernière mise à jour de votre projet. INSTANT DVD 2.0 Page 107 Conseil : Vous pouvez changer la séquence de lecture en glissant-déposant une vignette dans la liste de séquences de...
- Page 108 Conseil : En cas d’élimination de trames dans la vidéo capturée, baissez le niveau de " Quality " dans la fenêtre " MPEG Setting " ou activez l’option DMA de votre disque dur. INSTANT DVD 2.0 Page 108 ) pour appeler le menu illustré...
-
Page 109: Spanish Manual
Pasos rapidos de configuracion ... 110 Perspectiva General De Instant DVD ... 111 Formas de Captura y Edicion de Video... 112 Guia de Instalacion de Instant DVD 2.0 ... 114 Perspectiva General Del Equipo Fisico... 115 Instale las aplicaciones de software ... 117 Capture Wizard de USB Instant DVD ... -
Page 110: Pasos Rapidos De Configuracion
9.) Haga clic en Preview [Previsualizar] en la interfaz de CapWiz y aparecerá el vídeo. Familiarícese con CapWiz durante un tiempo y luego instale los otros valiosos programas de software que hemos incluido con Instant DVD INSTANT DVD 2.0 Page 110... -
Page 111: Perspectiva General De Instant Dvd
No damos sólo una única forma de usar el producto, sino que proveemos muchas maneras de hacer vídeos, reproducirlos y guardarlos en disco. Instant DVD 2.0 includes several flexible and dynamic software tools for your video projects: Instant DVD 2.0 Instant DVD 2.0 es una forma divertida y fácil de transferir vídeo DVD,... -
Page 112: Formas De Captura Y Edicion De Video
(MPEG-2 a 2,4 megabits/seg.) en un CD-ROM. SVCD se puede reproducir en muchos reproductores de DVD caseros. En un disco CD de 700 MB puede meter alrededor de 35-40 minutos de contenido SVCD. **SE RUEGA VER EL CD PARA MÁS INFORMACIÓN ACERCA DE ESTOS PRODUCTOS** INSTANT DVD 2.0 Page 112... - Page 113 (MP3 o WAV), seleccionar un estilo de editar y el programa hace el resto. **SE RUEGA VER EL CD PARA MÁS INFORMACIÓN ACERCA DE ESTOS PRODUCTOS** INSTANT DVD 2.0 Page 113...
-
Page 114: Guia De Instalacion De Instant Dvd 2.0
Guía de Instalación de Instant DVD 2.0 Puesta en marcha Los pasos básicos son: 1. Compruebe el contenido del paquete USB Instant DVD 2. ¡Conéctelo! – Conexiones de audio y vídeo 3. ¡Enchúfelo! – Conexión de corriente y USB 4. Instale los controladores de dispositivo 5. -
Page 115: Perspectiva General Del Equipo Fisico
USB 1.1 utilizan los controladores de USB de Microsoft. Si utiliza Win98SE o WinME recomendamos que utilice la conexión de USB 1.1 de su ordenador para el funcionamiento correcto de Instant DVD. PERSPECTIVA GENERAL DEL EQUIPO FÍSICO INSTANT DVD 2.0 Page 115... - Page 116 En esta sección conectaremos los cables de audio y vídeo que utilizará para captar audio y vídeo y luego enviar el audio y el vídeo de vuelta a una TV o un VCR para ver o grabar. INSTANT DVD 2.0 Page 116...
-
Page 117: Instale Las Aplicaciones De Software
Unidad CD para regresar a la pantalla de instalación de Instant DVD. c) Prosiga instalando el paquete de software clave en el sistema: Video Studio 7, DVD Movie Factory y Muvee AutoProducer. 2. Instale VideoStudio 7 del disco 2. INSTANT DVD 2.0 Page 117... - Page 118 6. Haga clic en la ficha de Configuración 7. Active el DMA marcando la casilla de DMA. 8. Haga clic en Aceptar 9. Haga clic en Aceptar Ahora el ordenador se reiniciará con el DMA activado. INSTANT DVD 2.0 Page 118...
-
Page 119: Resumen De La Instalación
Para más información acerca de estas normas, haga clic en “Aprender más acerca de las normas de vídeo mundiales” Paso segundo: Selección de entradas y salidas de vídeo Elija RCA o S-Video, según su fuente de vídeo INSTANT DVD 2.0 Page 119... - Page 120 VCR. Pulse Reproducir en la fuente de vídeo (VCR, reproductor de DVD, etc.). Haga clic en Finalizar y la pantalla del Wizard desaparecerá y verá la interfaz completa de Capture Wizard. INSTANT DVD 2.0 Page 120...
-
Page 121: Utilizacion De La Herramienta De Captar/Reproducir Video De Capture Wiard Por Primera Vez
6.) Notará que el nombre del archivo se ha añadido a la casilla de lista de reproducción. ) “Grabar” rojo mientras previsualiza un vídeo, éste se detendrá ) “Parar” o pulse la tecla de “Esc” del teclado. INSTANT DVD 2.0 Page 121 Status Indicator... - Page 122 Play. 2.) Para detener la reproducción, haga clic en el botón ( INSTANT DVD 2.0 Page 122 ) “Parar” o pulse la tecla de “Esc” del teclado. 352 x 240 NTSC / 352 x 288 PAL...
- Page 123 3.) Haga clic en el botón ( ) REPRODUCIR para iniciar la reproducción o haga doble clic en el nombre del archivo para una reproducción instantánea. 4.) Para detener la reproducción, haga clic en el botón ( ) Parar. INSTANT DVD 2.0 Page 123...
-
Page 124: Caracteristicas Y Funciones De Capture Wizard
2.) Haga clic en o desmarque Show Wizard para que las pantallas del asistente no aparezcan en el arranque. Puede reactivar estas prestaciones en cualquier momento volviendo a seleccionar las opciones. INSTANT DVD 2.0 Page 124... -
Page 125: Opciones De Menu
1 Mb/seg. hasta 15 Mb/seg. MPEG-2: Puede seleccionar cualquier resolución de captura de vídeo y cualquier tasa de bits de captura de vídeo desde 1 Mb/seg. hasta 15 Mb/seg. INSTANT DVD 2.0 Page 125 USB 1.1 2,5, 3 o 4 Mb/seg.*... - Page 126 áreas donde no haya demasiado cambio. Esto dará como resultado una calidad general mejorada y un tamaño general de archivo inferior. Los valores predeterminados de captura están establecidos en tasa de bits constante. INSTANT DVD 2.0 Page 126 352 x 288 (VCD) 352 x 576 (1/2 D1)
- Page 127 MPEG-1 o MPEG-2. Estos mandos le permiten controlar la cámara de vídeo a través del software, así que posee la capacidad de rebobinar, avanzar rápidamente, reproducir y parar la cámara de vídeo a través de estos mandos. INSTANT DVD 2.0 Page 127...
- Page 128 “Parar” en el panel de control de la cámara de vídeo digital. *Si desea actualizar la unidad Instant DVD 2.0 a una unidad Instant DVD + DV, póngase en contacto con el departamento de atención al cliente para ver si hay alguna oferta de actualización actual.
- Page 129 MPEG. Para asegurar que utiliza el decodificador de software de Instant DVD, desmarque este valor. Skins [Superficies]… Esto abrirá el Skin Chooser [Selector de superficies]. Actualmente CapWiz incluye 2 superficies. Puede elegir la que desee fácilmente. En el futuro podría haber una amplia selección. INSTANT DVD 2.0 Page 129...
- Page 130 Esto abrirá un cuadro de diálogo con la información completa del sistema. Puede hacer clic en el botón de copiar y pegar esta información en un correo electrónico y enviarlo al empleado de asistencia técnica de ADS si se lo pide. INSTANT DVD 2.0 Page 130...
- Page 131 User Guide ULEAD Systems, Inc. January 2003 INSTANT DVD 2.0 Page 131...
-
Page 132: Videostudio
MPEG-1 y también se puede utilizar por ambas caras, así como con capas individual y doble. Se pueden reproducir en reproductores de DVD independientes o el lector de DVD-ROM del ordenador. INSTANT DVD 2.0 Page 132... - Page 133 • Haga doble clic en el icono VideoStudio en su escritorio Windows. • Seleccione el icono VideoStudio desde el grupo de programas de VideoStudio en el menú Inicio de Windows. Pantalla de instalación de VIDEOSTUDIO Ejecución de VideoStudio desde el menú de Inicio de Windows INSTANT DVD 2.0 Page 133...
- Page 134 3.) Aparecerá el cuadro de diálogo de Change Capture Plug-in. Seleccione ADS Instant DVD USB2 Capture Plug-in”. 4.) Haga clic en “OK”. 5.) Si ya estaba seleccionado el aditivo de captura de Instant DVD, haga clic en “Cancel” [Cancelar]. INSTANT DVD 2.0 Page 134...
- Page 135 Panel de Navegación Contiene todos los clips y efectos Utilice estos botones multimedia de pronto uso que se para explorar un clip capturaron o importaron de otras seleccionado para edición fuentes de archivo. o recorte de precisión. INSTANT DVD 2.0 Page 135...
- Page 136 • Opciones: Muestra un menú que le permite modificar las configuraciones de captura. • Capturar Vídeo: Transfiere el vídeo desde la origen al disco duro. • Capturar Imagen: Captura el marco de vídeo exhibido como una imagen. INSTANT DVD 2.0 Page 136...
- Page 137 Aceptar para iniciar el proceso de captura. Para desactivar esto, haga clic en Archivo: Preferencias. En el cuadro de diálogo de Preferencias, haga clic en la ficha de Captura, desmarque Activar y haga clic en Aceptar para captura. INSTANT DVD 2.0 Page 137...
- Page 138 1.) Haga clic en el icono de Captura de vídeo para iniciar la grabación. 2.) Haga clic de nuevo o haga clic en la tecla de “Esc” del teclado para detener la captura de vídeo. **SE RUEGA VER EL CD PARA MÁS INFORMACIÓN ACERCA DE ESTOS PRODUCTOS** INSTANT DVD 2.0 Page 138...
- Page 139 User Guide Ulead Systems, Inc. October 2002 INSTANT DVD 2.0 Page 139...
-
Page 140: Dvd Movie Factory 2
Valores del proyecto Nota: La disponibilidad de las tareas del panel izquierdo dependen de la versión de DVD MovieFactory que tenga. Desplazarse al próximo paso INSTANT DVD 2.0 Page 140 El paso en que se encuentra actualmente Opciones con cada tarea Directrices rápidas... - Page 141 DVD ubicada en el disco duro o en un disco. Puede elegir Copiar de archivo de imagen de disco para copiar el archivo de imagen de un disco y grabarlo en un disco. Haga clic en Siguiente para ir directamente al paso de salida. (Véase la página 19 para los detalles.) INSTANT DVD 2.0 Page 141...
- Page 142 • El cuadro de diálogo de Captar vídeo es de uso exclusivo de la captura de vídeo. La reproducción de un clip de vídeo captado sólo se puede hacer en la lista de clips de multimedia de la ventana principal. INSTANT DVD 2.0 Page 142 Sugerencia: Puede cambiar la secuencia de reproducción moviendo...
- Page 143 Valores de MPEG a un valor inferior o active el valor DMA del disco duro. **SE RUEGA VER EL CD PARA MÁS INFORMACIÓN ACERCA DE ESTOS PRODUCTOS** ) Aquí verá el menú como se muestra más adelante. El menú muestra INSTANT DVD 2.0 Page 143...
-
Page 144: Service And Warranty
ADS please see the “Terms and Conditions of Sale” on the reverse side of your sales invoice. Returns to ADS Technologies, Inc. are for repair or warranty replacement only. If you need to return product to ADS Technologies, Inc. for repair or replacement you must follow these steps: 1. -
Page 145: Warranty
ADS Technol- ogies, Inc. product or inability to use the product, even if the dealer or ADS Technologies, Inc. has been advised of such liability or other claims. -
Page 146: Instant Dvd Helpful Hints
CapWiz and Ulead Video Studio portions of this user guide. Having DMA not enabled is the most common cause of poor video captures with symptoms such as dropped frames, jerky preview or video playback that looks like it is playing in fast forward. INSTANT DVD 2.0 Page 146... - Page 147 “Legal” for the VCD, SVCD or DVD standard. Authoring software and DVD players will burn and playback video that meets the standards. This is discussed earlier in the CapWiz portion of this user guide. INSTANT DVD 2.0 Page 147...
- Page 148 Input setting in CapWiz (RCA or S-VHS). Make any changes and start preview again. We hope you enjoy using Instant DVD 2.0. ADS Technologies, Inc. For more help and additional resources visit our support pages: Technical Support: http://www.adstech.com/support/support.asp...
- Page 149 INSTANT DVD 2.0 Page 149...
- Page 150 If you have any problems or questions on this product, please call : Technical Support 562.926.4338 North America Support Hours: M-F : 7 am - 6 pm, PST Email : support@adstech.com website : www.adstech.com European Technical Support: +353.61.702042 ADS Tech North America Office 12627 Hidden Creek Way Cerritos, CA, 90703...
Need help?
Do you have a question about the INSTANT DVD 2 and is the answer not in the manual?
Questions and answers