
Related Manuals for G&D RackConsole 17

Summary of Contents for G&D RackConsole 17
- Page 1 Guntermann & Drunck GmbH www.gdsys.de G&D RackConsole 17 Installation und Bedienung Installation and Operation A9100177-2.31...
- Page 2 © Guntermann & Drunck GmbH 2015. Alle Rechte vorbehalten. Version 2.31 – 09.02.2015 Guntermann & Drunck GmbH Dortmunder Str. 4a 57234 Wilnsdorf Germany Telefon +49 (0) 2739 8901-100 Telefax +49 (0) 2739 8901-120 http://www.GDsys.de sales@GDsys.de i · G&D RackConsole 17...
-
Page 3: Table Of Contents
Inhaltsverzeichnis Inhaltsverzeichnis Sicherheitshinweise ..................2 RackConsole 17 ....................3 Lieferumfang ....................3 Montage ......................4 Anschluss der RackConsole 17 via USB ............4 Bedienung ......................5 Einstellungen ....................6 Bild ........................6 Farbe ......................6 VGA-Einstellungen ................... 6 Einstellungen ..................... 7 Eingänge ..................... -
Page 4: Sicherheitshinweise
Ziehen Sie vor dem Öffnen des Gehäuses immer den Netzstecker. , Vor Reinigung Netzstecker ziehen Ziehen Sie vor der Reinigung des Geräts den Netzstecker. Verwenden Sie zur Reinigung ein trockenes oder leicht angefeuchtetes Tuch. Keine Reinigungsmit- tel verwenden! 2 · G&D RackConsole 17... -
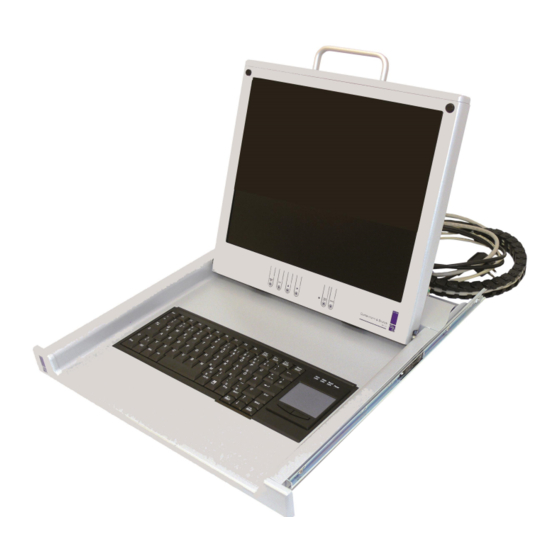
Page 5: Rackconsole 17
1 × Energiekette mit folgenden vorbestückten Kabeln: 1 × Stromanschlusskabel 1 × VGA-Monitor-Anschlusskabel 1 × PS/2-Geräteanschlusskabel Maus 1 × PS/2-Geräteanschlusskabel Tastatur 1 × DVI-Anschlusskabel 1 × USB-Anschlusskabel A/A 1 × Handbuch G&D RackConsole 17 · 3... -
Page 6: Montage
(Bild 4). 7. Verschrauben Sie die Energiekette hinten an der Schiene (Bild 5). 8. Stecken und verlegen Sie die Kabel. Anschluss der RackConsole 17 via USB HINWEIS: Mit dem im Lieferumfang enthaltenen USB-Kabel schließen Sie die eingebaute Tastatur und Maus der TFT-Schublade... -
Page 7: Bedienung
(VGA und DVI) zwischen analogem und digitalem Eingang zu wählen. Bei analogem Signal erfolgt das Auto-Adjustment durch Drücken der Auto Taste. 5. Klappen Sie nach dem Betrieb das Display vollständig ein und schieben die Schub- lade am Griff bis ganz nach hinten. G&D RackConsole 17 · 5... -
Page 8: Einstellungen
Desktop, Multimedia, Gaming), den Gamma- Wert (0-7) sowie die Farbtemperatur (warm, normal, kalt) des Bildes ein. VGA-Einstellungen Im Menü passen Sie das VGA-Einstellungen Timing, den automatischen Abgleich, die totale, vertikale und horizontale Position sowie die Phase des Bildes an. 6 · G&D RackConsole 17... -
Page 9: Einstellungen
Sie den Video- Eingänge eingang (VGA oder DVI) aus. Im Untermenü stellen Sie die Einblend- dauer, die Transparenz, die Sprache (englisch, spanisch, deutsch, französisch, italienisch, rus- sisch), die Rotation sowie die Position des OSD ein. G&D RackConsole 17 · 7... -
Page 10: Info
Software, Revision und Timing zur Verfü- gung. Advanced Setup Das Untermenü dient zur War- Advanced Setup tung des Displays. Über den Menüpunkt Smart führen Sie ein Software-Update durch. Zusätzlich können Sie hier den CVT-Mode an- oder ausschalten. 8 · G&D RackConsole 17... -
Page 11: Technische Daten
483 × 44 × 535 mm (B × H × T) ohne Tele- skopschienen Einbautiefe: 560 - 850 mm Gewicht: ca. 12 kg Kabelführung: Energiekette Stromversorgung Eingangsspannung: 100-240 V AC, 60-50 Hz Leistungsauf- Betrieb: max. 15,6W nahme Standby: max. 1W G&D RackConsole 17 · 9... - Page 12 © Guntermann & Drunck GmbH 2015. All rights reserved. Version 2.31 – 09/02/2015 Guntermann & Drunck GmbH Dortmunder Str. 4a 57234 Wilnsdorf Germany Phone +49 2739 8901-100 +49 2739 8901-120 http://www.GDsys.de sales@GDsys.de i · G&D RackConsole 17...
- Page 13 Table of contents Safety instructions .................... 1 RackConsole 17 ....................2 Package contents ....................2 Installation ....................... 3 Connecting the RackConsole 17 via USB ............3 Operation ......................4 Settings ......................5 Picture Menu ..................... 5 Color ......................5 VGA Settings Menu ..................5 Setup Menu .......................
-
Page 14: Safety Instructions
Always unplug the power plug before opening the device. , Unplug power plug before cleaning Clean the device only when the power plug is unplugged. Use a dry or damp cloth to clean the device. Do not use detergents. 1 · G&D RackConsole 17... -
Page 15: Rackconsole 17
1 × VGA monitor connection cable 1 × PS/2 device connection cable mouse 1 × PS/2 device connection cable keyboard 1 × DVI connection cable 1 × USB connection cable A/A 1 × Manual G&D RackConsole 17 · 2... -
Page 16: Installation
6. Insert the cable chain to the fastener at the front until it is locked in place (figure 4). 7. Screw the cable chain to the back of the rail (figure 5). 8. Connect the cables. Connecting the RackConsole 17 via USB NOTE: The supplied USB cable lets you connect both keyboard and mouse of the... -
Page 17: Operation
When using both video inputs (DVI and VGA), press the Source button to switch between digital and analogue input. Press the button for auto adjusting the analogue signal. Auto 5. After operation close the display, and slide the drawer back into the rack. G&D RackConsole 17 · 4... -
Page 18: Settings
Gaming), gamma value (0-7) and color bal- ance (warm, normal, cold). VGA Settings Menu lets you adjust the picture‘s VGA Settings Menu timing, auto setup, total, vertical and horizontal position as well as the phase. 5 · G&D RackConsole 17... -
Page 19: Setup Menu
(VGA or DVI). The submenu lets you adjust the OSD’s time out, transparancy, language (english, spa- nish, german, french, italian, russian), rotation and position. Info The submenu Info shows you information about software, revision and timing. G&D RackConsole 17 · 6... -
Page 20: Advanced Setup
Settings Advanced Setup The submenu Advanced Setup is for maintaining the display. The menu item Smart ISP lets you carry out a software update. The menu item Mode lets you turn on/off the CVT Mode. 7 · G&D RackConsole 17... -
Page 21: Technical Data
Installation depth: 560 - 850 mm (distance between 19“ profiles) Weight: Approx. 12 kg Cable routing: Cable chain Power supply Supply voltage: 100-240 V AC, 50/60 Hz Power Operation: Max. 15.6 W consumption Standby: Max. 1W G&D RackConsole 17 · 8... - Page 22 NOTES...
- Page 23 NOTES...
- Page 24 Das Handbuch wird fortlaufend aktualisiert und im Internet veröffentlicht. The manual is constantly updated and available on our website. http://gdsys.de/A9100177 Guntermann & Drunck GmbH Dortmunder Str. 4a 57234 Wilnsdorf Germany http://www.GDsys.de sales@GDsys.de...
Need help?
Do you have a question about the RackConsole 17 and is the answer not in the manual?
Questions and answers