Advertisement
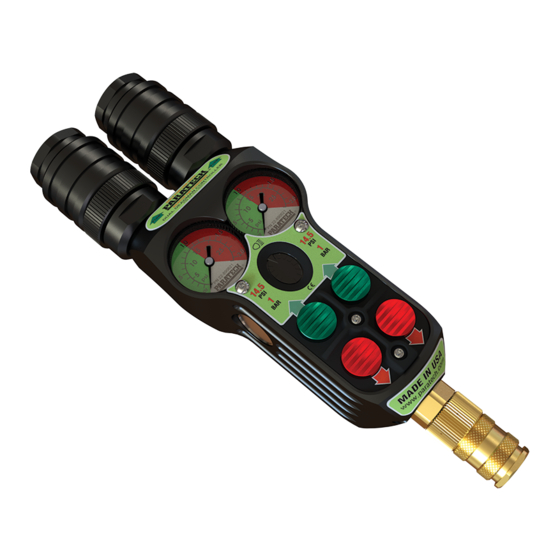
G3 DUAL DEADMAN 14.5 PSI CUSHION CONTROLLER
FEATURES:
HIGH VISABILITY GAUGES
PROTECTED BY CONTROLLER
BODY
GAUGE LIGHT
TO VIEW DURING LOW
LIGHT SITUATIONS
Paratech Incorporated
P.O. Box 1000, Frankfort, IL 60423 USA
Customer Service: 800.435.9358
Phone: 815.469.3911 Fax: 815.469.7748
www.paratech.com E-mail:
INSTRUCTION SHEET
P/N: 22-887305G3
QUICK CONNECT OPEN COUPLINGS
IN-LINES TO HOSES & CUSHIONS
DEFLATE BUTTONS - RED
VENTED QUICK CONNECT OPEN COUPLING,
INLET HOSE TO PRESSURE REGULATOR OR
REGULATED AIR SOURCE
Paratech Europe, Branch of Paratech Inc.
P.O. Box 174, 5260 Odense S, Denmark
www.paratech.com Email:
paratech@paratech.us
PROTECTED 14.5 PSI PRESSURE RELIEF
VALVES – 40 MICRON POROUS FILTER
TO PREVENT OVER PRESSURIZATION OF
CUSHIONS
INFLATE BUTTONS - GREEN
Paratech@paratech.dk
Advertisement
Table of Contents

Related Manuals for paratech G3 DUAL DEADMAN

Summary of Contents for paratech G3 DUAL DEADMAN
- Page 1 INSTRUCTION SHEET G3 DUAL DEADMAN 14.5 PSI CUSHION CONTROLLER P/N: 22-887305G3 FEATURES: QUICK CONNECT OPEN COUPLINGS IN-LINES TO HOSES & CUSHIONS HIGH VISABILITY GAUGES PROTECTED BY CONTROLLER BODY GAUGE LIGHT TO VIEW DURING LOW LIGHT SITUATIONS PROTECTED 14.5 PSI PRESSURE RELIEF VALVES –...
- Page 2 2. G3 Deadman Gauge Light, PN 22-890862: Ultra bright white LED flashlight with black polyurethane housing and PARATECH logo. IPX-7 rated with 3 minute timer mode to enhance battery life, see maintenance section for installation procedure. Gauge Light Weight .02 lbs. (.01 kg.)
- Page 3 9. With the Cushion(s) inflated to the desired height/pressure close (turn clockwise) the shut-off valve on the safety inline relief valve(s). Paratech Incorporated Paratech Europe, Branch of Paratech Inc. P.O. Box 1000, Frankfort, IL 60423 USA P.O. Box 174, 5260 Odense S, Denmark Customer Service: 800.435.9358...
- Page 4 2 gauge threads. 5. Screw gauge back into the base and retighten until the PARATECH logo on the dial face is parallel with the vice jaws AND the gauge threads are flush to slightly recessed with the bottom of the gauge base.
- Page 5 3. Remove and discard the old gauge light and replace it with PARATECH PN 22-890862. 4. Fold the cover plate down and reinstall the 2, T20 Torx screws.
- Page 6 Paratech Incorporated Paratech Europe, Branch of Paratech Inc. P.O. Box 1000, Frankfort, IL 60423 USA P.O. Box 174, 5260 Odense S, Denmark Customer Service: 800.435.9358 www.paratech.com Email: Paratech@paratech.dk Phone: 815.469.3911 Fax: 815.469.7748 www.paratech.com E-mail: paratech@paratech.us...
Need help?
Do you have a question about the G3 DUAL DEADMAN and is the answer not in the manual?
Questions and answers