Table of Contents
Advertisement
Available languages
Available languages
Quick Links
Advertisement
Table of Contents

Related Manuals for RND lab 355-00011

Summary of Contents for RND lab 355-00011
- Page 1 Autoranging Digital Multimeter User Manual RND 355-00011 www.rnd-electronics.com...
-
Page 2: Safety Warnings
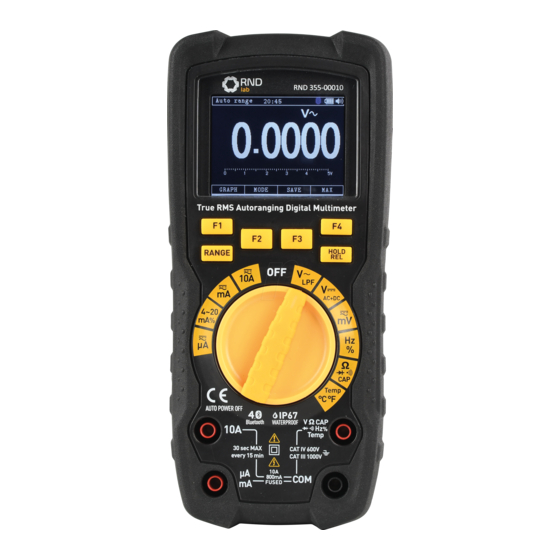
SYMBOLS AND ANNUNCIATORS SAFETY WARNINGS Continuity The following safety information must be observed to insure maximum personal safety Low Battery Low Battery during the operation at this meter: Diode test Diode test Data Hold Data Hold • Measurements beyond the maximum selected range must not be attempted. AutoRanging AutoRanging •... -
Page 3: Dc Current Measurement
MODE button DC CURRENT MEASUREMENT To select AC or DC measurement when in Voltages, Amps, 1. Insert the black test lead banana plug into the negative (COM) jack. HOLD /BLCTR button 2. For current measurements up to 4000uA DC, set the HOLD/BLCTR key is the reading hold/backlight control key that acts with trigger . - Page 4 6. The diode or junction can be evaluated as follows: RESISTANCE [ Ω ] MEASUREMENT A. If one reading shows a value and the other reading shows OL, the diode is good. B. If both readings show OL, the device is open. WARNING: To avoid electric shock, disconnect power to the unit under test and discharge C.
-
Page 5: Specifications
SPECIFICATIONS DC Voltage (Auto-ranging) Technical: Insulation: Class2, Double insulation. Overvoltage category: CATIV 600V,CATIII 1000V NOTE: These meters meet CAT III and CAT IV IEC 61010 standards. The IEC 61010 safety standard defi nes four overvoltage categories (CAT I to IV) based on the magnitude of danger from transient impulses. - Page 6 Resistance [Ω] (Auto-ranging) DC Voltage (Auto-ranging) Overload Protection: FF500mA / 1000V and F10A / 1000V Fuse. Input Protection: 1000V dc or 1000V ac rms. Maximum Input: 400uA dc on uA range 400mA dc on mA range Capacitance (Auto-ranging) 10A dc on 10A range. AC Current (Auto-ranging) Input Protection: 1000V dc or 1000V ac rms.
-
Page 7: Battery Installation
Sensor: Type K Thermocouple Frequency (Auto-ranging) Overload protection: 1000V dc or ac rms. Diode Test Open circuit voltage: MAX. 3V dc Overload protection: 1000V dc or ac rms. Audible continuity Audible threshold: Less than50Ω Test current MAX. 1.5mA Overload protection: 1000V dc or ac rms. Accessories Included accessories Standard Red/Black lead set with test probes... - Page 8 1. Disconnect the test leads from the meter and any item under test. 2. Open the fuse door by loosening the screw on the door using a Phillips head screwdriver. 3. Remove the old fuse from its holder by gently pulling it out. 4.
-
Page 9: Betrieb
SICHERHEITSWARNUNGEN SYMBOLE UND MELDER Die folgenden Sicherheitshinweise sind zu beachten, um eine maximale persönliche Kontinuität Sicherheit während des Betriebs an diesem Messgerät zu gewährleisten: Niedriger Akkuladestand Diodentest Messungen, die ausserhalb des ausgewählten Maximalbereichs liegen, dürfen nicht • Datenspeicher Halten versucht werden. AutoRanging •... -
Page 10: Ac-Strommessung
Taste MODE 4. Schliessen Sie die Messleitungen parallel an den zu prüfenden Stromkreis an. Zum Auswählen von AC- oder CD-Messungen in Spannungen, Ampere 5. Lesen Sie die Spannungsmessung auf der LCD-Anzeige ab. mA, uA, Ω, •))), CAP, Hz, %, DC-STROMMESSUNG Taste HOLD/BLCTR 1. - Page 11 WIDERSTANDSMESSUNG [Ω] HINWEIS: Der beim Diodentest angezeigte Wert ist die Durchlassspannung. WARNUNG: Um einen Stromschlag zu vermeiden, trennen Sie das zu prüfende KAPAZITÄTSMESSUNG Gerät von der Stromversorgung, und entladen Sie alle Kondensatoren, bevor Sie WARNUNG: Um einen Stromschlag zu vermeiden, entladen Sie den zu prüfenden Widerstandsmessungen durchführen.
-
Page 12: Spezifikationen
SPEZIFIKATIONEN Gleichspannung (automatische Bereichswahl) Technisch: Bereich Auflösung Genauigkeit Isolierung: Klasse 2, doppelte Isolierung. 400.0 mV 0.1 mV Überspannungskategorie: CAT IV 600 V, CAT III 1000 V HINWEIS: Diese Messgeräte entsprechen den Normen CAT III und CAT IV IEC 61010. 4.000 V 1 mV ±0.8 % des Messwerts Die Sicherheitsnorm IEC 61010 definiert vier Überspannungskategorien (CAT I bis IV) - Page 13 Gleichspannung (automatische Bereichswahl) Widerstand [Ω] (automatische Bereichswahl) Bereich Auflösung Genauigkeit Bereich Auflösung Genauigkeit ±0.8 % des Messwerts 400.0 uA 0.1 uA 400.0 Ω 0.1 Ω ±5 Stellen 4000 uA 1 uA ±1.2 % des Messwerts 4.000 kΩ 1 Ω ±3 Stellen 40.00 mA 10 uA ±0.8 % des Messwerts...
- Page 14 Frequenz (automatische Bereichswahl) Sensor: Thermoelement Typ K Überlastschutz: 1000 VDC oder AC eff. Bereich Auflösung Genauigkeit Diodentest 4.000 Hz 0.001 Hz Prüfstrom Auflösung Genauigkeit 40.00 Hz 0.01 Hz 1 mA typisch/offen ±10 % des Messwerts 1 mV 400.0 Hz 0.1 Hz ±1.0 % des Messwerts MAX.
-
Page 15: Austauschen Der Sicherungen
AUSTAUSCHEN DER SICHERUNGEN WARNUNG: Um einen Stromschlag zu vermeiden, trennen Sie die Messleitungen von einer Spannungsquelle, bevor Sie die Sicherungs-/Batteriefachabdeckung entfernen. 1. Trennen Sie die Messleitungen vom Zähler und allen zu prüfenden Teilen. 2. Öffnen Sie die Sicherungsfachabdeckung, indem Sie die Schraube an der Abdeckung mit einem Kreuzschlitzschraubendreher lösen. - Page 17 www.rnd-electronics.com...
Need help?
Do you have a question about the 355-00011 and is the answer not in the manual?
Questions and answers