Table of Contents
Advertisement
Quick Links
Advertisement
Table of Contents

Related Manuals for Tempo Communications 915FS


Summary of Contents for Tempo Communications 915FS
- Page 1 INSTRUCTION MANUAL 915FS Optical Fiber Fusion Splicer Read and understand all of the instructions and safety information in this manual before operating or servicing this tool. Register this product at www.TempoCom.com 52079877 REV 2 © 2020 Tempo Communications Inc. 03/20...
-
Page 2: Table Of Contents
Splice Set ..........................27 Data Save ..........................27 Set ............................29 Section 4. Specifications Section 5. Troubleshooting Appendix A. 915FS Fusion Splicer Cleaning Appendix B. Practice Splicing Appendix C. Tempo Communications Splice-on Connectors Tempo Communications Inc. 1390 Aspen Way • Vista, CA 92081 USA • 800-642-2155... -
Page 3: Preface
Tempo Communications 915FS Optical Fiber Fusion Splicer. Keep this manual available to all personnel. All specifications are nominal and may change as design improvements occur. Tempo Communications Inc. shall not be liable for damages resulting from misapplication or misuse of its products. -
Page 4: Important Safety Information
Read and understand all of the instructions and safety information in this manual before operating or servicing this tool. Failure to observe this warning could result in severe injury or death. Tempo Communications Inc. 1390 Aspen Way • Vista, CA 92081 USA • 800-642-2155... - Page 5 • Liquid or foreign matter falls into cabinet. • Splicer is damaged or dropped. If these faults occur, return unit to Tempo Communications service center for repair. Leaving splicer in a damaged state could cause equipment failure, electric shock or fire, and could result in severe injury or death.
- Page 6 This may result in electric shock, splicer malfunction, or poor splicing performance. Failure to observe these warnings could result in severe injury or death. Tempo Communications Inc. 1390 Aspen Way • Vista, CA 92081 USA • 800-642-2155...
- Page 7 • Do not attempt to open the battery. It contains no user-serviceable parts. Failure to observe these precautions may result in injury and may damage the unit. Tempo Communications Inc. 1390 Aspen Way • Vista, CA 92081 USA • 800-642-2155...
- Page 8 Contact Tempo service center for repair. Failure to observe these precautions may result in injury and may damage the unit. Tempo Communications Inc. 1390 Aspen Way • Vista, CA 92081 USA • 800-642-2155...
-
Page 9: Section 1. Identification
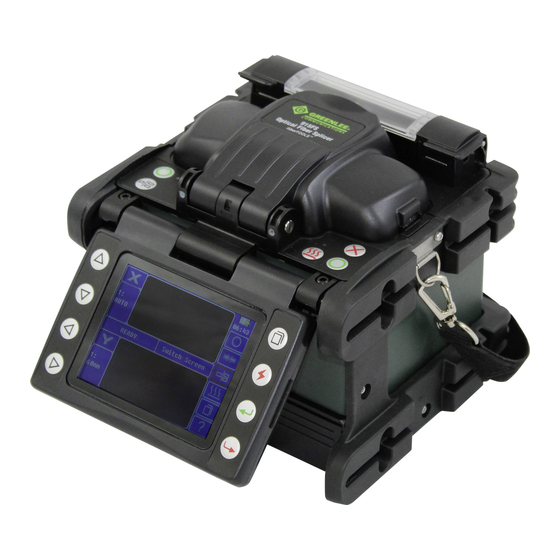
915FS Section 1. Identification Components of Splicer Tempo Communications Inc. 1390 Aspen Way • Vista, CA 92081 USA • 800-642-2155... - Page 10 915FS Top View Tube Heater Electrode Cover Electrode Ocular V-grooves Fiber Clamps Tempo Communications Inc. 1390 Aspen Way • Vista, CA 92081 USA • 800-642-2155...
-
Page 11: Section 2. Operation Setup
Section 2. Operation Setup Installing Battery in Splicer The 915FS can be powered by an external power adapter and battery. Inserting the Battery Open the battery cover and insert the battery into the battery compartment. Then close the battery cover and lock it. -
Page 12: Splice Mode
The automatic arc calibration function works in AUTO modes only. It is not active in the standard splice modes. When using those modes, performing arc calibration before splicing is strongly recommended. Tempo Communications Inc. 1390 Aspen Way • Vista, CA 92081 USA • 800-642-2155... -
Page 13: Fiber Preparation
Use the supplied fiber stripping tool to strip the outer coating 30 to 40 mm (1.25 to 1.5 in) from its tip. Thoroughly clean the fiber with alcohol-soaked (99% or greater) gauze or lint-free tissue. Tempo Communications Inc. 1390 Aspen Way • Vista, CA 92081 USA • 800-642-2155... -
Page 14: Splicing Procedure
Splicing Procedure To ensure a good splice, the optical fiber is observed with the image processing system equipped in the 915FS. However, in some cases the image processing system cannot detect a faulty splice. Visual inspection with the monitor is often necessary for better splicing yield. -
Page 15: Heating Protection Sleeve
Visually inspect the finished sleeve to verify that no bubbles or debris/dust is present in the sleeve. Cooling Tray Place the splice into the cooling tray on the back of the 915FS splicer. Tempo Communications Inc. 1390 Aspen Way • Vista, CA 92081 USA • 800-642-2155... -
Page 16: Splice-On Connectors
915FS Splice-on Connectors The 915FS uses the Tempo Communications version of splice-on connectors. The 915FS currently supports SC, LC, FC, and ST versions (both PC and APC finish, where applicable). Follow the instructions supplied with the splice-on connectors packaging. Upgrading Software The 915FS software can be upgraded using the online software upgrade tool at www.TempoCom.com. -
Page 17: Appendixes
915FS Appendixes Refer to the following appendixes at the end of this manual for additional operating information: • Appendix A—915FS Fusion Splicer Cleaning • Appendix B—Practice Splicing • Appendix C—Tempo Communications Splice-on Connectors Tempo Communications Inc. 1390 Aspen Way • Vista, CA 92081 USA • 800-642-2155... -
Page 18: Section 3. Menu Operation
Automatic arc calibration works in this splice mode. For splicing multi-mode fiber (ITU-T G651). Core diameter: 50.0 to 62.5 µm. 5 AUTO MM1 Automatic arc calibration works in this splice mode. Tempo Communications Inc. 1390 Aspen Way • Vista, CA 92081 USA • 800-642-2155... - Page 19 User can edit all parameters of this splice mode such as prefuse power, prefuse time, arc power, arc time, align, proof test, etc. BLANK 13~60 User can assign these as their own custom splicing profiles. (other modes) Tempo Communications Inc. 1390 Aspen Way • Vista, CA 92081 USA • 800-642-2155...
-
Page 20: Splice Mode Menu (S-Mode)
Arc2 ON Time: Set or disable the Arc2’s working (arcing) duration. • Arc2 OFF Time: Set or disable the Arc2’s off duration. • Rearc Time: Set or disable the duration of the Rearc. Tempo Communications Inc. 1390 Aspen Way • Vista, CA 92081 USA • 800-642-2155... -
Page 21: Heater Mode Menu (H-Mode)
• Sleeve Type: Enter the protection sleeve name. • Mode Title1: Enter the heater mode setting name. • Mode Title2: Enter the alternate heater mode setting name. • Heat Time: Enter the heater duration. Tempo Communications Inc. 1390 Aspen Way • Vista, CA 92081 USA • 800-642-2155... -
Page 22: Maintenance
Repeat steps 1–4 until “arc adjust OK” displays on splicer screen. Cleaning the Electrodes It may be necessary to clean the electrodes if the arc calibration fails or if the 915FS is not splicing properly. Remove the electrodes and clean the electrodes using the electrode polisher. -
Page 23: Splice Set
Navigate to the “Splice Set” icon and press Each menu item can be enabled or disabled per the user’s preference. Data Save The 915FS stores up to 5000 splicing results, which can be downloaded via the USB port. Navigate to the “Data Save” icon and press to access. - Page 24 By using the super password, the user or service staff can unlock the splicer to renew the password. The super password is obtained from Tempo Communications customer service. For each restart, the [XX] is changed, so the user cannot use the last super password again and needs to contact customer service.
-
Page 25: Section 4. Specifications
100 to 240V AC Adapter; Li-ion Battery (4400 mAh) Weight 3.3lbs (1.5kg) with battery 2.6lbs (1.2kg) no battery Dimensions (HxWxD) 4.9” x 4.9” x 5.3” (125 x 125 x 135mm) Tempo Communications Inc. 1390 Aspen Way • Vista, CA 92081 USA • 800-642-2155... -
Page 26: Section 5. Troubleshooting
Check if fiber cleaver is clean and in good condition. Dust still present after cleaning fiber Clean fiber thoroughly and/or or cleaning arc. increase “Cleaning Arc Time.” Tempo Communications Inc. 1390 Aspen Way • Vista, CA 92081 USA • 800-642-2155... - Page 27 Note: A vertical line sometimes appears at the spice point when MM fibers or dissimilar fibers (different diameters) are spliced. This does not affect splice quality, such as splice loss or tensile strength. Note: If the user is getting high splice losses, make sure that the 915FS is not in Splice Mode #10, which is used to make attenuator splices.
- Page 28 If the error occurs again, strip, clean, and cleave the fibers. • Check the condition of fiber cleaver. If the blade is worn, rotate the blade to a new position. Tempo Communications Inc. 1390 Aspen Way • Vista, CA 92081 USA • 800-642-2155...
- Page 29 The magnet on windshell is missing. Magnet needs to be factory replaced. windshell is closed Notified to replace Electrodes require calibration or Stabilize electrodes as per Menu 3; replace electrodes replacement. electrodes. Tempo Communications Inc. 1390 Aspen Way • Vista, CA 92081 USA • 800-642-2155...
- Page 30 Other mode. the loss. The MFD mismatch function does not work for certain types of specialty fibers. In these cases, set the “MFD Mismatch” to OFF. Tempo Communications Inc. 1390 Aspen Way • Vista, CA 92081 USA • 800-642-2155...
-
Page 31: Appendix A. 915Fs Fusion Splicer Cleaning
915FS Appendix A. 915FS Fusion Splicer Cleaning Precautions When Cleaning 915FS and 915CL • Turn off splicer. • Use only lint-free cotton swabs. • Use only 99% pure isopropyl alcohol or an approved substitute. • Do not touch the electrodes. • Never use compressed air. - Page 32 Use the cleaning brush only to clean debris from general working area, never on the lenses, or V-grooves. • Periodically clean the fiber adapters with isopropyl alcohol and a lint-free cotton swab. Never touch the fiber clamping area of the fiber adapters. Tempo Communications Inc. 1390 Aspen Way • Vista, CA 92081 USA • 800-642-2155...
- Page 33 Clean the circular cleaving blade and clamp pads with a lint-free cotton swab soaked with isopropyl alcohol. Fiber Clamps Cutting Blade Figure 4 Tempo Communications Inc. 1390 Aspen Way • Vista, CA 92081 USA • 800-642-2155...
-
Page 34: Appendix B. Practice Splicing
Figure 2 Testing Splicing Splice-on Connectors (SOC) The 915FS can fusion splice SOC using the universal SOC adapters. Be sure to select the correct SOC to match the field fibers before splicing. The following procedure should be used to practice fusion splicing with SOC: 1. - Page 35 On/Off 1 λ λ On/Off λ dB/dBm Figure 3 Figure 4 SOC Spliced Patch Cord Optical Source 0 dB λ λ On/Off 1 λ On/Off dB/dBm Figure 5 Tempo Communications Inc. 1390 Aspen Way • Vista, CA 92081 USA • 800-642-2155...
- Page 36 Slide the 900 μm strain relief boot and then the 27 mm mini splice protective sleeve over the 900 μm field fiber. Use the 915CL to cleave the field fiber. Insert the fiber adapter with the cleaved fiber into the left-hand side of the 915FS fusion splicer. Make sure to butt the 900 μm buffer up to the edge of the fiber adapter.
- Page 37 Note: The extended cap may be put in place now to aid in the transfer to the splice sleeve oven. The heater adapter is a detachable component (Figure 7). Change the right cover to the heater adapter of SOC. Fiber Figure 7 Tempo Communications Inc. 1390 Aspen Way • Vista, CA 92081 USA • 800-642-2155...
- Page 38 connectors, install the outer housing onto the connector, being sure to align the angled corners of the inner housing with those of the outer housing (Figure 9). Figure 8 Figure 9 Compatibility Chart The Tempo Communications SOC adapter allows the Tempo 900 micron SOC to be used in competitors’ fusion splicers. Manufacturer Sumitomo Fitel INNO...
- Page 39 Limited Warranty Tempo Communications Inc. warrants to the original purchaser of these goods for use that these products will be free from defects in workmanship and material for three years, excepting normal wear and abuse. For all Test instrument repairs, you must first request a Return Authorization Number by contacting our...
Need help?
Do you have a question about the 915FS and is the answer not in the manual?
Questions and answers