Table of Contents
Advertisement
Available languages
Available languages
Quick Links
Download this manual
See also:
User Manual
Advertisement
Table of Contents

Subscribe to Our Youtube Channel
Related Manuals for ZyXEL Communications NWD310N


Summary of Contents for ZyXEL Communications NWD310N
-
Page 1: Table Of Contents
Wireless N PCI Adapter Quick Start Guide Version 1.00 10/2007 Edition 1 ENGLISH DEUTSCH ESPAÑOL FRANÇAIS ITALIANO PУССКИЙ SVENSKA Copyright © 2007. All rights reserved CONTENTS... -
Page 2: Install The Software
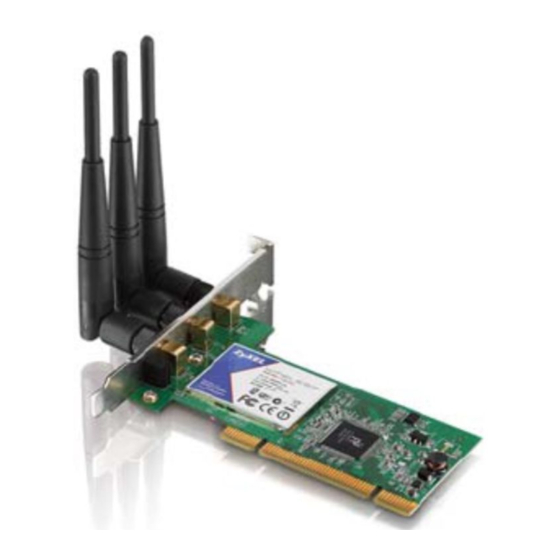
Overview The NWD310N is a wireless network adapter for your desktop computer. The NWD310N is WPS (Wi-Fi Protected Setup) compatible. 1 Install the Software Install the software from the CD before you insert the NWD310N. Do not insert the NWD310N yet. - Page 3 ENGLISH 3 When the following screen displays, click Setup to install the ZyXEL utility and driver. If the screen does not display, locate and double-click autorun.exe on the CD.
- Page 4 ENGLISH 4 When the following screen displays, click Next. 5 Select Driver and Utility to install both the ZyXEL utility and the driver on your computer. You can still use your...
- Page 5 ENGLISH operating system’s wireless network utility, if you choose not to install the ZyXEL utility. 6 Click Install.
- Page 6 You will need to shut down your computer after installing the ZyXEL utility. Make sure you have saved your work before continuing. 7 When the following screen displays, select No, I will restart my computer later. You will turn your computer off when you install the hardware.
-
Page 7: Install The Hardware
Ground yourself by wearing an anti-static wrist strap if you have one or touching a grounded metal object. 4 Remove the computer cover, and then remove the NWD310N from its packaging. 5 If the antennas are attached to the NWD310N, remove (unscrew) them. ENGLISH... - Page 8 6 Insert the NWD310N into an available PCI slot. Make sure the NWD310N's contacts are fully seated in the PCI slot (A). 7 Secure the NWD310N to the computer with a bracket screw and replace the computer cover. 8 Attach (screw) the antennas onto the NWD310N.
- Page 9 The NWD310N’s Link LED (light) turns on if it is properly inserted. If the NWD310N’s Link LED is not on after you have installed the software and the NWD310N, make sure the NWD310N is properly inserted. 11A Found New Hardware Wizard window displays. Select Install the software automatically (recommended) and click Next and then click Finish.
-
Page 10: Connect To A Wireless Network
1 Make sure that your wireless AP (Access Point) is turned on and that it is within range of your desktop computer. 2 Press the WPS button on the NWD310N and on your wireless AP (ZyXEL’s NWA570N is shown as an example). - Page 11 Other WPS enabled devices have a similar WPS button. NWD310N 3 The AP and the NWD310N establish a secure connection. This can take up to two minutes. 4 You are now ready to connect to the Internet wirelessly through your NWD310N.
- Page 12 AP as well as how to configure wireless settings manually to join a wireless network. 4.1 Open the Utility 1 After you install the ZyXEL utility and insert the NWD310N, an icon appears in the system tray. Double- click the icon.
- Page 13 If the install the ZyXEL utility. See the User’s Guide for how to uninstall the utility. The NWD310N automatically connects to an available wireless network without security enabled. However, this wireless network may not be connected to the Internet. If the icon is green you are already connected to a wireless network.
- Page 14 • The PIN - Use the PIN from the AP or Wireless Router option is used when you want to register the AP’s or wireless router’s PIN with the NWD310N (see the User’s Guide if you want to use this instead).
-
Page 15: Connecting To A Wireless Network
NWD310N’s PIN (an example screen from ZyXEL’s NWA570N is shown). 4 Click Start in the NWD310N Adapter screen and Apply or Start in the AP’s WPS screen within two minutes. The AP authenticates the NWD310N and sends the proper configuration settings to the NWD310N. This may take up to two minutes. - Page 16 2 The available wireless networks display in the Available Network List. SSID means Service Set Identifier and is the name of the wireless network. 3 If a wireless network has no security, one of the following icons appears next to its entry in the list. If a wireless network has security, one of the following icons appears next to its entry in the list.
-
Page 17: Note For Windows Xp Users
6 To access the Internet, open your Internet browser and enter the URL of a web site in the address bar. The AP should be connected to the Internet. If the web site displays correctly, you are successfully connected to the Internet. Note for Windows XP Users If you want to use Windows Zero Configuration (WZC), right- click the... - Page 18 ENGLISH Procedure to View a Product’s Certification(s) 1 Go to www.zyxel.com. 2 Select your product from the drop-down list box on the ZyXEL home page to go to that product's page. 3 Select the certification you wish to view from this...
- Page 19 ENGLISH...
-
Page 20: Deutsch
1 Installation der Software Installieren Sie die Software von der CD, bevor Sie die NWD310N einstecken. 1 Entfernen Sie die NWD310N wieder, falls Sie sie bereits eingesteckt haben. 2 Legen Sie die mitgelieferte CD in das CD-ROM-Laufwerk des Computers ein. Bei entsprechender Einstellung Ihres Betriebssystems startet das Setup Programm automatisch. - Page 21 DEUTSCH 3 Klicken Sie im folgenden Bildschirm auf Setup, um das ZyXEL-Utility und den Treiber zu installieren. Falls dieses Fenster nicht erscheinen sollte, navigieren Sie auf der CD zur Datei autorun.exe und klicken Sie doppelt darauf.
- Page 22 4 Wenn das folgende Fenster erscheint, klicken Sie auf Next (Weiter). 5 Wählen Sie Driver (Treiber) und Utility (Utility), um das ZyXEL Utility Programm und den Treiber auf dem Computer zu installieren. Wenn Sie nur den Treiber installieren und die Wireless Zero Configuration (WZC) mit Windows XP verwenden möchten, wählen Sie nur Driver (Treiber) (siehe Sie auf Next (Weiter), um den vorgegebenen...
- Page 23 DEUTSCH verwenden, oder klicken Sie auf Browse (Durchsuchen), um einen anderen Ordner auszuwählen. 6 Klicken Sie auf Install (Installieren).
- Page 24 Wenn Sie das ZyXEL Utility Programm installiert haben, muss der Computer neu gestartet werden. Stellen Sie sicher, dass Sie vor dem Neustart Ihre Arbeiten sichern! 7 Wenn das folgende Fenster erscheint, wählen Sie die Option Nein, den Computer später starten. Schalten Sie den Computer manuell aus, um die Hardware zu installieren.
-
Page 25: Installieren Der Hardware
4 Erden Sie sich, indem Sie ein antistatisches Handgelenkband umbinden oder einen geerdeten Metallgegenstand berühren. Entfernen Sie das Gehäuse des Computers, und nehmen Sie den NWD310N aus der Verpackung heraus. 5 Wenn die Antennen am NWD310N befestigt sein sollten, schrauben Sie diese vor dem Einbau heraus. - Page 26 6 Setzen Sie den NWD310N in einen freien PCI-Steckplatz. Stellen Sie sicher, dass die Kontakte des NWD310N vollständig im PCI-Steckplatz sitzen(A). 7 Schrauben Sie den NWD310N mit einer Schraube an der Halterung fest. 8 Schrauben Sie die Antennen wieder an den NWD310N.
- Page 27 Die Link-LED (Anzeige) des NWD310N beginnt zu leuchten, sobald das Gerät angeschlossen ist. Wenn die Link-LED des NWD310N nach dem Installieren der Software und des NWD310N nicht leuchtet, prüfen Sie, ob der NWD310N richtig angeschlossen ist. 11Auf dem Bildschirm erscheint das Fenster Assistent für das Suchen neuer Hardware.
- Page 28 Wenn Sie Ihr Gerät mit dieses Programm zu einem Drahtlosnetzwerk hinzufügen möchten, gehen Sie zu Abschnitt 4. Der NWD310N unterstützt zwei WPS-Methoden, um eine sichere Verbindung herzustellen: • PBC (Push Button Configuration; Tastenkonfiguration) - Sie erstellen ein sicheres Drahtlosnetzwerk, indem Sie auf eine Taste drücken.
- Page 29 2 Drücken Sie am NWD310N und am drahtlosen AP (NWA570N von ZyXEL ist ein Beispiel) auf die WPS- Taste. Dabei ist es egal, welche Taste Sie zuerst drücken. Jedoch muss die zweite Taste spätestens zwei Minuten nach dem Drücken der ersten Taste gedrückt werden.
- Page 30 Sie die Drahtloseinstellungen konfigurieren müssen, um manuell die Verbindung zu einem Drahtlosnetzwerk herzustellen. 4.1 Öffnen des Utility-Programms 1 Wenn Sie das ZyXEL Utility-Programm installiert und den NWD310N angeschlossen haben, erscheint in der Taskleiste ein Symbol. Klicken Sie doppelt auf das Symbol.
- Page 31 Sie es erneut. Im Benutzerhandbuch finden Sie eine Beschreibung, wie das Utility- Programm deinstalliert wird. Der NWD310N sucht automatisch nach verfügbaren Netzwerken und stellt eine Verbindung zu einem ungesicherten Drahtlosnetzwerk her. Es ist jedoch möglich, dass dieses Drahtlosnetzwerk nicht mit dem Internet verbunden ist.
- Page 32 4.2 WPS PIN-Konfiguration 1 Klicken Sie auf die Registerkarte Adapter. 2 Das Fenster Adapter des ZyXEL-Utility-Programms erscheint. Wählen Sie im Bereich WPS die Option WPS und PIN - Use this device's PIN (PIN - Die PIN dieses Geräts verwenden). Geben Sie die 8-stellige PIN ein, die im grau hinterlegten Textfeld des Pop-up-Fensters angezeigt wird.
- Page 33 Einstellungen konfigurieren und die PIN des NWD310N eingeben können (die Abbildung zeigt als Beispiel ein Fenster des NWA570N von ZyXEL). 4 Klicken Sie im Fenster Adapter des NWD310N auf Start und innerhalb der folgenden zwei Minuten im WPS- Fenster des AP auf Apply (Übernehmen) oder Start.
- Page 34 Der AP authentifiziert den NWD310N und sendet die richtigen Konfigurationseinstellungen an den NWD310N. Dieser Vorgang kann bis zu zwei Minuten dauern. Der NWD310N kann nun in einer sicheren Verbindung mit dem AP kommunizieren. 4.3 Herstellen einer Verbindung zu einem Drahtlosnetzwerk 1 Klicken Sie doppelt auf -Symbol.
- Page 35 Identifier, und sie ist der Name des Drahtlosnetzwerks. 3 Wenn ein Drahtlosnetzwerk nicht gesichert ist, erscheint eines der folgenden Symbole neben dem jeweiligen Eintrag in der Liste. Wenn ein Drahtlosnetzwerk gesichert ist, erscheint eines der folgenden Symbole neben dem jeweiligen Eintrag in der Liste. Wählen Sie das Netzwerk aus, zu dem Sie eine Verbindung herstellen möchten, und klicken Sie auf Connect (Verbinden).
- Page 36 Wenn die Website richtig angezeigt wird, wurde die Verbindung zum Internet erfolgreich hergestellt. Hinweis für Windows XP-Benutzer Wenn Sie WZC (Windows Zero Configuration) verwenden möchten, klicken Sie mit der rechten Maustaste auf das Symbol . Wählen Sie dann die Option Use Windows Zero Configuration as Configuration utility (Als Konfigurationsprogramm Windows Zero Configuration verwenden).
- Page 37 Vorgehensweise zum Aufrufen einer Produktzertifizierung 1 Gehen Sie auf www.zyxel.com. 2 Wählen Sie Ihr Produkt aus der Auswahlliste auf der ZyXEL Homepage aus, um die Seite des entsprechenden Produkts aufzurufen. 3 Wählen Sie die Zertifizierung, die Sie von dieser Seite aus aufrufen möchten. DEUTSCH...
-
Page 38: Español
Vista general El NWD310N es un adaptador de red inalámbrica compatible con Wi-Fi Protected Setup (WPS) para su ordenador de sobremesa. 1 Instalar el software Instale el software del CD antes de insertar el NWD310N. No inserte el NWD310N todavía. - Page 39 ESPAÑOL 3 Cuando aparezca la siguiente pantalla, haga clic en Setup para instalar la utilidad ZyXEL y el controlador. Si la pantalla no aparece, busque y haga doble clic en autorun.exe.
- Page 40 4 Cuando aparezca la siguiente pantalla, haga clic en Next (Siguiente). 5 Seleccione Driver (Controlador) y Utility (Utilidad) para instalar la utilidad y el controlador ZyXEL en su ordenador. Si desea instalar el controlador solamente y utiliza Wireless Zero Configuration (WZC) con Windows XP, seleccione Driver (Controlador) solamente (ver para usuarios de Windows (Siguiente) para aceptar la ubicación del archivo...
- Page 41 ESPAÑOL predeterminada o haga clic en Browse (Examinar) para seleccionar una carpeta distinta. 6 Haga clic en Install (Instalar).
- Page 42 Necesitará reiniciar su ordenador tras la instalación de la utilidad ZyXEL. Asegúrese de haber guardado su trabajo antes de continuar. 7 Cuando aparezca la siguiente pantalla, seleccione No, I will restart my computer later (No, reiniciaré el sistema más adelante). Apague el ordenador para instalar el hardware.
-
Page 43: Instalar El Hardware
4 Asegure la toma de tierra llevando una muñequera antiestática si tiene una o tocando un objeto de metal conectado a tierra. Retire la tapa del ordenador y luego saque el NWD310N de su embalaje. 5 Si las antenas están conectadas al NWD310N, quítelas (desenroscando). ESPAÑOL... - Page 44 6 Inserte el NWD310N en una ranura PCI libre. Asegúrese de que los contactos del NWD310N estén bien asentados en la ranura PCI (A). 7 Fije el NWD310N al ordenador con un tornillo de soporte. 8 Coloque (enrosque) las antenas en el NWD310N. 9 Coloque las antenas hacia arriba.
- Page 45 Si el LED Link del NWD310N no se enciende tras haber instalado el software y el NWD310N, compruebe que el NWD310N esté bien insertado. 11Aparecerá la ventana del Asistente para hardware nuevo encontrado. Seleccione Instalar automáticamente el software (recomendado) y haga clic en Siguiente y en Finalizar.
- Page 46 1 Asegúrese de que su PA (Punto de Acceso) inalámbrico está encendido y de que está dentro del alcance del ordenador de sobremesa. 2 Presione el botón WPS en el NWD310N y en su PA inalámbrico (el NWA570N del ZyXEL aparece como ESPAÑOL...
- Page 47 Otros dispositivos con WPS tienen un botón WPS similar. NWD310N 3 El PA y el NWD310N establecen una conexión segura. Esto puede tardar hasta dos minutos. 4 Ahora ya puede conectarse a Internet sin cables a través de su NWD310N.
- Page 48 PA además de ajustar la configuración inalámbrica manualmente para unirse a una red inalámbrica. 4.1 Abra la utilidad 1 Tras instalar la utilidad ZyXEL e insertar el NWD310N, aparecerá un icono en la bandeja del sistema. Haga doble clic en el icono 2 Aparecerá...
- Page 49 ZyXEL. Consulte la Guía del usuario para saber cómo desinstalar la utilidad. El NWD310N buscará automáticamente una red o redes disponible(s) y se conectará a una red inalámbrica que no tenga la seguridad habilitada. Sin embargo, esta red inalámbrica puede no estar conectada a Internet.
- Page 50 4.2 Configuración WPS PIN 1 Haga clic en la ficha Adapter (Adaptador). 2 Aparecerá la pantalla de la Utilidad ZyXEL Adapter (Adaptador). En la sección WPS, seleccione WPS y PIN - Use this device’s PIN (PIN - Usar el PIN de este dispositivo).
- Page 51 PIN del NWD310N (se muestra una pantalla de ejemplo del ZyXEL NWA570N). 4 Haga clic en Start (Inicio) en la pantalla NWD310N Adapter (Adaptador) y en Apply (Aplicar) o Start (Inicio) en la pantalla WPS del PA antes de dos minutos.
- Page 52 4.3 Conectar a una red inalámbrica 1 Haga doble clic en el icono . Aparecerá la pantalla Link Info (Información de la conexión) de la utilidad ZyXEL. Haga clic en la ficha Site Survey (Sondeo de sitios). 2 Aparecerá(n) la(s) red(es) disponible(s) en la Available Network List (Lista de redes...
- Page 53 Si una red inalámbrica tiene seguridad, aparecerá uno de los siguientes iconos junto a su entrada en la lista. Elija la red a la que desea conectarse haciendo clic en ella y haciendo clic en Connect (Conectar). 4 Si una red no tiene seguridad, aparecerá la pantalla Link Info (Información de la conexión).
- Page 54 ESPAÑOL Nota para usuarios de Windows XP Si desea utilizar Windows Zero Configuration (WZC), haga clic con el botón derecho en el icono y seleccione Use Windows Zero Configuration as Configuration utility (Usar Windows Zero Configuration como utilidad de configuración). Para activar la utilidad ZyXEL de nuevo, haga clic en el icono y seleccione Use ZyXEL Utility as Configuration utility (Usar la utilidad ZyXEL como utilidad de configuración).
- Page 55 Procedimiento para ver las certificaciones de un producto 1 Vaya a www.zyxel.com. 2 Seleccione el producto que desea en el cuadro de lista desplegable que se encuentra en la página principal de ZyXEL para obtener acceso a la página de dicho producto. 3 Seleccione la certificación que desea ver en esta página.
-
Page 56: Français
Présentation Le NWD310N est un adaptateur de réseau sans fil compatible WPS (Wi-Fi Protected Setup) pour votre ordinateur de bureau. 1 Installation du logiciel Installez le logiciel à partir du CD avant d'insérer le NWD310N. Ne pas encore insérer le NWD310N. - Page 57 FRANÇAIS 3 Quand l'écran suivant s'affiche, cliquez sur Installer pour installer l'utilitaire et le pilote de ZyXEL. Si l'écran n'apparaît pas, localisez et double cliquez sur autorun.exe.
- Page 58 4 Quand l'écran suivant apparaît, cliquez sur Next (Suivant). 5 Sélectionner Driver (Pilote) et Utility (Utilitaire) pour installer à la fois l'utilitaire et le pilote du ZyXEL sur votre ordinateur. Si vous voulez installer uniquement le pilote et utiliser Wireless Zero Configuration (Configuration zéro sans fil) (WZC) avec Windows XP, sélectionnez seulement Driver (Pilote) (voir Windows...
- Page 59 FRANÇAIS l'emplacement des fichiers par défaut ou cliquez sur Browse (Parcourir) ou pour sélectionner un autre dossier. 6 Cliquez sur Install (Installer).
- Page 60 Vous devrez redémarrer votre ordinateur après avoir installé l'utilitaire du ZyXEL. Vérifiez que vous avez sauvegardé votre travail avant de continuer. 7 Quand l'écran suivant apparaît, sélectionnez No, I will restart my computer later (Non, je redémarrerai mon ordinateur plus tard). Vous éteindrez votre ordinateur afin d'installer le matériel.
-
Page 61: Installer Le Matériel
à la terre. Retirez le capot de l'ordinateur, et retirez ensuite le NWD310N de son emballage. 5 Si les antennes sont fixées au NWD310N, retirez-les (dévissez-les). FRANÇAIS... - Page 62 6 Insérez le NWD310N dans un logement PCI disponible. Vérifiez que les contacts du NWD310N sont entièrement insérés dans le logement PCI (A). 7 Fixez le NWD310N à l'ordinateur avec une vis de support. 8 Fixez (vissez) les antennes au NWD310N. 9 Dirigez les antennes vers le haut.
- Page 63 Si la LED Link (Liaison) du NWD310N n'est pas allumée après avoir installé le logiciel et le NWD310N, assurez-vous que le NWD310N est correctement inséré. 11Une fenêtre Assistant de Nouveau matériel trouvé s'affiche. Sélectionner Installer automatiquement le logiciel (recommandé) et cliquez sur Suivant et cliquez ensuite sur Terminer.
- Page 64 1 Assurez-vous que votre AP (Access Point) sans fil est allumé et qu'il est à portée de votre ordinateur de bureau. 2 Appuyez sur le bouton WPS sur le NWD310N et sur votre AP sans fil (voir NWA570N de ZyXEL comme exemple).
- Page 65 Vous devez appuyer sur le second bouton dans les deux minutes qui suivent l'appui sur le premier. Votre NWD310N est équipé d'un bouton WPS situé sur son panneau, ainsi que d'un bouton WPS sur son utilitaire de configuration. Les autres périphériques WPS sont équipés d'un bouton WPS...
- Page 66 à un réseau sans fil. 4.1 Ouvrez l'utilitaire 1 Après avoir installé l'utilitaire ZyXEL et avoir inséré le NWD310N, une icône apparaît dans la barre d'état. Double cliquez sur l'icône 2 L'écran Info liaison de l'utilitaire ZyXEL apparaît.
- Page 67 Si l'icône réinstallez l'utilitaire ZyXEL. Consultez le guide de l'utilisateur pour désinstaller l'utilitaire. Le NWD310N recherche automatiquement les réseaux disponibles et se connecte à un réseau sans fil non sécurisé. Cependant, ce réseau sans fil n'est peut-être pas connecté à...
- Page 68 • Le PIN - L'option Utilisez le PIN de l'AP ou du rou- teur sans fil est utilisée quand vous voulez enregistrer le PIN de l'AP ou du routeur sans fil avec le NWD310N (consultez le guide de l'utilisateur si vous voulez uti- liser cela à...
- Page 69 PIN du NWD310N (un écran d'exemple du NWA570N du ZyXEL est présenté). 4 Cliquez sur Start (Démarrer) dans l'écran Adapter (Adaptateur) NWD310N et Apply (Appliquer) ou Start (Démarrer) dans l'écran WPS de l'AP en l'espace de deux minutes.
- Page 70 4.3 Se connecter à un Réseau sans fil 1 Double cliquez sur l'icône . L'écran Link Info (Info liaison) de l'utilitaire ZyXEL apparaît. Cliquez sur l'onglet Site Survey (Inspection de site). 2 Le(s) réseau(x) sans fil disponibles s'affichent dans la Liste des réseaux disponibles.
- Page 71 Choisissez le réseau auquel vous voulez vous connecter en cliquant sur celui-ci et en cliquant sur Connect (Connecter). 4 Si un réseau n'est pas sécurisé, l'écran Link Info (Info liaison) apparaît. Allez à l'étape 6. 5 Si un réseau est sécurisé, l'écran des paramètres de sécurité...
- Page 72 Pour activer à nouveau l'utilitaire ZyXEL, faites un clic droit sur l'icône et sélectionnez Utiliser l'utilitaire ZyXEL comme utilitaire de configuration. Si vous voulez uniquement utiliser WZC, décochez Utilitaire pendant l'installation du ZyXEL. Procédure permettant de consulter une(les) Certification(s) du Produit 1 Connectez vous sur www.zyxel.com.
- Page 73 FRANÇAIS...
-
Page 74: Italiano
Cenni generali L'NWD310N è un adattatore di rete wireless compatibile WPS (Wi-Fi Protected Setup) per computer desktop. 1 Installare il Software Installare il software dal CD prima di inserire NWD310N. Non inserire ancora NWD310N. 1 Rimuovere NWD310N se è già stato inserito. - Page 75 ITALIANO 3 Quando viene visualizzata la seguente schermata, fare clic su Setup per installare l'utility e il driver ZyXEL. Se la schermata non viene visualizzata, individuare e fare doppio clic sul file autorun.exe.
- Page 76 4 Alla visualizzazione della schermata seguente, fare clic su Next (Avanti). 5 Selezionare Driver e Utility per installare sia l'utility ZyXEL sia il driver sul computer. Se si desidera installare solo il driver e utilizzare Wireless Zero Configuration (WZC) di Windows XP, selezionare solo Driver (vedere Nota per gli utenti di Windows (Avanti) per accettare la posizione predefinita o fare clic ITALIANO...
- Page 77 ITALIANO su Browse (Sfoglia) per selezionare una cartella alternativa. 6 Fare clic su Install (Installa).
- Page 78 Sarà necessario riavviare il computer dopo l'installazione dell'utility ZyXEL. Assicurarsi di aver salvato il lavoro prima di continuare. 7 Quando viene visualizzata la seguente schermata, selezionare No, I will restart my computer later (No, avvierò il computer in un secondo momento). Il computer verrà...
-
Page 79: Installazione Dell'hardware
4 Eliminare verso terra le scariche indossando un polsino anti-statico se posseduto oppure toccare un oggetto di metallo posto a massa. Rimuovere il coperchio del computer, quindi rimuovere NWD310N dalla sua confezione. 5 Se a NWD310N sono collegate le antenne, rimuoverle svitandole. ITALIANO... - Page 80 6 Inserire NWD310N in uno slot PCI libero. Verificare che i contatti di NWD310N siano completamente alloggiati nello slot PCI (A). 7 Fissare NWD310N al computer utilizzando una vite da avvitare alla staffa. 8 Avvitare le antenne a NWD310N. 9 Puntare le antenne verso l'alto.
- Page 81 Il corretto inserimento dell'NWD310N viene segnalato dall'accensione dell'indicatore Link. Se l'indicatore Link dell'NWD310N non è acceso in seguito all'installazione del software e dell'NWD310N, assicurarsi che l'NWD310N sia inserito correttamente. 11Appare la finestra Installazione guidata nuovo hardware. Scegliere Installare il software automaticamente (scelta consigliata) e fare clic su Avanti e quindi su Fine (A).
-
Page 82: Push Button Configuration
Se si desidera utilizzare il programma di utilità per collegarsi a una rete wireless, consultare la sezione 4. L'NWD310N supporta due metodi WPS per la creazione di una connessione sicura: • Push Button Configuration (configurazione con un tasto) - consente di creare una rete wireless sicura con la semplice pressione di un pulsante. - Page 83 2 Premere il pulsante WPS sull'NWD310N e sull'AP wireless (è mostrato l'NWA570N di ZyXEL a titolo di esempio). Non importa quale dei pulsanti viene premuto prima, occorre solo fare attenzione a premere il secondo pulsante entro due minuti dalla pressione del primo.
- Page 84 4.1 Aprire l'utilità 1 In seguito all'installazione dell'utility ZyXEL e all'inserimento di NWD310N, nella barra di sistema viene visualizzata un'icona. Fare doppio clic sull'icona 2 Viene visualizzata la schermata Link Info dell'utility ZyXEL.
- Page 85 ZyXEL. Fare riferimento alla Guida utente per le istruzioni su come disinstallare l'utility. L'NWD310N cerca automaticamente qualsiasi rete disponibile e si collega a una rete wireless se per questa non è attiva l'opzione di protezione. Tuttavia, questa rete senza fili potrebbe non essere collegata a Internet.
- Page 86 4.2 Configurazione PIN WPS 1 Fare clic sulla scheda Adapter (adattatore). 2 Viene visualizzata la schermata Adapter dell'utilità ZyXEL. Nella sezione WPS, selezionare WPS e PIN - Use this device’s PIN (utilizza questo PIN per il dispositivo). Annotare il PIN di 8 cifre visualizzato in testo grigio nella finestra a comparsa.
- Page 87 3 Avviare l'utilità di configurazione dell'AP, aprire la schermata in cui è possibile configurare le impostazioni WPS e immettere il PIN dell'NWD310N (è raffigurata una schermata di esempio dell'NWA570N di ZyXEL). 4 Scegliere Start nella schermata NWD310N Adapter (adattatore) e quindi Apply oppure Start nella schermata WPS dell'AP entro due minuti.
- Page 88 L'AP autentica l'NWD310N e invia la configurazione corretta all'NWD310N. L'operazione può richiedere fino a due minuti. L'NWD310N è ora in grado di comunicare in sicurezza con l'AP. 4.3 Connessione a una rete wireless 1 Fare doppio clic sull'icona . Viene...
- Page 89 Se la rete senza fili è protetta, vicino alla voce dell'elenco appare una delle icone seguenti. Scegliere la rete a cui si desidera connettersi e quindi fare clic su Connect (connetti). 4 Se una rete non è protetta, viene visualizzata la schermata Link Info.
- Page 90 ITALIANO Nota per gli utenti di Windows XP Per utilizzare il sistema WCZ (Windows Zero Configuration), fare clic con il pulsante destro del mouse sull'icona scegliere Use Windows Zero Configuration as Configuration utility (utilizzare WCZ come utilità di configurazione). Per attivare nuovamente l'utilità di ZyXEL, fare clic con il pulsante destro del mouse sull'icona e selezionare Use ZyXEL Utility as Configuration utility (utilizza utilità...
- Page 91 Procedura per visualizzare le certificazioni di un prodotto 1 Andare alla pagina www.zyxel.com. 2 Nel sito ZyXEL, selezionare il proprio prodotto dall’elenco a discesa per andare alla pagina di quel prodotto. 3 Da questa pagina selezionare la certificazione che si vuole vedere. ITALIANO...
-
Page 92: Pусский
совместим со стандартом Wi-fi Protected Setup (WPS). 1 Установите программное обеспечение Установите с CD-диска программное обеспечение перед подключением NWD310N. Пока не подключайте NWD310N. 1 Отключите NWD310N, если вы его уже подключили. 2 Вставьте CD-диск с ПО в привод CD-ROM вашего компьютера. PУССКИЙ РУССКИЙ... - Page 93 РУССКИЙ 3 Когда отобразится следующее окно, щелкните на кнопке Setup (Установить) утилиту и драйвер ZyXEL. Если такое окно не появилось, то найдите и запустите файл autorun.exe.
- Page 94 1 Когда отобразится следующее окно щелкните на кнопке Next [Далее]. 2 Выберите Driver and Utility [Драйвер и утилита], чтобы установить утилиту и драйвер ZyXEL на ваш компьютер. Если вы хотите установить только драйвер и использовать нулевую беспроводную конфигурацию (WZC) для Windows XP, выберите пункт Driver only [Только...
- Page 95 РУССКИЙ подтвердить расположение файла по умолчанию или Browse [Обзор], чтобы выбрать другую папку. 3 Щелкните на кнопке Install [Установить].
- Page 96 Вам следует перезагрузить ваш компьютер после установки утилиты ZyXEL. Перед началом установки сохраните все необходимые данные. 4 Когда отобразится следующее окно, выберите No, I will restart my computer later [Нет, перезагрузить компьютер позже]. Вы выключите компьютер для установки оборудования. Нажмите Finish [Завершить], чтобы завершить процесс установки.
-
Page 97: Установка Оборудования
3 Отключите компьютер от сети питания. 4 Оденьте браслет для защиты от статического электричества, или прикоснитесь к заземленному металлическому объекту. Снимите крышку процессорного блока компьютера, затем распакуйте NWD310N. 5 Если к NWD310N подключена антенна, то ее необходимо снять (открутить). РУССКИЙ... - Page 98 6 Вставьте NWD310N в доступный порт PCI на компьютере. Убедитесь, что контакты NWD310N полностью вошли в разъем PCI(A). 7 Закрепите NWD310N внутри компьютера винтом на кронштейне. 8 Закрепите (прикрутите) антенны на NWD310N. 9 Направьте антенны вверх. 10 Включите комьютер. РУССКИЙ...
- Page 99 Если адаптер NWD310N правильно подключен, то на нем включается светодиодный индикатор Link (Связь). (Если индикатор NWD310N Link (Связь) не загорается после установки программного обеспечения и адаптера NWD310N, убедитесь в правильность подключения NWD310N. 11Следуя подсказкам на экране, выполните поиск NWD310N и установку драйвера.
- Page 100 к беспроводной сети. Если вы хотите использовать для подключения к беспроводной сети утилиту, то смотрите раздел 4. Адаптер NWD310N поддерживает две процедуры в стандарте WPS для создания безопасного соединения: • Push Button Configuration (Конфигурация, созданная нажатием кнопки) - создание безопасной беспроводной...
- Page 101 1 Убедитесь, что ваша беспроводная точка доступа (AP) включена и находится в зоне покрытия сети вашего компьютера. 2 Нажмите на кнопку WPS на NWD310N и на вашей беспроводной АР (на примере показано устройство ZyXEL NWA570N). Не имеет значения, какую из кнопок...
- Page 102 3 AP и NWD310N устанавливают безопасное соединение. Это может занять пару минут. 4 Теперь вы можете подключаться к Интернету по беспроводной сети через NWD310N. 4 Подключение к беспроводной сети с использованием утилиты ZyXEL В этом разделе показано как использовать ПИН для...
- Page 103 деинсталлируйте, а затем заново установите утилиту ZyXEL. Смотрите Руководство пользователя, где описана процедура деинсталляции утилиты. Адаптер NWD310N автоматически проводит поиск любой доступной сети(ей) и подсоединяется к беспроводной сети без включения системы защиты. Тем не менее, эта беспроводная сеть может не иметь выхода в Internet.
- Page 104 4.2 Конфигурация ПИН WPS 1 Щелкните на закладке Adapter (Адаптер). 2 Появится окно утилиты ZyXEL Adapter (Адаптер). В разделе WPS, выберите WPS и PIN - Use this device’s PIN (Использовать ПИН этого устройства). Запишите 8- значный ПИН в всплывающем окне. Вам понадобится ввести...
- Page 105 перейдите к окну настройки параметров WPS и введите ПИН NWD310N (на примере показано окно утилиты устройства ZyXEL NWA570N). 4 Щелкните на кнопке Start (Старт) в окне NWD310N Adapter (Адаптер) и нажмите на кнопке Apply (Применить) или Start (Старт) в окне настройки WPS вашей...
-
Page 106: Подключение К Беспроводной Сети
Точка доступа определит NWD310N и пошлет на NWD310N необходимые параметры конфигурации. Этот процесс может занять пару минут. Теперь NWD310N может безопасно обмениваться данными с АР. 4.3 Подключение к беспроводной сети 1 Дважды щелкните на иконке . Появится окно Link Info (Информация... - Page 107 3 Если доступна беспроводная сеть без системы защиты, то рядом с элементом списка будет находиться одна из следующих иконок. Если доступна беспроводная сеть с включенной системой защиты, то рядом с элементом списка будет находиться одна из следующих иконок. Выберите сеть, к которой вы хотите подключиться, щелкнув...
- Page 108 РУССКИЙ Примечания для пользователей Windows XP Если вы хотите использовать нулевую конфигурацию Windows (WZC), то щелкните правой кнопкой на значке и выберите пункт Use Windows Zero Configuration as Configuration utility (Использовать для настройки нулевую конфигурацию Windows). Чтобы снова активировать утилиту ZyXEL щелкните правой...
- Page 109 Процедура просмотра сертификатов 1 Зайдите на сайт www.zyxel.ru. 2 Выберите нужное изделие из раскрывающегося списка на домашней странице корпорации ZyXEL и перейдите на страницу, посвященную этому изделию. 3 Выберите на этой странице нужный сертификат для просмотра. РУССКИЙ изделий...
-
Page 110: Svenska
1 Installera programvaran Installera programvaran från CD-skivan innan du sätter i NWD310N. Sätt inte i NWD310N ännu. 1 Ta ut NWD310N om du redan satt i den. 2 Sätt i den medföljande CD-skivan i CD-ROM-enheten i datorn. SVENSKA SVENSKA... - Page 111 SVENSKA 3 När följande skärmbild visas, klicka på Setup för att installera ZyXELs verktyg och drivrutin. Om skärmen inte visas, leta reda på och dubbelklicka på autorun.exe på CD-skivan.
- Page 112 4 När följande skärmbild visas, klicka på Next (nästa). 5 Välj Driver (drivrutin) och Utility (verktyg) för att installera både ZyXEL-verktyget och drivrutinen i din dator. Om du enbart vill installera drivrutinen och använda WCZ (Wireless Zero Configuration) med Windows XP, välj enbart Driver (se Klicka på...
- Page 113 SVENSKA installationskatalog eller klicka på Browse (sök) för att välja en annan mapp. 6 Klicka på Install (installera).
- Page 114 Du måste starta om datorn när du installerat ZyXEL-verktyget. Kontrollera att du har sparat ditt arbete innan du fortsätter. 7 När följande skärmbild visas, välj No, I will restart my computer later (nej, jag startar om datorn senare). Klicka på Finish (slutför) för att slutföra programvaruinstallationen.
- Page 115 4 Jorda dig själv genom att ta på ett anti-statiskt armband (om du har ett sådant) eller vidröra ett jordat metallföremål. Ta bort datorhöljet och ta sedan upp NWD310N ur förpackningen. 5 Om antennerna är anslutna till NWD310N, ta bort (skruva loss) dem. SVENSKA...
- Page 116 6 Sätt in NWD310N i en ledig PCI-plats. Kontrollera att NWD310Ns kontakter är helt införda i PCI-platsen (A). 7 Fäst NWD310N vid datorn med en fästskruv. 8 Anslut (skruva fast) antennerna till NWD310N. 9 Rikta antennerna uppåt. 10 Sätt på datorn.
- Page 117 SVENSKA Om NWD310Ns LED-lampa Link inte tänds sedan du installerat programvaran och NWD310N, kontrollera att NWD310N är rätt införd. 11Följ instruktionerna på skärmen för att söka efter NWD310N och installera drivrutinen.
- Page 118 1 Se till att din trådlösa AP (Access Point) är påslagen och inom räckhåll för din stationära dator. 2 Tryck på WPS-knappen på NWD310N och på din trådlösa AP (ZyXELs NWA570N visas som ett exempel). Det spelar ingen roll vilken knapp du trycker på först. Du SVENSKA om du vill använda verktyget för...
- Page 119 WPS-knapp i sitt konfigurationsverktyg. Andra WPS-kompatibla enheter har en liknande WPS- knapp. NWD310N 3 AP och NWD310N upprättar en säker anslutning. Detta kan ta upp till två minuter. 4 Nu kan du ansluta trådlöst till Internet via NWD310N. SVENSKA Internet...
- Page 120 AP samt hur du konfigurerar trådlösa inställningar manuellt för att ingå i ett trådlöst nätverk. 4.1 Öppna verktyget 1 När du har installerat ZyXEL-verktyget och satt i NWD310N, visas en ikon i aktivitetsfältet. Dubbelklicka på ikonen 2 ZyXEL-verktygets skärm Link Info...
- Page 121 Om ikonen ominstallera ZyXEL-verktyget. Se bruksanvisningen angående hur du avinstallerar verktyget. NWD310N söker automatiskt efter eventuella tillgängliga nätverk och ansluter till ett trådlöst nätverk utan säkerhetsfunktionen aktiverad. Men detta trådlösa nätverk är eventuellt inte anslutet till Internet. ikonfärgen är röd, är du inte ansluten till ett trådlöst nätverk.
- Page 122 4.2 WPS PIN-konfiguration 1 Klicka på fliken Adapter. 2 ZyXEL-verktygets skärm Adapter visas. I sektionen WPS, välj WPS och PIN - Use this device’s PIN (PIN - använd denna enhets PIN). Skriv ner den 8-siffriga PIN-kod som visas i det gråtonade textfältet i popup-fönstret. Du måste ange denna PIN på...
- Page 123 WPS-inställningar och ange NWD310Ns PIN (en exempelskärm från ZyXELs NWA570N visas). 4 Klicka på Start på skärmbilden NWD310N Adapter och Apply (verkställ) eller Start på APs WPS-skärm inom två minuter. AP autentiserar NWD310N och skickar rätt konfigurationsinställningar till NWD310N.
- Page 124 4.3 Ansluta till ett trådlöst nätverk 1 Dubbelklicka på ikonen . ZyXEL-verktygets skärm Link Info (länkinformation) visas. Klicka på fliken Site Survey (platsöversikt). 2 Tillgängliga trådlösa nätverk visas i Available Network List (lista över tillgängliga nätverk). SSID står för Service Set Identifier och är namnet på...
- Page 125 Välj det nätverk du vill ansluta till genom att klicka på det och klicka på Connect (anslut). 4 Om ett nätverk saknar säkerhet, visas skärmen Link Info (länkinformation). Gå till steg 6. 5 Om ett nätverk har säkerhet, visas skärmen för säkerhetsinställningar.
- Page 126 Du aktiverar ZyXEL-verktyget igen genom att högerklicka på ikonen och välja Use ZyXEL Utility as Configuration utility (använd ZyXEL-verktyget som konfigurationsverktyg). Om du bara vill använda WZC, avmarkera Utility under installatonen av ZyXEL-verktyget. Procedur för att visa en produkts 1 Gå till www.zyxel.com. 2 Välj din produkt från rullgardinslistrutan på...
- Page 127 SVENSKA...
Need help?
Do you have a question about the NWD310N and is the answer not in the manual?
Questions and answers