Table of Contents
Advertisement
Available languages
Available languages
Quick Links
Owners Manual
Garage and Workshop Heater
IMPORTANT: Please read all instructions and warnings carefully before installation
and use. Failure to follow these instructions may result in a possible electric shock,
injury to persons, or possible fire hazard. It will also void the warranty.
Royal Sovereign International Inc.
Because our products are subject to continuous improvement,
Royal Sovereign reserves the right to modify product design and
specifications without notice and without incurring any obligation.
HWS-480
Advertisement
Chapters
Table of Contents

Subscribe to Our Youtube Channel
Related Manuals for Royal Sovereign PRO HWS-480


Summary of Contents for Royal Sovereign PRO HWS-480
- Page 1 It will also void the warranty. Because our products are subject to continuous improvement, Royal Sovereign International Inc. Royal Sovereign reserves the right to modify product design and specifications without notice and without incurring any obligation.
-
Page 2: Table Of Contents
CONTENTS Safety Instructions ------------------------------------------- Description ------------------------------------------- Accessories ------------------------------------------- Assembly ------------------------------------------- Operation ------------------------------------------- Cleaning and Maintenance ------------------------------------------- Troubleshooting ------------------------------------------- Specifications ------------------------------------------- Warranty ------------------------------------------- Page en français -------------------------------------------... -
Page 3: Safety Instructions
Safety Instructions PLEASE READ AND SAVE THESE IMPORTANT SAFEFTY INSTRUCTIONS When using electrical heaters, basic precautions should always be followed to reduce the risk of fire, electrical shock, and injury to persons, including the following: Read all instructions before using this heater. This heater is hot when in use. - Page 4 14. This heater, when installed, must be electrically grounded in accordance with local codes, with the current CSA C22.0 Canadian Electrical codes or for USA installations, follow local codes or for USA installations, follow local codes and the National Electric code ANSI/NFPA No. 70. 15.
- Page 5 NEVER • Place drapes, clothing or towels over electric heater to dry. • Use in the presence of explosive or flammable vapors such as gas or paint. • Plug another electrical heater into the same circuit. Blown fuses, tripped circuits and fire hazards •...
-
Page 6: Description
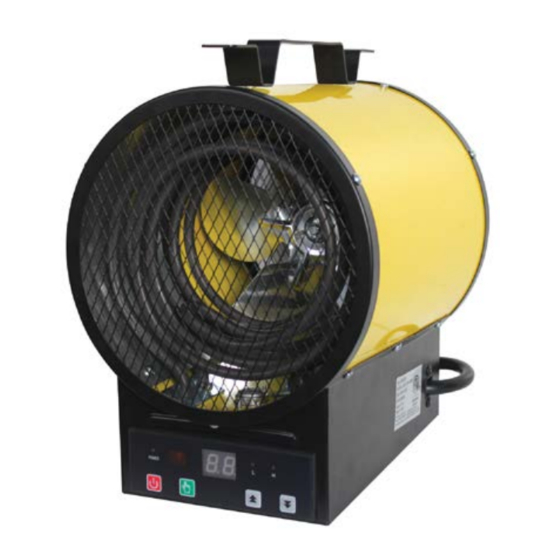
Description Control Carrying Handle Heater Coil Safety Grill Remote Control Accessories 65 mm Screws (3) 20mm Screw (1) 16 mm Screws (2) Wall/Ceiling M10 mm Screw (1) Lock Washer (1) 5 mm Washers (2) 5mm Nut (1) Bracket (1) 10 mm Washer (1) Lock Washers (2) Handle (1) 10 mm Nut (1) -
Page 7: Assembly
Assembly WARNING: USE THIS HEATER ONLY AS DESCRIBED IN THIS MANUAL. ANY OTHER USE NOT RECOMMENDED BY THE MANUFACTURER IS STRICTLY PROHIBITED AND MAY CAUSE FIRE, ELECTRIC SHOCK, OR INJURY TO PERSONS CEILING MOUNT APPLICATION WALL MOUNT APPLICATION Remove Heater and all packing material from the box. Tools Required ▪... -
Page 8: Operation
Secure two 65mm screws to wall / ceiling joist leaving 1/8” exposed. Two (2) screws must be attached securely to a wood stud (min 1.5”/38mm) Attach bracket to exposed screw head by sliding through keyholes on bracket and pushing down to lock the bracket into place. - Page 9 Attach heater to wall or ceiling as noted in instructions. Connect the fan heater to the proper electrical power outlet. Refer to grounding instructions below. The power indicator light will illuminate Press the red power button. The display panel will flash five (5) times followed by displaying the room temperature.
-
Page 10: Cleaning And Maintenance
Overheat Safety Control This heater is equipped with and internal heat limiting thermostat and overheat protection circuit. When a potential overheat temperature is reached, the system will automatically shut the heater off. IF SAFETY LIMIT LIGHT ILLUMINATES an abnormal condition has turned off the heating elements. TO RESET WAIT 10 MINUTES to allow the heater to cool down, the heater will automatically reset once the heating element cools down. -
Page 11: Troubleshooting
Troubleshooting PROBLEM CAUSE SOLUTION Heating element does not glow red Stainless steel elements won’t glow red Heater is operating correctly to produce heat. Do not feel heat or air flow No power to heater Check power connection to heater Desired room temperature reached. Thermostat will shut off heater once desired room temperature is reached. -
Page 12: Specifications
Specifications Model HWS-480 Material Metal Construction Heater Element Stainless Steel Heating Element Heating Area 538 sq ft (50m2) BTU per Hour /Watts 16382 /4800w Thermostat Display Remote Control Included Timer 0-9 hours Amps Voltage 208-240V, 60 Hz Plug Type Nema 6-30P Unit Size 10.3"... -
Page 13: Warranty
Warranty (One Year Limited) Royal Sovereign International, Inc. (and its affiliated companies) warranties this product to be free from defects in material and workmanship for a period of one (1) year. This warranty is extended to the original purchaser only. -
Page 14: Page En Français
électrocution, des blessures aux personnes, ou un risque d'incendie éventuel. Cela annulera également la garantie. Nos produits étant soumis à une amélioration continue, Royal Royal Sovereign International Inc. Sovereign se réserve le droit de modifier la conception et les spécifications des produits sans préavis et sans aucune obligation. - Page 15 CONTENU Instructions de sécurité ------------------------------------------- Description ------------------------------------------- Accessoires ------------------------------------------- Assemblage ------------------------------------------- Fonctionnement ------------------------------------------- Nettoyage et entretien. ------------------------------------------- Dépannage. ------------------------------------------- Spécifications ------------------------------------------- Garantie -------------------------------------------...
-
Page 16: Instructions De Sécurité
Instructions de sécurité VEUILLEZ LIRE ET CONSERVER CES INSTRUCTIONS DE SÉCURITÉ IMPORTANTES Lorsque vous utilisez des appareils de chauffage électriques, vous devez toujours prendre des précautions de base pour réduire le risque d'incendie, d'électrocution et de blessure aux personnes, notamment les suivantes : Lisez toutes les instructions avant d'utiliser cet appareil. - Page 17 14. Cet appareil de chauffage, une fois installé, doit être mis à la terre conformément aux codes locaux, avec les codes électriques canadiens CSA C22.0 actuels ou pour les installations aux États-Unis, suivre les codes locaux ou pour Pour les installations aux Etats-Unis, suivre les codes locaux et le code électrique national ANSI/NFPA No.
- Page 18 JAMAIS • Placez les rideaux, les vêtements ou les serviettes sur le chauffage électrique pour les faire sécher. • Utiliser en présence de vapeurs explosives ou inflammables telles que le gaz ou la peinture. • Branchez un autre appareil de chauffage électrique dans le même circuit. Fusibles grillés, circuits déclenchés et risques d'incendie •...
-
Page 19: Description
Description Contrôle Poignée de transport Bobine de chauffage Grille de sécurité Télécommande Accessoires (3) vis de 65 mm (1) vis de 20 mm (2) vis de 16 mm (1) support de fixation (1) vis 10 mm (1) rondelle (2) rondelles de 5 mm (1) écrous de 5 mm mural/plafond (1) rondelle de 10 mm... -
Page 20: Assemblage
Assemblage AVERTISSEMENT : N'UTILISEZ CET APPAREIL DE CHAUFFAGE QUE DE LA MANIÈRE DÉCRITE DANS CE MANUEL. TOUTE AUTRE UTILISATION NON RECOMMANDÉE PAR LE FABRICANT EST STRICTEMENT INTERDITE ET PEUT CAUSER UN INCENDIE, UNE ÉLECTROCUTION OU DES BLESSURES AUX PERSONNES. INSTALLATION AU PLAFOND INSTALLATION MURALE Retirer l'appareil de chauffage et tout le matériel d'emballage de la boîte. -
Page 21: Fonctionnement
Fixez deux vis de 65 mm à la solive du mur / plafond en laissant 1/8 po exposé. Deux (2) vis doivent être fixées solidement à un montant de bois (min 38 mm/1,5 po) Fixez le support à la tête de vis exposée en le faisant glisser dans les trous de serrure du support et en le poussant vers le bas pour le verrouiller en place. - Page 22 Fixez l'appareil de chauffage au mur ou au plafond comme indiqué dans les instructions. Branchez le chauffe-ventilateur à la prise électrique appropriée. Consultez les instructions de mise à la terre ci-dessous. Le témoin d'alimentation s'allumera Appuyez sur le bouton rouge de mise en marche. L'écran d'affichage clignotera cinq (5) fois, puis la température ambiante sera affichée.
-
Page 23: Nettoyage Et Entretien
Contrôle de sécurité en cas de surchauffe Cet appareil de chauffage est équipé d'un thermostat de limitation de la chaleur et d'un circuit de protection contre la surchauffe. Lorsqu'une température de surchauffe potentielle est atteinte, le système arrête automatiquement le chauffage. SI LA LUMIÈRE DE LA LIMITE DE SÉCURITÉ... -
Page 24: Dépannage
Dépannage PROBLÈME CAUSE SOLUTION L'élément chauffant ne s'allume pas en Les éléments en acier inoxydable ne L’appareil de chauffage fonctionne rouge s'illuminent pas en rouge pour produire correctement. de la chaleur. Ne sent pas la chaleur ou le débit d'air Pas d'alimentation à... - Page 25 Spécifications Modèle HWS-480 Matériau Construction en métal Élément chauffant Élément chauffant en acier inoxydable Espace de chauffage 50 m (538 pi. ca.) 16382/4800W BTU par heure/watts 16 400 /4 800 watts Affichage du thermostat Télécommande Incluse Minuterie 0-9 heures Ampères Tension 208-240 V, 60 Hz Type de fiche...
- Page 26 Garantie limitée d’un an Royal Sovereign International, Inc. (et ses sociétés affiliées) garantit que ce produit est exempt de tout défaut de matériau et de fabrication pendant une période d'un (1) an. Cette garantie s'applique uniquement à l'acheteur original. Cette garantie couvre uniquement les produits qui sont correctement installés, correctement entretenus et correctement utilisés conformément aux instructions fournies.
Need help?
Do you have a question about the PRO HWS-480 and is the answer not in the manual?
Questions and answers