Table of Contents

Related Manuals for Tristar Products Power AirFryer Series


Summary of Contents for Tristar Products Power AirFryer Series
- Page 1 GEBRAUCHSANLEITUNG INSTRUCTIONS FOR USE MODE D’EMPLOI MANUALE DI UTILIZZAZIONE GEBRUIKSAANWIJZING HASZNÁLATI UTASÍTÁ NÁVOD K POUŽITÍ NÁVOD NA POUŽITIE INSTRUCŢIUNI DE UTILIZARE INSTRUKCJA OBSŁUGI KULLANIM KILAVUZU...
-
Page 2: Table Of Contents
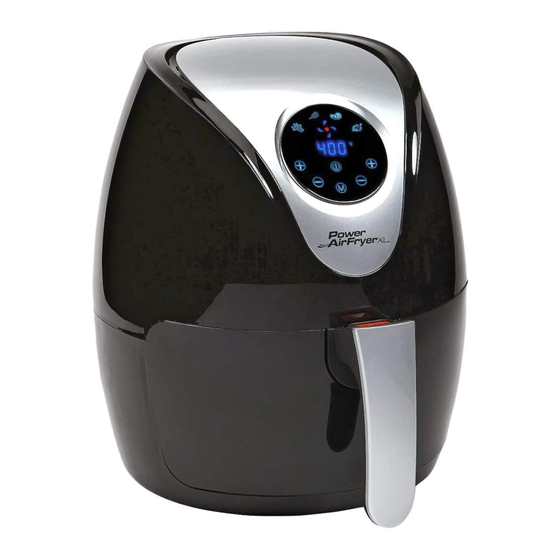
DE ......................... 6 Conservazione ..................36 Základné pokyny na použitie: SICHERHEITSHINWEISE: ..............6 Smaltimento ................... 36 Pretrepať pre rovnomernú prípravu ..........62 Schiebesicherung & Taste für die Entriegelung des Korbes NL .......................36 Riešenie problémov (tabuľka 4) ............63 (Abbildung 2) ....................7 VEILIGHEIDSAANWIJZINGEN: ............ - Page 3 Abbildung 1 | Illustration 1 | Illustrations 1 | Figura 1 | Afbeelding 1 | Ábra 1 | Obrázek 1 | Obrázok 1 | Figura 1 | Rys. 1 | Resim 1 | Ansicht von oben Ι Top View Ι Vue du haut Ι Vista dall’alto Ansicht von vorne Ι...
- Page 4 Obsah balení & označení dílů (Obrázek 1): Inclus în livrare & denumirile pieselor Teslimat kapsamı & parçaların tanımları 1. Fritovací koš (Figura 1): (Resim 1): 2. Tlačítko k odblokování koše 1. Coş de prăjire 1. Kızartma sepeti 3. Pojistka zásuvky 2.
- Page 5 Power AirFryer XL Abbildung 3 | Illustration 3 | Abbildung 2 | Illustration 2 | Illustration 2 | Figura 2 | Afbeelding 2 | Obrázek 2 | Illustration 3 | Figura 3 | Afbeelding 3 | Obrázok 2 | Figura 2 | Rys. 2 | Resim 2 Obrázek 3 | Obrázok 3 | Figura 3 | Rys.
-
Page 6: Sicherheitshinweise
SICHERHEITSHINWEISE: BEI DER VERWENDUNG ELEKTRONISCHER GERÄTE MÜSSEN DIE FOLGENDEN SICHERHEITSHINWEISE UNBEDINGT BEFOLGT WERDEN: 1. BITTE VOR VERWENDUNG DIESES GERÄTES ALLE ANLEITUNGEN LESEN UND DIESE BEDIENUNGSANLEITUNG ZUM NACHSCHLAGEN AUFBEWAHREN. 2. Sollte der Power AirFryer XL/XXL an Dritte weitergegeben werden, so muss diese Bedienungsanleitung ebenfalls mit ausgehändigt werden. -
Page 7: Schiebesicherung & Taste Für Die Entriegelung Des Korbes (Abbildung 2)
24. Lassen Sie das Gerät nach Gebrauch für mindestens 30 Minuten abkühlen, bevor Sie mit der Reinigung beginnen oder es in einen Schrank stellen. 25. Vergewissern Sie sich, dass die Speisen, welche in diesem Gerät zubereitet wurden, goldbraun und knusprig und nicht dunkel oder schwarz frittiert wurden. -
Page 8: Voreingestellte Zubereitungsprogramme Power Airfryer Xl (Tabelle 1)
Tasten 7-13: Voreingestellte Zubereitungsprogramme Power AirFryer XL (4 Programme): Sie können Programme für folgende Speisen auswählen: Pommes Frites, Hähnchen, Steaks oder Fisch. Power AirFryer XXL (7 Programme): Ihr Power AirFryer XXL verfügt über 7 voreingestellte Programme für Pommes Frites, Gebratenes, Shrimps, Kuchen/Gebäck, Hähnchen, Steak und Fisch. -
Page 9: Nur Bei Deluxe Versionen: Verwenden Der Mini-Pizzabackform (12) Und Des Backeinsatzes (13)
Hinweise: • Stellen Sie das Gerät auf eine stabile, gerade und hitzebeständige Oberfläche. • Geben Sie den Frittierkorb in die Frittierschublade und lassen Sie diesen einrasten. • Schieben Sie die Frittierschublade in das Gehäuse. Sie hören ein „Klick“, wenn diese richtig eingerastet ist. •... -
Page 10: Grundlegende Anwendungshinweise: Schütteln Für Gleichmäßige Zubereitung
schnell aus dem Gerät, dies stört den Zubereitungsprozess massiv. Verwenden Sie die Informationen aus den Tabellen dieser Anleitung, um die korrekten Einstellungen zu erhalten. GRUNDLEGENDE ANWENDUNGSHINWEISE: SCHÜTTELN FÜR GLEICHMÄSIGE ZUBEREITUNG Um eine gleichmäßige Zubereitung zu gewährleisten, ist es erforderlich, einige Speisen während des Zubereitungsprozesses zu schütteln. Um dies zu tun, entfernen Sie einfach die Frittierschublade inklusive Frittierkorb aus dem Gehäuse. -
Page 11: Fehlerbehebung (Tabelle 4)
Tabelle 3 soll Ihnen dabei helfen, bei den genannten Speisen die richtigen Standardeinstellungen zu treffen: Speisen Zeit (Min)* Temperatur °C Schütteln Empfehlungen Dünne gefrorene Pommes 15-16 Dicke gefrorene Pommes 15-20 Hausgemachte Pommes 10-16 +1/2 EL Öl Kartoffelecken 18-22 +1/2 EL Öl Kartoffelwürfel 12-18 +1/2 EL Öl... -
Page 12: Die Häufigsten Fragen
Der Frittierkorb ist überladen. Befüllen Sie den Korb nicht über den MAX Strich im Korb. Die Frittierschublade lässt sich nicht ordnungsgemäß in das Der Frittierkorb ist nicht richtig in der Frittierschublade Drücken Sie den Frittierkorb vorsichtig in die Frittierschublade, Gehäuse einschieben. eingerastet. -
Page 13: Vergleich Der Gerätevarianten (Tabelle 5)
VERGLEICH DER GERÄTEVARIANTEN (TABELLE 5) Digitales Easy-Touch Modell Merkmale Automatische Programme Bedienfeld Power AirFryer XL*** • Digitales Easy-Touch Bedienfeld • 4 voreingestellte Zubereitungsprogramme Pommes Frites • Zeitschaltuhr mit automatischer Ausschaltfunktion Hähnchen • 1350 Watt Leistung (220-240V~ 50-60 Hz ) Steak •... -
Page 14: Safety Information
SAFETY INFORMATION WHEN USING THE ELECTRONIC APPLIANCE THE FOLLOWING SAFETY INFORMATION MUST BE OBSERVED. 1. PLEASE READ ALL INSTRUCTIONS PRIOR TO USE OF THIS APPLIANCE AND KEEP THIS INSTRUCTION MANUAL FOR LATER REFERENCE. 2. If the Power AirFryer XL/XXL is passed on to a third party, this instruction manual must also be handed over. 3. -
Page 15: Sliding Button Guard & The Basket Release Button (Illustration 2)
as the outer frying basket is extracted. 27. CAUTION: Do not pull the sliding button guard until the outer frying basket and the frying basket are placed on a level, heat- resistant surface. Never use the basket and outer basket if the sliding button guard has become detached. Automatic Switch-Off The appliance has an integrated timer that deactivates it automatically as soon as the appliance has come to the end of a process. -
Page 16: Default Cooking Preparation Programmes - Power Airfryer Xl (Table 1)
# 15: Fan Display The fan display appears when the appliance is switched on, and goes off approximately 20 seconds after it is switched off. A red star-shaped LED symbol appears in the centre of the display as soon as the appliance is in „cooking“ or „pre-heat“ mode. DEFAULT COOKING PREPARATION PROGRAMMES –... -
Page 17: Frying With Your New Power Airfryer Xl/Xxl
Put the Mini-Pizza baking tray or the baking tray in the frying basket. Never place both trays in the outer frying basket! Only to be used in combination with the frying basket. A Versatile Appliance The Power AirFryer XL/XXL has been designed to cook a number of your favourite dishes. The tables and suggestions included in this instruction manual will help you achieve great results. - Page 18 it is possible that the basket release button may be pressed accidentally. Tip: Set the timer to half of the cooking time. It will then ring when it is time to shake the foods in the frying basket. Audio signal at the end of the cooking time When you hear the timer’s audio signal, the pre-set cooking time has expired.
-
Page 19: Troubleshooting (Table 4)
Stuffed vegetables Cakes 20-25 Use the baking tray** Quiche 20-22 Use the mini-pizza/baking tray** Muffins 15-18 Use the baking tray** Sweet snacks Use the mini-pizza/baking tray** **only inluded with the deluxe version *Add 3 minutes cooking time, when the appliance is not pre-heated. Please note: these settings are only recommendations. As foods may differ in quantities, size, condition and producer, cooking times can vary slightly. -
Page 20: Comparison Of The Appliance Variants (Table 5)
4. What should I do if the appliance switches off during cooking? To prevent damage from overheating, the Power AirFryer XL/XXL has an automatic safety shutoff device. Remove the outer basket from the casing and place it on a heat-resistant base. Leave it to completely cool down. Unplug the cable from the mains. Then restart the appliance by pressing the on-off button. -
Page 21: Storage
4. Clean the interior of the appliance with warm water, a mild detergent and a soft sponge. 5. If necessary, remove the food remnants from the heating element with a brush. STORAGE 1. Unplug the appliance from the mains and leave it to completely cool down. 2. -
Page 22: Glissière De Sécurité Et Touche Pour Le Déverrouillage De La Corbeille (Illustration 2)
électriques. Laissez un écart d‘au moins 5 cm sous ou sur l‘appareil. Ne mettez rien sur le Power AirFryer XL/XXL. 17. N‘utilisez jamais l‘appareil à d‘autres fins que celles prévues dans ce mode d‘emploi. 18. Ne laissez jamais l‘appareil allumé sans surveillance. 19. -
Page 23: Programme De Préparation Préréglé Power Airfryer Xl (Tableau 1)
d‘environ 20 secondes. Touches 2 & 3 : touches de contrôle Timer Avec le symbole + et -, vous pouvez allonger ou réduire la durée de préparation. L‘échelle affiche les minutes. Quand vous appuyez sur la touche, le temps change très rapidement. Touches 4 &... -
Page 24: Instructions D'application Fondamentales
ATTENTION Ne remplissez jamais le panier extérieur d‘huile ou d‘un autre liquide. Cela peut entraîner la formation de flammes et un risque de combustion. INSTRUCTIONS D‘APPLICATION FONDAMENTALES Pour la première utilisation Retirez complètement le matériau d‘emballage, les étiquettes et autres instructions. Nettoyez le panier extérieur et le panier à frire à fond avec de l‘eau savonneuse chaude, les deux pièces peuvent être mises dans le lave-vaisselle. -
Page 25: Instructions D'application Fondamentales : Secouez Pour Une Préparation Homogène
Mise en marche 1. Branchez l‘appareil sur la prise. 2. Quand le panier à frire et les aliments se trouvent bien mis dans l‘appareil, appuyez une fois sur la touche Marche-Arrêt. 3. Sélectionnez un des programmes de préparation préréglés, en appuyant à nouveau sur la touche M jusqu‘à ce que le programme souhaité s‘allume ou bien réglez manuellement la durée et la température. -
Page 26: Solutions De Problèmes (Tableau 4)
moins de temps de cuisson que la pâte que l‘on confectionne soi-même. • Mettez une plaque ou grille du four dans le panier à frire si vous faites un gâteau ou une quiche. Les deux sont conseillées de la même façon si vous confectionnez des plats farcis ou délicats. -
Page 27: Questions Les Plus Fréquemment Posées
Les aliments ne sont pas frits Certains plats doivent être secoués durant le processus Veuillez lire encore une fois le tableau 3 de manière homogène. de préparation. Ne remplissez pas le panier au dessus du trait MAX dans le Le panier à frire est surchargé. Le panier extérieur ne panier. -
Page 28: Comparaison Des Variantes D'appareils (Tableau 5)
COMPARAISON DES VARIANTES D‘APPAREILS (TABLEAU 5) Panneau de commande Modèle Caractéristiques Programme automatique numérique Easy-Touch Power AirFryer XL*** • Panneau de commande numérique Easy-Touch • 4 Programmes de préparation préréglés • Minuterie avec une fonction d‘arrêt automatique Frites • Puissance 1350 Watt (220-240V~ 50-60 Hz ) Poulet •... -
Page 29: Avvertenze Di Sicurezza
AVVERTENZE DI SICUREZZA QUANDO SI USANO APPARECCHI ELETTRONICI, OCCORRE OSSERVARE ASSOLUTAMENTE LE SEGUENTI AVVERTENZE DI SICUREZZA: 1. PRIMA DI UTILIZZARE QUESTO APPARECCHIO LEGGERE TUTTE LE ISTRUZIONI E CONSERVARE QUESTO LIBRETTO PER RIFERIMENTI FUTURI. 2. In caso di cessione del Power AirFryer XL/XXL a terzi, consegnare anche queste istruzioni. 3. -
Page 30: Protezione Scorrevole E Pulsante Per Il Rilascio Del Cestello (Figura 2)
Rimuovere le parti bruciate. 26. Il Power AirFryer XL/XXL è dotato di un interruttore automatico interno che spegne immediatamente l’apparecchio non appena si estrae il cassetto. 27. ATTENZIONE Rimuovere la protezione del pulsante solo se il cassetto estraibile e il cestello sono posizionati su una superficie piana e resistente al calore. -
Page 31: Programmi Di Preparazione Preimpostati Power Airfryer Xl (Tabella 1)
IIl Power AirFryer XXL dispone di 7 programmi preimpostati per patatine fritte, arrosti, gamberetti, dolci da forno (torte/biscotti), pollo, bistecche o pesce. # 14: tempo e temperatura Per tutta la fase di cottura, questa spia segnala il tempo residuo e la temperatura attuale. # 15: spia del ventilatore La spia del ventilatore compare quando si accende l’apparecchio. -
Page 32: Solo Per Le Versioni Deluxe: Uso Della Mini Teglia Per La Pizza (12) E Dello Stampo Da Forno (13)
Inserire il separatore (figura 5): Al centro del cestello si trovano a destra e a sinistra delle guide per il separatore. Introdurre il separatore nel cestello inserendolo nelle guide. SOLO PER LE VERSIONI DELUXE: USO DELLA MINI TEGLIA PER LA PIZZA (12) E DELLO STAMPO DA FORNO (13) Inserire la mini teglia per la pizza o stampo da forno nel cestello. - Page 33 ATTENZIONE: il cassetto estraibile si riscalda notevolmente, indossare sempre un guanto da forno per evitare possibili ustioni si consiglia di indossare. Onde evitare di premere accidentalmente il pulsante di rilascio del cestello mentre si agitano gli alimenti, non rimuovere mai la protezione scorrevole del pulsante.
-
Page 34: Risoluzione Die Problemi (Tabella 4)
Petto di pollo 10-15 Involtini primavera 15-20 Prodotti surgelati (piatti pronti) Nuggets di pollo surgelati 10-15 Prodotti surgelati (piatti pronti) Bastoncini di pesce surgelati 6-10 Prodotti surgelati (piatti pronti) Bastoncini di mozzarella 8-10 Prodotti surgelati (piatti pronti) Verdure ripiene Usare mini teglia per la pizza / Torte 20-25 stampo da forno**... -
Page 35: Le Domande Più Frequenti
LE DOMANDE PIÙ FREQUENTI 1. Con il Power AirFryer XL/XXL si possono preparare solo cibi fritti? Nel Power AirFryer XL/XXL si può preparare una gran varietà di alimenti come, per esempio, bistecche, costolette, hamburger o dolci da forno. Per qualche idea, basta dare un’occhiata al ricettario allegato. 2. -
Page 36: Pulizia
PULIZIA Pulire il Power AirFryer XL/XXL dopo ogni utilizzo. Il cassetto estraibile e il cestello sono rivestiti con uno speciale strato antiaderente. Non usare mai utensili di pulizia con superfici ruvide. 1. Staccare il cavo di alimentazione dalla presa di corrente e, prima di pulire l’apparecchio, assicurarsi che si sia raffreddato del tutto. Nota bene: togliendo il cassetto estraibile dall’unità, l’apparecchio si raffredda più... -
Page 37: Bescherming & Ontgrendelingsknop Voor Frituurmand (Afbeelding 2)
geschikt voor gebruik door kinderen. Kinderen mogen de reiniging en het door de gebruiker te verrichten onderhoud niet verzorgen, tenzij ze ouder dan 8 jaar zijn en onder toezicht zijn. Houd het apparaat en het netsnoer verwijderd van kinderen jonger dan 8 jaar. 12. -
Page 38: Gebruik Van Het Digitale Bedieningspaneel (Afbeelding 3 + 4)
GEBRUIK VAN HET DIGITALE BEDIENINGSPANEEL (AFBEELDING 3 + 4) Knop 1: Aan-uitknop Zodra de frituurlade en het frituurmandje goed in de behuizing zitten, wordt de aan-uitknop verlicht. Druk eenmaal op de knop. Het apparaat zal zo tot een vooraf ingestelde temperatuur van ongeveer 190 graden verhitten en een voorbereidingstijd van 15 minuten instellen. Druk nu een tweede keer op de aan-uitknop om met de bereiding te beginnen. -
Page 39: Koken Met De Power Airfryer Zonder Vooraf Ingestelde Bereidingsprogramma's
KOKEN MET DE POWER AIRFRYER ZONDER VOORAF INGESTELDE BEREIDINGSPROGRAMMA’S Zodra u bekend bent met de Power Airfryer XL / XXL, wilt u misschien uw eigen recepten gaan bereiden. U hoeft hier geen automatisch programma voor te kiezen, u kunt gewoon een tijd en temperatuur instellen naar uw eigen wensen. De Power AirFryer voorverwarmen Om de Power Airfryer XL / XXL effectiever te gebruiken, is het raadzaam om deze twee of drie minuten voor te verwarmen. -
Page 40: Gebruiksinstructies: Schudden Voor Gelijkmatige Bereiding
Schuif de frituurlade in de behuizing tot u een ‚klik‘ hoort (afbeelding 8). Gebruik de frituurlade nooit zonder het frituurmandje. LET OP: Tijdens de bereiding wordt de frituurlade zeer heet. Wilt u deze verwijderen om de bereiding van het voedsel te controleren, zorg er dan voor dat u een hittebestendige onderzetter in de buurt heeft om de frituurlade op te zetten. - Page 41 • Gebruik kant en klaar deeg van de supermarkt om snel en gemakkelijk gevulde snacks te bereiden. Kant en klaar deeg is sneller gaar dan zelfgemaakt deeg. • Plaats een taartvorm of ovenschaal in de mand als u een cake of een quiche wilt maken. Dit wordt ook aanbevolen bij het maken van breekbare of gevulde gerechten.
-
Page 42: Oplossingen Bij Eventuele Problemen (Tabelle 4)
OPLOSSINGEN BIJ EVENTUELE PROBLEMEN (TABELLE 4) PROBLEEM MOGELIJKE OORZAAK OPLOSSING De stekker zit niet goed in het stopcontact. Steek de stekker in het stopcontact. Druk op de aan-uitknop. Kies een van de automatische Het apparaat is niet ingesteld. Stel een bereidingstijd of bereidingsprogramma’s, of stel zelf een tijd of temperatuur in. -
Page 43: Vergelijking Van De Verschillende Versies Van Het Apparaat (Tabel 5)
6. Kan ik tijdens het koken controleren hoe het voedsel is bereid? U kunt de frituurlade op elk gewenst moment uit de behuizing nemen. Vervolgens kunt u de inhoud schudden om een uniform, gefrituurd resultaat te krijgen. 7. Is de Power AirFryer XL / XXL geschikt voor de vaatwasser? Alle uitneembare delen (frituurmand, scheidingselement, frituurlade, mini-pizzabakvorm**, bakelement**) zijn geschikt voor de vaatwasser. -
Page 44: Opbergen
OPBERGEN 1. Trek de stekker van het apparaat uit het stopcontact en laat het apparaat goed afkoelen. 2. Zorg dat alle onderdelen schoon en droog zijn. 3. Bewaar het apparaat op een droge en schone plek. AFVOEREN Werp het product aan het eind van zijn levensduur daarom niet bij het normale huisvuil. Breng het naar een verzamelpunt voor het recyclen van elektrische en elektronische apparaten. -
Page 45: Csúszó Fedél És Kapcsoló A Kosár Kioldásához (2. Ábra)
21. Ha fekete füst távozik a készülékből, azonnal húzza ki a dugót az áramból. A sütő fiókot és a sütőkosarat csak akkor távolítsa el, ha a füst már nem szivárog. 22. A készüléket csak vízszintes, stabil és nem gyúlékony felületen használja. 23. -
Page 46: Előre Beállított Elkészítési Programok Power Airfryer Xl (1. Táblázat)
Power AirFryer XL (4 program): Választhat a következő ételek közül: sült krumpli, csirke, steak vagy hal. Power AirFryer XXL (7 program): A Power AirFryer XXL 7 előre beállított programot tartalmaz sült krumplihoz, garnélarákhoz, süteményekhez, csirkéhez, steakhez és halhoz. 14 #: Idő és hőmérséklet Ez a kijelző... -
Page 47: Csak A Deluxe Változatoknál: A Mini Pizzasütő-Forma (12) És A Sütőbetét (13) Használata
Az elválasztó betét behelyezése (5. ábra): A sütő kosár középén, bal és jobb oldalon vékony sínek találhatóak az elválasztó betét számára. Csúsztassa az elválasztó betétet a sütő kosárba a vezetősínek segítségével. CSAK A DELUXE VÁLTOZATOKNÁL: A MINI PIZZASÜTŐ-FORMA (12) ÉS A SÜTŐBETÉT (13) HASZNÁLATA Helyezze a mini pizzasütő-formát vagy a sütő... - Page 48 nehogy véletlenül megnyomja a kosár kioldó gombját. Tipp: Állítsa az időzítőt az elkészülési idő felére. Így ez akkor fog csengetni, amikor itt az ideje, hogy megrázza az ételt a sütő kosárban. Hangjelzés az elkészítési idő végén Ha meghallja az időzítő hangjelzését, az azt jelenti, hogy az előre beállított elkészítési idő lejárt. Vegye ki a sütő fiókot, és helyezze egy hőálló felületre.
-
Page 49: Probléma Megoldások (4. Táblázat)
Töltött zöldség Sütemény 20-25 Sütőbetét alkalmazásával** Mini pizzasütő-forma/ Sütőbetét Quiche 20-22 alkalmazásával** Muffin 15-18 Sütőbetét alkalmazásával** Mini pizzasütő-forma/ Sütőbetét Édes snackek alkalmazásával** ** csak a Deluxe változatban * Adjon hozzá 3 percet az elkészítéshez ha a készüléket nem melegítette fel előre. Kérjük, vegye figyelembe: ezek a beállítások csak ajánlások. Mivel az élelmiszerek mennyisége, mérete, állapota és gyártója különböző, az elkészítési idők is kissé... -
Page 50: Az Eszközváltozatok Összehasonlítása (5. Táblázat)
3. Bármikor kikapcsolhatom a Power AirFryer XL / XXL-t? Egyszerűen nyomja meg 1 x a Be / Ki gombot, vagy húzza ki a sütő fiókját a szekrényből. VIGYÁZAT: Ne távolítsa el a csúszó fedelet, amíg a sütő tálcát és a sütő kosarat egyenes, hőálló felületre nem helyezte. 4. -
Page 51: Tárolás
3. A sütő fiókot és a sütő kosarat meleg vízzel, enyhe tisztítószerrel és puha szivaccsal tisztítsa meg. Kérjük, vegye figyelembe: mindkét alkatrészt mosogatógépben is elmoshatja. Tipp: Ha erről a két darabról az ételmaradékok nehezen távolíthatók el, tegyen szappanos vizet mindkét kosárba, és áztassa kb.10 percig. 4. -
Page 52: Pojistka Zásuvky A Tlačítko K Odblokování Koše (Obrázek 2)
14. Nepropojujte tento spotřebič s časovým spínačem, nepoužívejte prodlužovací kabel. 15. Nepoužívejte přístroj za žádných okolností v blízkosti hořlavých materiálů, jako jsou např. ubrusy a záclony. 16. Neposouvejte spotřebič za provozu ke stěnám nebo do bezprostřední blízkosti jiných elektrických spotřebičů. Nechejte za spotřebičem, resp. -
Page 53: Přednastavené Programy Přípravy Power Airfryer Xl (Tabulka 1)
Tlačítka 4 a 5: Ukazatel regulace teploty Pomocí tlačítek + a - lze můžete zvyšovat nebo snižovat teplotu. Každé stisknutí tlačítka znamená změnu o 5 °C. Když podržíte tlačítko stisknuté, mění se teplota velmi rychle. Lze nastavovat teploty 80-200 °C. Tlačítko 6: Tlačítko nabídky Tlačítkem M můžete navolit přednastavené... -
Page 54: Pouze U Verzí De Luxe: Použijte Mini Formu Na Pečení Pizzy
Upozornění: • Postavte přístroj na stabilní rovnou plochu, odolnou vůči vysokým teplotám. • Dejte fritovací koš do fritovací zásuvky a nechejte zaklapnout. • Zasuňte fritovací zásuvku do pláště. Při správném zaklapnutí uslyšíte cvaknutí. • Upozornění: spotřebič funguje pouze když je zásuvka právně zasunutá. •... -
Page 55: Základní Pokyny Pro Používání: Protřepávání Pro Stejnoměrnou Přípravu
ZÁKLADNÍ POKYNY PRO POUŽÍVÁNÍ: PROTŘEPÁVÁNÍ PRO STEJNOMĚRNOU PŘÍPRAVU Pro zajištění stejnoměrné přípravy je potřeba pokrmy v průběhu přípravy protřepávat. Provádí se to tak, že prostě vytáhnete fritovací zásuvku a fritovací koš ze spotřebiče. Pak opatrně protřepejte obsah podle potřeby, zásuvku opět zasuňte do spotřebiče a vařte dál. U těžkých pokrmů se může stát, že budete chtít raději oddělit fritovací... -
Page 56: Řešení Problémů (Tabulka 4)
Hamburger 7-14 Párečky v županu 13-15 Kuřecí stehno 18-22 Kuřecí prsa 10-15 Hluboce zmrazené potraviny Jarní rolky 15-20 (polotovar) Hluboce zmrazené potraviny Zmrazené kuřecí nuggety 10-15 (polotovar) Hluboce zmrazené potraviny Zmrazené rybí prsty 6-10 (polotovar) Hluboce zmrazené potraviny Mozzarellové sýrové prsty 8-10 (polotovar) Plněná... -
Page 57: Nejčastější Otázky
Před přidáním oleje syrové hranolky důkladně osušte. Hranolky nejsou křupavé. Syrové hranolky obsahují příliš mnoho vody. Nakrájejte na menší kousky. Přidejte trochu více oleje. E1 - Přerušený proudový obvod v teplotním čidle Konzultujte s naším zákaznickým servisem (kontaktní údaje Hlášení chyb E2 - Zkrat v teplotním čidle jsou na polední... -
Page 58: Čištění
Power AirFryer XXL*** • Digitální ovládací pole Easy-Touch Hranolky • 7 přednastavených programů přípravy Pečeně • Časový spínač s funkcí automatického vypnutí Krevety • Výkon 1500 wattů (220-240 V 50/60 Hz) Koláč/pečivo • Fritovací zásuvka s velkou stabilní rukojetí Kuře •... - Page 59 že sú káble a zástrčky nepoškodené a v pôvodnom obale. 6. Skontrolujte, či je zástrčka správne zapojená do elektrickej zásuvky. 7. Ak chcete, aby vaše potraviny neprišli do kontaktu s vykurovacím telesom Power AirFryer XL / XXL, uistite sa, že kôš na vyprážanie nie je preťažený.
-
Page 60: Posuvné Zabezpečenie A Tlačidlo Na Uvoľnenie Koša (Obrázok 2)
POSUVNÉ ZABEZPEČENIE A TLAČIDLO NA UVOĽNENIE KOŠA (OBRÁZOK 2) Posuvné zabezpečenie zabraňuje náhodnému stlačeniu tlačidla na uvoľnenie koša Po stlačení tohto tlačidla sa kôš na vyprážanie oddelí od zásuvky na vyprážanie. Môže to viesť k zraneniu, ak ešte nebol umiestnený na rovný, teplo vzdorný... -
Page 61: Varte S Power Airfryer Bez Vopred Nastavených Programov Prípravy
VARTE S POWER AIRFRYER BEZ VOPRED NASTAVENÝCH PROGRAMOV PRÍPRAVY Akonáhle sa oboznámite s Power AirFryer XL / XXL, možno budete chcieť pripraviť svoje vlastné recepty. Nemusíte vyberať automatický program, jednoducho nastavte čas a teplotu jednotlivo. Predhriatie Power AirFryer Ak chcete Power AirFryer XL / XXL používať účinnejšie, odporúča sa predhrievať ho na 2 alebo 3 minúty. Jednoducho nastavte prednastavenú alebo vyššiu teplotu. -
Page 62: Základné Pokyny Na Použitie: Pretrepať Pre Rovnomernú Prípravu
UPOZORNENIE: Počas prípravy sa zásuvka na pečenie veľmi zohreje. Ak ju chcete vybrať, aby ste skontrolovali, do akej miery je jedlo pripravené, uistite sa, že máte v blízkosti výsuvnú lopatku odolnú proti žiaru, aby ste zásuvku odsunuli. Vždy noste kuchynské rukavice. Uvedenie do prevádzky 1. -
Page 63: Riešenie Problémov (Tabuľka 4)
tiež odporúčajú, ak pripravujete jemné alebo plnené jedlá. • Pomocou Power AirFryer XL / XXL môžete jedlá samozrejme tiež zohriať. Nastavte ho na 10 minút pri teplote 140 stupňov. Tabuľka 3 je určená na to, aby vám pomohla pri zvolených pokrmoch urobiť správne nastavenia. Jedlo Čas (min.)* Tepl. -
Page 64: Najčastejšie Otázky
Jedlo nie je rovnomerne Niektoré potraviny musia byť počas prípravy pretrepané. Prečítajte si znova tabuľku 3. fritované. Kôš na pečenie je preťažený. Neplňte kôš nad rysku MAX v košíku. Zásuvku na vyprážanie nie je možné správne vložiť do krytu. Kôš na vyprážanie nie je správne vložený do zásuvky na Jemne zatlačte kôš... -
Page 65: Porovnanie Variantov Zariadení (Tabuľka 5)
POROVNANIE VARIANTOV ZARIADENÍ (TABUĽKA 5) Digitálny ovládací panel Model Vlastnosti Automatické programy Easy-Touch Power AirFryer XL*** • Digitálny ovládací panel Easy-Touch • 4 prednastavené programy prípravy • Časovač s funkciou automatického vypnutia Hranolky • Výkon 1350 Watt (220-240V~ 50-60 Hz ) Kuracie mäso •... -
Page 66: Instrucţiuni De Siguranţă
INSTRUCŢIUNI DE SIGURANŢĂ: URMĂTOARELE INSTRUCŢIUNI DE SIGURANŢĂ TREBUIE URMATE ATUNCI CÂND SE UTILIZEAZĂ DISPOZITIV ELECTRONIC: 1. ÎNAINTE DE A UTILIZA ACEST APARAT CITIŢI TOATE INSTRUCŢIUNILE ŞI PĂSTRAŢI ACEST MANUAL PENTRU CONSULTARE ULTERIOARĂ. 2. Dacă înstrăinaţi Power AirFryer XL/XXL către terţi, atunci aceste instrucţiuni de utilizare trebuie să fie de asemenea înmânate. 3. -
Page 67: Siguranţa Culisantă Şi Butonul Pentru Deblocarea Coşului (Figura 2)
27. ATENŢIE: Eliminaţi resturile doar după ce tava de prăjire şi coşul au fost aşezate pe o suprafaţă rezistentă la căldură. Nu utilizaţi niciodată coşul şi tava dacă siguranţa de glisare este ruptă. Oprire Automată Dispozitivul dispune de un timer încorporat, care oprește automat după ce timpul a expirat. Puteţi opri aparatul manual. Pentru aceasta, apăsaţi butonul timer, până... -
Page 68: Programe De Gătit Power Airfryer Xl (Tabelul 1)
PROGRAME DE GĂTIT POWER AIRFRYER XL (TABELUL 1) PROGRAM Temperatura ° C Timp (min.) Cartofi prăjiţi Steak Peşte PROGRAME DE GĂTIT POWER AIRFRYER XXL (TABELUL 2) PROGRAM Temperatura ° C Timp (min.) Cartofi prăjiţi Prăjeală Creveţi Prăjituri/patiserie Steak Peşte GĂTIŢI CU POWER AIRFRYER FĂRĂ PROGRAME DE GĂTIT PRESTATE Odată... -
Page 69: Prăjiţi Cu Noul Dumneavoastră Power Airfryer Xl/Xxl
INDICAŢIE: • Nu amplasaţi niciodată nimic pe aparat. • Nu acoperiţi niciodată supapele de admisie şi evacuare de pe şi din partea posterioară a Power AirFryer XL/XXL. PRĂJIŢI CU NOUL DUMNEAVOASTRĂ POWER AIRFRYER XL/XXL Atunci când trageţi tava de prăjire din carcasă veţi simţi o uşoară rezistenţă. Aşezaţi o mână pe carcasă şi trageţi cu grijă tava afară. ATENŢIE: PROTECŢIA LA GLISARE ÎMPIEDICĂ... - Page 70 cu o suprafaţă netedă. Nu întoarceţi niciodată tava de prăjire cu fundul în sus atâta timp cât încă mai este fixat de ea coşul de prăjire. În caz contrar, excesul de ulei, care este colectat în partea de jos a tăvii de prăjire se va scurge pe alimente. Cu ajutorul Power AirFryer XL/XXL puteţi prepara mai multe coşuri pline cu alimente gustoase unul după...
-
Page 71: Soluţii Pentru Probleme (Tabelul 4)
alimentele, resp. cantităţile, mărimile, starea şi producătorul diferă, timpul de preparare poate diferi. SOLUŢII PENTRU PROBLEME (TABELUL 4) PROBLEMĂ MOTIV POSIBIL SOLUŢIE Dispozitivul nu este conectat. Introduceţi cablul în priză. Apăsați tasta pornit-oprit. Selectaţi unul dintre programele de Nu aţi pornit aparatul, setaţi timpul de gătit sau tempera- gătit presetate sau selectaţi manual timpul sau temperatura. -
Page 72: Compararea Variantelor Aparatului (Tabelul 5)
aparatul nou prin apăsarea butonului de pornire-oprire. 5. Power AirFryer XL/XXL are nevoie de timp pentru a se încălzi? Dacă utilizaţi Power AirFryer XL/XXL „rece“, atunci adăugaţi cca. 3 minute la timpul de preparare. 6. În timpul gătirii pot să văd cât de mult s-au preparat alimentele? În orice moment, puteţi scoate tavă... -
Page 73: Depozitare
DEPOZITARE 1. Decuplaţi aparatul de la priză şi lăsaţi-l să se răcească bine. 2. Asiguraţi-vă că toate piesele sunt curate şi uscate. 3. Aşezaţi aparatul pe un loc curat si uscat ELIMINARE Din acest motiv produsul, la sfârşitul duratei sale de funcţionare ,nu va fi debarasat împreună cu gunoiul menajer. Predaţi-l la punctele de colectare în vederea reciclării aparatelor electrice şi electronice. -
Page 74: Zabezpieczenie Suwakowe & Przycisk Do Odblokowania Koszyka (Rys. 2)
szuflada do frytowania. Uwaga na oparzenia. Przy kontakcie z urządzeniem zakładać rękawice lub stosować łapki kuchenne. 21. Jeśli w urządzenia wydobywa się czarny dym, natychmiast odłączyć urządzenie od prądu. Szufladę i koszyk do frytowania wyjąć dopiero, gdy przestanie wydobywać się dym. 22. -
Page 75: Predefiniowane Programy Do Przygotowywania Potraw Power Airfryer Xl (Tabela 1)
urządzenie zaczyna automatycznie przygotowywać żądaną potrawę, stosując predefiniowany czas i temperaturę. Wskazówka: W każdej chwili możecie Państwo znieść wybrany program, podnosząc lub redukując czas lub temperaturę. Przyciski 7-13: Predefiniowane programy do przygotowywania potraw Power AirFryer XL (4 programy): Można wybrać programy dla następujących potraw: Frytki, kurczak, steki lub ryba. Power AirFryer XXL (7 programów): Państwa AirFryer XXL dysponuje 7 programami dla frytek, potraw prażonych, krewetek, potraw pieczonych (ciasto/ pieczywo), kurczaka, steków i ryb. -
Page 76: Tylko W Wersjach Delux: Stosowanie Miniformy Do Pieczenia Pizzy (12) I Wkładki Do Pieczenia (13)
• Wcisnąć koszyk do szuflady do frytowania, aż kliknie. • Wsunąć szufladę do frytowania do obudowy. Gdy „kliknie” oznacza to, że jest dobrze zamocowana. • Proszę pamiętać: niniejsze urządzenie pracuje tylko przy prawidłowo wsuniętej szufladzie. • Urządzenie podłączyć bezpośrednio do gniazdka, nie używać przedłużaczy ani rozgałęziaczy. Montowanie wkładki oddzielającej (Rys. - Page 77 wyciągnąć szufladę i koszyk do frytowania z obudowy. Ostrożnie potrząsnąć zawartością i ponownie wsunąć szufladę w urządzenie, aby kontynuować gotowanie. Przy ciężkich potrawach może się zdarzyć, że chcielibyście Państwo oddzielić koszyk od szuflady do frytowania, zanim potrząśniecie potrawami. Aby to zrobić, należy wyjąć koszyk i połączoną z nim szufladę z urządzenia i ustawić ją na powierzchni ogniotrwałej.
-
Page 78: Rozwiązywanie Problemów (Tabela 4)
Zapiekanka ziemniaczana 15-18 Stek 8-12 Kotlety wieprzowe 10-14 Hamburgery 7-14 Kiełbaski w cieście 13-15 Udko z kurczaka 18-22 Pierś z kurczaka 10-15 Sajgonki 15-20 Mrożonka (produkt gotowy) Mrożone nuggetsy z kurczaka 10-15 Mrożonka (produkt gotowy) Mrożone paluszki rybne 6-10 Mrożonka (produkt gotowy) Paluszki z mozzarelli 8-10 Mrożonka (produkt gotowy) -
Page 79: Najczęstsze Pytania
Przed dodaniem oleju dobrze osuszyć surowe frytki. Frytki nie są chrupiące. Surowe frytki zawierają za dużo wody. Pokroić na drobniejsze kawałki. Dodać nieco więcej oleju. E1 – przerwany obwód prądu w czujniku temperatury Proszę się skontaktować z naszym serwisem (dane Komunikat błędu. -
Page 80: Porównanie Wariantów Urządzenia (Tabela 5)
PORÓWNANIE WARIANTÓW URZĄDZENIA (TABELA 5) Cyfrowy wyświetlacz Model Cechy Programy automatyczne dotykowy Easy-Touch • Cyfrowy wyświetlacz dotykowy Easy-Touch Power AirFryer XL*** • 4 predefiniowane programy do przygotowywania potraw • Zegar z funkcją automatycznego wyłączania Frytki • Moc 1350 Watt (220-240V~ 50-60 Hz ) Kurczak •... - Page 81 2. Power AirFryer XL/XXL üçüncü şahıslara verilirken bu kullanım kılavuzu da birlikte verilmelidir. 3. Power AirFryer gövdesini kesinlikle suya batırmayın. Bu gövde elektronik yapı parçaları ve ısıtma elemanı içermektedir. Çeşme altına tutarak temizlemeyin. 4. Elektrik çarpma tehlikelerini önlemek için fritözün gövdesine hiçbir sıvı dökmeyin. Buraya elektronik yapı parçaları yerleştirilmiştir.
-
Page 82: Sepet Kilidinin Açılması Için Itme Emniyeti Ve Tuş (Resim 2)
AKIM BESLEMESİ Power AirFryer XL/XXL ürününün bağlı olduğu akım devresine aşırı yüklenildiğinde cihazınız tekniğine uygun bir şekilde çalışmayabilir. Sadece bu cihazı bir akım devresine bağlayın, uzatma kablosu kullanmayın. AŞIRI ISINMAYA KARŞI KORUMA SİSTEMİ Dahili sıcaklık kontrol sistemi bozulduğunda aşırı ısınmaya karşı koruma sistemi etkinleşir. Cihaz artık çalışmaz. Bu durum söz konusu olduğunda cihazı... -
Page 83: Power Airfryer Xxl (Tablo 2)
ÖNCEDEN AYARLANMIŞ PIŞIRME PROGRAMLARI POWER AIRFRYER XXL (TABLO 2) PROGRAM Sıcaklık °C Süre (dak.) Patates kızartması Kızartma Karides Kek/hamur işi Piliç Biftek Balık POWER AIRFRYER ILE ÖNCEDEN AYARLANMIŞ PIŞIRME PROGRAMLARI OLMADAN PIŞIRIN Power AirFryer XL/XXL ürününü öğrendiğinizde kendi tariflerinizi de pişirmek isteyebilirsiniz. Bunun için otomatik program seçmek zorunda değilsiniz, süre ve sıcaklığı... -
Page 84: Esas Oluşturucu Uygulama Bilgileri: Eşit Pişirme Işlemi Için Karıştırın
DİKKAT: İTME EMNİYETİ, SEPET KİLİDİNİN AÇILMASINA YÖNELİK TUŞA İSTEMEDEN BASMANIZI ÖNLER. BU TUŞA BASILIRSA KIZARTMA SEPETİ KIZARTMA ÇEKMECESİNDEN AYRILIR. HENÜZ DÜZ VE ISIYA KARŞI DAYANIKLI BİR YÜZEYDE DURMUYORSA YARALANMALAR MEYDANA GELEBİLİR. UYARI: Fritöz çekmecesini tutarken daima fırın eldiveni kullanın. Yiyecekleri kızartma sepetine koyun (resim 6). Lütfen dikkate alın: Sepete kesinlikle tavsiye edilenden fazla yiyecek koymayın (max. - Page 85 Uygulama ipuçları • Daha küçük yiyecekler büyüklere göre genelde daha kısa pişirme süresine ihtiyaç duyar. • Daha yüksek yiyecek miktarları küçüklere göre daha uzun pişirme süresine ihtiyaç duyar. • Küçük yiyeceklerin pişirme süresinin yarısında karıştırılması yiyeceklerin eşit kızarmasını garanti eder. •...
-
Page 86: Sorun Çözümleri (Tablo 4)
SORUN ÇÖZÜMLERI (TABLO 4) SORUN OLASI SEBEBİ ÇÖZÜM Cihazı takılı değil. Kabloyu prize takın. Açma-kapatma tuşuna bakın. Önceden ayarlı pişirme Cihazı çalıştırmadınız, pişirme süresi ya da sıcaklık programlarından birini veya manuel olarak süre ya da sıcaklığı ayarlayın. seçin. Açma-kapatma tuşuna basın ve pişirme işlemi başlar. Power AirFryer çalışmıyor. -
Page 87: Cihaz Varyasyonlarının Karşılaştırılması (Tablo 5)
batırılmamalıdır. Gövdeyi sıcak, nemli bez ya da az miktarda hafif bir deterjan ile yumuşak bir sünger aracılığıyla temizleyin. ** Sadece Deluxe versiyonunda vardır. 8. Cihaz tavsiye edilen adımları gerçekleştirdikten sonra da çalışmıyor. Ne yapmalıyım? Cihazı kendiniz onarmayı denemeyin. Üretici ile iletişime geçin ve cihaz değişimi ile ilgili prosedürlerine uyun. Onarım denemeleri değişim hakkınızı... - Page 88 Hergestellt in China | Made in China | Fabriqué en Chine | Fabbricato in Cina | Made in China | Származási hely: Kína | Vyrobeno v Číně | Vyrobené v Číne | Tara de provenienta: China | Wyprodukowano w Chinach | Çin malıdır Importeur | Importer | Importateur | Importatore | Importeur | ImportÓr Dovozce | Dodávateľ...
Need help?
Do you have a question about the Power AirFryer Series and is the answer not in the manual?
Questions and answers