Advertisement
Introduction:
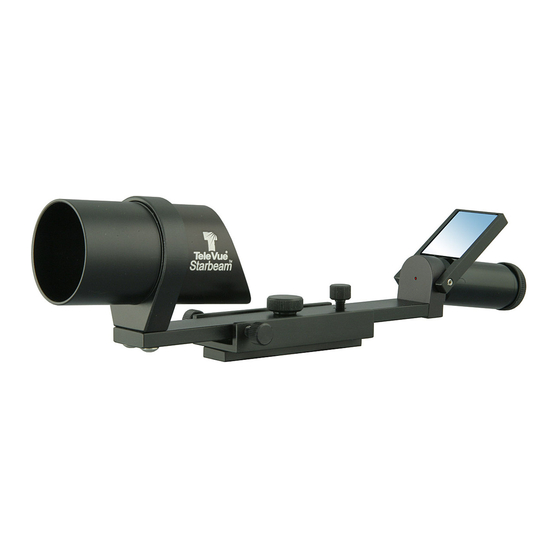
Starbeam is a precision unit power finder designed to make pointing your astronomical telescope easy. Viewing through Starbeam, a
transparent "red-star" appears projected against the sky background. The "star" is actually a small pinhole illuminated by a red L.E.D. Placed
at the focus of a beam-splitting mirror/lens, the star is projected to infinity. Starbeam is effectively a reverse Herschelian telescope.
The size of the pinhole and focal length of the mirror result in a 0.4° red-star, about the diameter of the moon. Its size, color, and adjustable
brightness and blink rate make it easy to see against any twilight to dark sky background. With a mirror aperture of 39mm, the projected
image can be easily seen at any distance behind the mirror, whether 2 inches or 2 feet! Because the mirror surface is uncoated, and a
multi-coated compensating curve is designed into the back of the mirror, the normal sky background appears through the almost invisible
"mirror-lens."
There are three mounting bases available for Starbeam, one for Tele Vue scopes, one for Newtonian/Dobsonians with a 4" or larger tube
diameter, and one for SCTs 8" or larger. Adjustment screws and lock screw make Starbeam
Installation:
For Tele Vue Telescopes (SFT-2003)
1) Removing Starbeam from Base Channel - First, back out the Horizontal Adjustment Screws until they clear the Optical
Assembly Support Bar. While holding Starbeam, remove the Lock Screw and lift Starbeam from the Base Channel.
2) Installing Base Channel - Drop the button head screw through the clearance hole in the Base Channel. Using the Allen key (provided),
lock the Base Channel (with the Horizontal Adjustment Screws oriented towards the front of the telescope) into the preferred mating
channel of the telescope mount ring. If the screw bottoms out before the Base Channel is locked down, use the supplied lock-washer as a
spacer by putting it under the screw head.
3) Installing Starbeam - Position Starbeam so the holes in the sides of the Optical Assembly Support Bar align with the horizontal
adjustment screws. Tighten the Horizontal Adjustment Screws until the tips enter the holes in the Optical Assembly Support Bar. You
can now lock the Starbeam down gently with the Vertical Lock Screw.
For Open Tube Telescopes (SFU-2004)
To attach Starbeam to any open telescope tube over 4" diameter, simply drill matching holes in your tube and use the supplied machine
screws and nuts to fasten the Base Channel to your telescope tube. Follow the instructions above for mounting Starbeam in its Base Channel.
For Schmidt Cassegrain Telescopes (SFC-2009)
The Starbeam model for 8" or larger diameter SCTs installs on the rear cell of the telescope. First, mount the Attachment Bracket
to the telescope's rear cell. The screw slots in the Attachment Bracket are sized and spaced to accommodate the wide variety of accessory
attachment points on popular SCTs. However, due to the different screw sizes and lengths, attachment screws are not provided with the
Starbeam. Slide the Dove Tail into the Attachment Bracket until it hits the Screw Stop. Tighten the thumb screw on the side of the
Attachment Bracket.
Tele Vue
V i s i o n a r y
Starbeam
advanced telescope pointer
Tele Vue Base
Universal Open Tube Base
SCT Base
SCT Attachment
Bracket
32 Elkay Dr., Chester, New York 10918 Ph. (845) 469 - 4551 www.televue.com
TM
TM
easy to align to your telescope.
Button Head Attachment screw
Machine Screws
Nuts
Dovetail
Attachment Slots
Base Channel
Base Channel
Stop Screw
Base Channel
Advertisement
Table of Contents

Subscribe to Our Youtube Channel
Related Manuals for TeleVue Starbeam SFT-2003

Summary of Contents for TeleVue Starbeam SFT-2003
- Page 1 Universal Open Tube Base Base Channel Stop Screw Nuts SCT Base Base Channel SCT Attachment Bracket Dovetail Attachment Slots Tele Vue 32 Elkay Dr., Chester, New York 10918 Ph. (845) 469 - 4551 www.televue.com V i s i o n a r y...
- Page 2 Alignment & Use: 1) Thread Illuminator into Starbeam. Compression of the rubber O-ring allows convenient positioning of the Blink Adjustment Knob. 2) Turn on Illuminator by rotating the black knob on the end clockwise. Continuing to rotate the knob clockwise increases the brightness. Adjust the intensity of the illuminator so the red-star appears comfortably bright without disturbing your night vision.
Need help?
Do you have a question about the Starbeam SFT-2003 and is the answer not in the manual?
Questions and answers