
Summary of Contents for SE Audiotechnik SMX 12A
- Page 1 SMX �2A AKTIVER KOAXIALER �2" MONITOR SELF POWERED 12" COAXIAL MONITOR / 12" 有源同轴返送音箱 HANDBUCH MANUAL / 使用说明书 中文...
- Page 3 Hier fi nden Sie die neuesten Aktualisierungen der Handbücher, Firmware sowie technische Dokumente für zusätzliche Unterstützung. © Copyright SE AUDIOTECHNIK® 2020. Alle Rechte vorbehalten. Der Inhalt dieses Dokuments kann ohne vorherige Ankündigung geändert werden, um die Zuverlässigkeit, Funktionalität, das Design oder andere Aspekte zu verbessern.
-
Page 5: Table Of Contents
INHALTSVERZEICHNIS WICHTIGE SICHERHEITSHINWEISE LIEFERUMFANG � EINLEITUNG � Merkmale � Verstärkerbedienfeld Anschlussfeld LED-Anzeigen VERKABELUNG UND INSTALLATION �� Montage der U-Halterung Wandmontage ANWENDUNGEN �� Monitor PA-System mit Subwoofer SPEZIFIKATIONEN �� Technische Spezifi kationen 1� Maßzeichnungen ERKLÄRUNGEN DES HERSTELLERS 2� ANHANG A ‒ PRESET-KENNLINIEN 中文... -
Page 6: Wichtige Sicherheitshinweise
WICHTIGE SICHERHEITSHINWEISE GRAFISCHE SYMBOLE AM PRODUKT Das Blitzsymbol in einem Symbol, das darauf hinweist, daß gleichschenkligen Dreieck soll das Gerät ausschließlich für den den Anwender auf die Gefahr Einsatz in Innenräumen bestimmt ist. eines Stromschlags hinweisen. Das Ausrufezeichen in einem Symbol für die Konformität mit den gleichschenkligen Dreieck soll den Richtlinien 2002/�6/EG und 2003/108/... - Page 7 MUSS ZU JEDER ZEIT FREI ZUGÄNGLICH SEIN. VORSICHTSMASSNAHMEN BEI LÄRMBELASTUNG DIESES PRODUKT KANN HOHE SCHALLDRUCKPEGEL (SPL) ABGEBEN, DIE ZU IRREVERSIBLEN HÖRSCHÄDEN FÜHREN KÖNNEN. SE Audiotechnik EMPFIEHLT, DIE ZEITLICHEN VORGABEN ZUR EXPOSITION BEI HOHEN SCHALLDRUCKPEGELN IN JEDEM FALL EINZUHALTEN. Lärmpegel (dBA) �5...
- Page 8 WICHTIGE SICHERHEITSHINWEISE Bewahren Sie diese Anleitung auf. Lesen Sie diese Anleitung. Leisten Sie allen Anweisungen folge. Beachten Sie alle Warnungen. Verwenden Sie dieses Gerät nicht in der Nähe von Wasser. Verwenden Sie zum Reinigen nur ein trockenes Tuch. Trennen Sie das Gerät vor der Reinigung vom Stromnetz.
-
Page 9: Lieferumfang
LIEFERUMFANG Im Lieferumfang des SMX 12A sind folgende Komponenten enthalten: SMX 12A Monitor, 1 Stück Wechselstromnetzkabel mit powerCON®-Stecker, 1 Stück SMX 12A Benutzerhandbuch, 1 Stück QC PASS Karte, 1 Stück Garantiekarte, 1 Stück Bitte überprüfen Sie den Produktkarton, bevor Sie das Gerät aus der Verpackung nehmen. Wenn die Ver- packung während des Transports beschädigt wurde, packen Sie das Produkt aus und überprüfen es vor... -
Page 10: Einleitung
EINLEITUNG Der SMX 12A wurde als aktiver Mehrzwecklautsprecher konzipiert, der sich trotz seiner kompakten Größe als leistungsstarkes Werkzeug für verschiedene Monitoring-Anwendungen auf und abseits der Bühne empfi ehlt. Acht DSP-Presets vereinfachen die Einrichtung und Abstimmung des Systems. Darüber hinaus eignet sich der Monitor in Kombination mit einem zusätzlichen Subwoofer für eine erweiterte Basswiedergabe auch... -
Page 11: Verstärkerbedienfeld
- FULL: Voreinstellungen 1 bis 4, mit einer erweiterten Bassansprache für den Einsatz des SMX 12A als Fullrange-Lautsprecher. - TOP: Voreinstellungen 5 bis 8, mit einem Hochpassfi lter bei 120 Hz für den Betrieb des SMX 12A mit einem zusätzlichen Subwoofer für die Tiefbasswiedergabe. -
Page 12: Anschlussfeld
Power In. powerCON® Typ A Netzanschlussbuchse. Ein passendes Netzkabel ist im Lieferumfang � enthalten. Der SMX 12A ist für einen Betrieb in zwei Spannungsbereichen ausgelegt: 100 bis 120 und 200 bis 240 VAC. Power Out. powerCON® Typ-B Stromausgangsbuchse zum Durchschleifen der Stromversorgung auf nachfolgende Geräte. -
Page 13: Led-Anzeigen
LED-ANZEIGEN Aufgrund des Einsatzgebiets und der möglichen Anwendung des SMX 12A erscheint es sinnvoll, dass der Lautsprecher keine blinkenden und damit störenden Lichter aufweist. Daher haben wir darauf verzichtet, Signal- oder Begrenzungsanzeigen zu verbauen. � Abbildung �. SMX 12A LED-Feld. -
Page 14: Verkabelung Und Installation
Pluspol Abbildung �. XLR-3-Anschluss und Link-Kabel-Belegung. Mit Hilfe der U-Halterung SMX �2UB und des PS�5 Adapters lässt sich der SMX 12A auf einem herkömm- lichen 35-mm-Lautsprecherstativ oder mit unserer SPS20 Stativstange auf einem Subwoofer mit M20 Flansch montieren. Der SMX 12A eignet sich auch für Festinstallationen. Schrauben und Dübel zur Befestigung der U-Halterung an der Wand oder Decke sind im Lieferumfang enthalten. -
Page 15: Montage Der U-Halterung
Pole Short wall mount Abbildung �. Die unterschiedlichen Positionierungsmöglichkeiten mit der SMX �2UB U-Halterung. So montieren Sie die SMX �2UB U-Halterung am SMX 12A: Lösen Sie die schwarzen Senkschrauben der M10-Flugpunkte auf der linken und rechten Seite des SMX 12A. - Page 16 U-Halterung befi ndet (siehe Abbildung 8). Ziehen Sie die Klemmhebel vorsichtig fest. 10. Befestigen Sie die SPS20 Stativstange im M20-Flansch des Subwoofers. 11. Heben Sie den SMX 12A an den beiden Griff en auf der linken und rechten Seite an und setzen Sie die U-Halterung auf die Stativstange. Siehe Abbildung 10.
- Page 17 Position B Achtung! Montieren Sie zuerst den U-Bügel am Monitor! � � Stativmontage Abbildung �0. Montage des SMX 12A mit der U-Halterung auf der SPS20 Stativstange. 14. Sichern Sie die Strom- und Audiokabel ordnungsgemäß, um Unfälle durch Kabelschlaufen zu vermeiden. 中文...
-
Page 18: Wandmontage
10. Schließen Sie die Audio- und Stromkabel an und stellen Sie den Pegel und die gewünschte Voreinstellung entsprechend der Anwendung ein. 11. Sofern Sie den SMX 12A sehr nah an der Wand und nach unten ausgerichtet montieren möchten, wählen Sie den Schlitz an Position C der U-Halterung. Siehe Abbildung 11. -
Page 19: Anwendungen
M-F3A S15 PRO B15A Wählen Sie am SMX 12A eine der TOP-Voreinstellungen aus, um einen passenden Hochpassfi lter bei 120 Hz zu aktivieren. Wählen Sie am angeschlossenen Subwoofer die entsprechende Voreinstellung „SMX 12A “ . Durch den sehr hohen Wirkungsgrad des Kompressionstreibers wird das Grundrauschen der elektronischen Schaltung verstärkt. -
Page 20: Spezifikationen
SPEZIFIKATIONEN TECHNISCHE SPEZIFIKATIONEN PARAMETER WERT ELEKTROAKUSTISCH Frequenzgang (-3 dB) 65 Hz bis 17 kHz Frequenzgang (-10 dB) 60 Hz bis 20 kHz Schallfeldabdeckung (-6 dB) [H x V] 60° x 60° Maximaler Schalldruckpegel (SPL) 12� dB Systemtyp 2-Wege-Koaxialsystem Frequenzweichentyp LPF: Butterworth 4. Ordnung, HPF: Butterworth 6. Ordnung Übergangsfrequenz 1,4 kHz Schallwandler... -
Page 21: Maßzeichnungen
MASSZEICHNUNGEN Abbildung ��. SMX12A Ansichten und Abmessungen. Bemaßung in Millimetern. 中文 Abbildung ��. SMX 12A isometrische Ansichten. -
Page 22: Erklärungen Des Herstellers
Recycling-Zentrum. Dies trägt dazu bei, Nutzungsbedingungen einen Defekt aufweisen. die Umwelt, in der wir alle leben, zu schützen. SE AUDIOTECHNIK® haftet nicht für Schäden, die durch das Produkt oder den Ausfall des Produkts verursacht werden, einschließlich entgangener Gewinne BATTERIEN UND AKKUS oder Einsparungen oder besonderer, zufälliger oder Folgeschäden. -
Page 23: Anhang A - Preset-Kennlinien
ANHANG A ‒ PRESET-KENNLINIEN Diese Abbildungen stellen die DSP-Kennlinien für die beiden Preset-Gruppen FULL und TOP dar. (dB) Pegel Preset-Profi le � bis � ‒ FULL -� Frequenz (Hz) 1 Flat 3 Club 2 Music 4 Speech Figure �5. Profi le curves of the FULL presets. (dB) Pegel Preset-Profi... - Page 25 There you will also fi nd the latest updates to manuals, fi rmware and technical documents for additional support. © Copyright by SE AUDIOTECHNIK® 2020. All rights reserved. The content of this document is subject to change without prior notice to improve reliability, function, design or otherwise.
- Page 27 LIST OF CONTENTS IMPORTANT SAFETY INSTRUCTIONS PACKAGE CONTENTS � INTRODUCTION � Features � Amplifi er panel Input panel LED indicators WIRING AND INSTALLATION �� U-bracket mounting Wall mounting APPLICATIONS �� Monitor PA system with subwoofer SPECIFICATIONS �� Technical Specifi cations 1�...
-
Page 28: Important Safety Instructions
IMPORTANT SAFETY INSTRUCTIONS GRAPHICAL SYMBOLS IN THE PRODUCT The lightning bolt triangle is used Symbol indicating that the to alert the user to the risk of equipment is for indoor use only. electric shock. Symbol for conformity with Directive The exclamation point triangle is 2002/�6/EC and Directive 2003/108/ used to alert the user to important EC of the European Parliament, on... - Page 29 SUPPLY CORD SHALL REMAIN READILY OPERABLE. NOISE EXPOSURE PRECAUTIONS THIS PRODUCT CAN RADIATE HIGH SOUND PRESSURE LEVELS (SPL), THAT CAN LEAD TO IRREVERSIBLE HEARING DAMAGE. SE Audiotechnik RECOMMENDS TO RESPECT THE TIMES OF EXPOSURE TO HIGH SPL. Noise level (dBA) �5...
- Page 30 IMPORTANT SAFETY INSTRUCTIONS Keep these instructions. Read these instructions. Follow thoroughly all instructions. Reed all warnings. Do not use this apparatus near water. Clean only with a dry cloth. Disconnect the device from the AC outlet before cleaning. Do not use paint thinners, solvents, cleaning fl...
-
Page 31: Package Contents
PACKAGE CONTENTS The packaging of the SMX 12A includes: 1 SMX 12A monitor 1 AC power cord with powerCON® connector 1 SMX 12A user manual 1 QC PASS card 1 Warranty card Please inspect your product packaging before unboxing it. If it has been damaged during shipping, unbox the product and check for any visual damage before using it. -
Page 32: Introduction
INTRODUCTION The SMX 12A has been designed as a multi-purpose, self-powered unit. It is a compact yet powerful tool for various monitoring requirements on and off stage. Eight DSP presets simplify the setup and tuning of the system. Furthermore, small to mid-size PA applications can be successfully achieved with an additional subwoofer for low frequency extension. -
Page 33: Amplifier Panel
- FULL: presets 1 to 4, with extended response in the low frequencies to use the SMX 12A as a full-range box. - TOP: presets 5 to 8, with a high-pass fi lter at 120 Hz to run the SMX 12A with additional subwoofer for the lowest frequencies. -
Page 34: Input Panel
For an optimal signal-to-noise ratio, it is recommended to input signals with a level of at least 0 dBu. It is possible to chain up to 10 SMX 12A signal inputs. A built-in output buff er amplifi er prevents any load problem for the signal source, like a mixer. -
Page 35: Led Indicators
LED INDICATORS The intended use and application of SMX 12A makes it preferable, not to have any blinking, disturbing lights. Hence we refrained from adding signal or limit indicators. � Figure �. SMX 12A LED panel. Protect. Lights red if the amplifi er or SMPS has short-circuited or overheated and the amplifi er output �... -
Page 36: Wiring And Installation
Figure �. XLR-3 plug-in and link cable connection. Using the U-bracket SMX �2UB and the PS�5 adapter, the SMX 12A can be mounted on a 35 mm standard speaker stand or mounted on a subwoofer with M20 thread, by using our SPS20 pole bar. SMX 12A can also be used for permanent installation. -
Page 37: U-Bracket Mounting
To attach the SMX �2UB U-bracket to the SMX 12A: Unscrew the black countersink screws from M10 fl y points on the left and right side of SMX 12A. Onto the thread of each M10 handle screw, put fi rst a steel washer and then, a silicone washer. - Page 38 10. Fix tightly the SPS20 pole bar into the M20 thread of the subwoofer. 11. Lift the SMX 12A with the left and right handles of the box and insert the U-bracket into the pole bar. See fi gure 10.
- Page 39 Position B Attention! First mount u-bracket to monitor! � � Pole mount Figure �0. Mounting the SMX 12A with the U-bracket in the SPS20 pole bar. 14. Secure mains and signal cables properly to prevent accidents due to cable entanglement. 中文...
-
Page 40: Wall Mounting
10. Plug in the signal and power cables, and set level and preset according to your application. 11. If you want to be very close to the wall and have SMX 12A pointing downwards, you can use the notch position C on the U-bracket. See fi gure 11. -
Page 41: Applications
M-F3A S15 PRO B15A Choose any of the TOP presets at the SMX 12A to activate a matching high-pass fi lter at 120 Hz. For the active subwoofers detailed, chose the related "SMX 12A" preset. The very high effi ciency of the compression driver amplifi es the electronics' inherent noise fl... -
Page 42: Specifications
SPECIFICATIONS TECHNICAL SPECIFICATIONS PARAMETER VALUE ELECTRO-ACOUSTICAL Frequency range (-3 dB) 65 Hz - 17 kHz Frequency range (-10 dB) 60 Hz - 20 kHz Coverage (-6 dB) [H x V] 60° x 60° Maximum Peak SPL 12� dB System type 2-way coaxial system Crossover type LPF: Butterworth 4... -
Page 43: Mechanical Drawings
MECHANICAL DRAWINGS Figure ��. SMX12A views and dimensions. Annotations given in millimeters. 中文 Figure ��. SMX 12A isometric views. -
Page 44: Manufacturer's Declarations
CORRECT DISPOSAL OF THIS PRODUCT (ELECTRICAL WASTE) (Applicable in the European Union and other European countries with In the unlikely event that the SE AUDIOTECHNIK® product has a recur- separate collection systems) ring failure, SE AUDIOTECHNIK®, at its discretion, may elect to provide a replacement unit of SE AUDIOTECHNIK®... -
Page 45: Annex A - Presets Profile Curves
ANNEX A ‒ PRESETS PROFILE CURVES These graphs detail the profi le curves of the DSP for the two group of presets, FULL and TOP. (dB) Level Profi les Presets � to � - FULL -� Frequency (Hz) 1 Flat 3 Club 2 Music 4 Speech... - Page 47 感谢您选择 ® 我们非常高兴能为您提供专业扩声与音频需求解决方案。 您本次购买的系统融入了我们20多年的扬声器 制造经验与超越40年的音箱设计经验的精华, 将德国的标准与中国的效率有机结合, 它将为您带来长期的高品 质产品体验。 请仔细阅读本手册并遵循其中的说明。 这将使您在安全操作的条件下最大程度地利用本产品, 并保证产品的 长期耐用性。 请妥善保管本手册, 以备未来参考, 如您发现任何错误或有其他疑问或建议, 请通过 info@se-audiotechnik.com与我们联系。 想了解更多关于SE的产品信息, 请访问我们的网站www.se-audiotechnik.com。 在此, 您还可获取有关手 册、 固件和技术文档的最新更新, 及其他更多支持。 © SE AUDIOTECHNIK® 2020版权所有, 保留所有权利。 本文件内容如因可靠性、 功能、 设计或其他方面改进而产生变更, 恕不另行通知。 中文...
- Page 49 目录 重要安全事项 包装内容 � 简介 � 特性 � 功放面板 输入面板 LED指示灯 连线与安装 �� U-型支架 壁挂式安装 应用 �� 返送音箱单独使用 连同超低音使用 规格参数 �� 技术规格 1� 产品图纸 制造商声明 2� 附件 A ‒ 预设曲线 中文...
- Page 50 重要安全事项 产品上的图形符号 闪电三角形是用来提醒使用者触电 此标志表示该设备只在室内适用。 危险。 此标志表示符合2002/�6/EC指令和欧 感叹号三角形是用来提醒用户重要的操 洲议会的2003/108/EC报废电子电气 作和维护说明。 设备指令。 CE标志表示符合欧洲相关安全、 健康和 此标志表示接地信号。 环保要求。 详见制造商声明。 本手册中的图形符号 重要概念和信息的符号, 以便更好地理 与触电危险有关的重要安全信息符号。 解产品的功能。 用于提醒用户重要的操作或维护说明 表示实用的提示和指导的符号, 利于确 的符号。 保产品的正确使用, 提高其操作性。...
- Page 51 RISK OF ELECTRONIC SHOCK DO NOT OPEN 电器安全措施 请勿将此设备暴露于雨水、 湿气、 滴水或溅起的液体中。 装有液体的物品, 如花瓶等, 不应放置在 该装置上。 为了减少触电风险, 不要试图打开本机的任何部分。 在产品内部没有用户可用的零件, 如需帮助, 请联系合格的服务人员为您提供服务。 若要完全断开此设备与交流电源的连接, 请将电源插头从交流电插座上断开。 电源线的电源插头 应随时处于工作状态。 噪声暴露预防措施 本产品可辐射高声压级 (SPL) , 可导致不可逆的听力损伤。 SE AUDIOTECHNIK®建议控制暴露在 高声压级下的时间。 噪音值 (dBA) �5 �� �� ��2 �2� 每24小时最大声压级的暴露时间建议 � 小时...
- Page 52 重要安全说明 保存指示说明 阅读指示说明 遵循所有说明 阅读所有警告事项 请勿在水边使用此设备 只用干布清洁此设备。 在清洁前将此设备与交流电插座切断连接。 不要使用油漆稀释剂、 溶剂、 清洁剂或 化学浸渍抹布。 不要堵住任何通风通道。 按照制造商的指示进行安装。 请勿在任何热源如散热器、 热储存器、 火炉等产生热量的设备(包括功放)附近安装此设备。 �. 不要破坏接地式插头的安全性。 一个接地式插头有两个插片和第三个接地插片。 第三个接地插片是为您 提供安全保障的。 如果所提供的插头不适合你的插座, 请咨询电工更换过时的老式插座。 保护电源线不被踩到或者夹住, 尤其是在插头、 插座, 以及电源线从设备上输出的重点位置。 在雷暴期间或长时间不使用时, 请拔下电源线。 使用电源插头将设备与电源断开。 远离可能被外部磁场损坏的物体。 为了避免电脑、 视频显示器和磁性数据载体等设备的损坏, 这些设备应 放置在至少1米远的地方。 只使用制造商指定和/或提供的安全插销、 附件和配件。 向合格的服务人员寻求所需服务。 无论以何种方式, 设备损坏时都需要维修, 如电源线或插头损坏、 液体 泄漏或物体落入设备中,...
- Page 53 全套内容 SMX 12A的包装包括: 1只SMX 12A返送音箱 1根带powerCON® 连接头的交流电源线 1本SMX 12A使用说明书 1张QC合格证 1张保修卡 请在开箱前检查您的产品包装。 如果产品在运输过程中被损坏, 在使用前请打开盒子并检查是否有任何外 观损伤。 如如有损伤, 请立即通知货运公司并联系您的SE Audiotechnik®经销商或服务中心寻求帮助。 最后, 保存装运纸箱作为可能索赔的证据, 只有您可以要求索赔。 我们还建议您保留所有的包装材料, 以便 日后的运输所需。 中文...
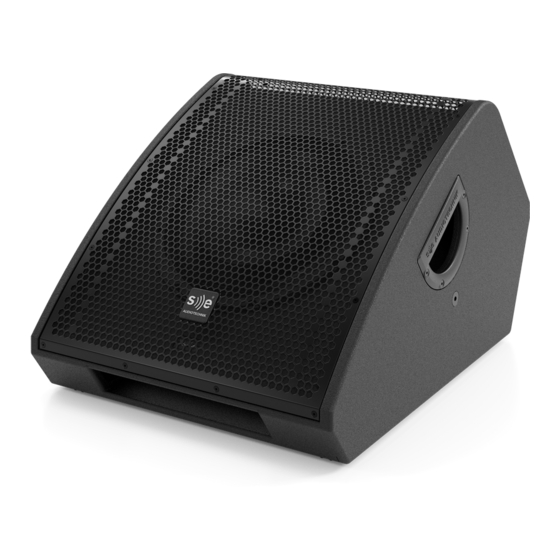
- Page 54 产品简介 作为一款有源多功能产品, SMX 12A紧凑且功能强大的特点, 能够满足舞台内外的各种需求。 八档DSP场景预设, 简化了系统的搭建与调试时间。 此外, 配合拓展低频下潜的低音音箱, 能够成功组 成一套小型到中型场地的扩声系统。 M10 吊点以及额外的安装附件, 拓展了SMX 12A的应用范围。 SMX 12TC防护套能够在运输与储存的过 程中保护音箱。 最后, SMX 12A的菊花链串联功能, 工厂预设以及安装硬件, 都能够使其胜任何固定安装系统, 或非固定 安装系统的工作。 图�. SMX 12A 产品特点: 12" 高效换能单元 1.75" 压缩单元同轴放置 波导管同轴设计 倾斜面35 ° 内置D类功放与DSP 增益与预设选择, 8档设置 嵌入式 I/O 面板设计, 外观无可视接头、 旋钮等...
- Page 55 增益: 输入信号电平提供8档调节: -50, -20, -10, -4, -2, 0, +2 以及 +4。 当旋钮位于0dB时, 标称输入灵敏 � 度为+4dBu。 标准的增益调节旋钮应该位于0dB, 此时功放的增益处于最大值, 即使是没有信号输入的情况下。 然 而在许多应用场景中并不需要这么大, 尤其是配合专业调音台的高输出功率下。 功放散热板 预设: 八档不同风格的预设选择, 不需要进行额外的均衡调整即可满足不同音色需求。 预设被分成两组模式 � - 模式: 预设1-4, 拓展SMX 12A低频响应, 用作全频段重放音箱。 - 模式: 预设5-8, 为SMX 12A在120Hz增加一个高通滤波器, 使之能够搭配额外的低音音箱, 拓展更低频段 预设详情可参考附件A ‒ 预设曲线. 中文...
- Page 56 于标准16 A 供电计算。 线路输入: 通过female Neutrik® XLR-3 接头输入线路电平的平衡信号。 输入电平可承受+20dBu且不失真。 � 您可以串联10只SMX 12A的输入信号。 一个内置的输出缓冲功放能够防止来自输入信号的任何过载 问题, 就像一个调音台。 线路输出: 通过male Neutrik® XLR-3 接头输出平衡的且缓冲后的线路电平信号。 它被用于其他SMX 12A音 � 箱或其他系统组成部分, 如低音音箱, 与SMX 12A的信号串联。 电源: 打开或关闭音箱 为了避免瞬态冲击的声音, 请每次使用时, 都在其他设备启动之后再打开SMX 12A, 并每次都最先关 闭SMX 12A。 关闭SMX 12A后, 请等待至少5秒再重新打开。 内部电压需要5秒的时间完全停止, 否则供...
- Page 57 LED 指示灯 SMX 12A的应用方式, 决定了产品正面没有显眼的闪烁指示灯设计。 这也是前面板上不带有信号指示灯与限幅 指示灯的原因。 � 图�. SMX 12A LED面板 保护: 若功放或SMPS电源出现短路或过热的情况, 保护指示灯会亮红灯, 此时功放输出会自动哑音。 这种 � 情况下, 关闭电源, 等待设备冷却。 恢复到正常工作状态时, 打开电源开关音箱就会恢复到正常工作模式。 若没 有, SMPS电源或功放可能已经由于其他原因而损坏。 电源: 当系统接入正确的供电且开启时, 亮绿灯。 中文...
- Page 58 建议使用至少18 AWG的导体线径。 对于长线缆, 最大导体线径为14 AWG。 这些线缆必须由合格的工程师装配。 对于音频信号, 输入与串联输出都由XLR-3接头完成, 它们遵循下图的操作步骤: 连接 接线图 XLR-3 IN XLR-3 OUT XLR-3 Female XLR-3 Male Click Click Shield Cold 图�. XLR-3接入与串联线缆图示 使用SMX �2UB U型架与PS�5转接件, SMX 12A能够通过SPS20支撑杆安装在任意标准35mm的音箱支架上, 或通过M20螺孔与一只低音音箱组合。 SMX 12A同样能够被用作固定安装系统。 根据房间的尺寸、 声学环境, SMX 12A的放置位置以及重放信号的特点, 能够自由选择符合理想表现的声音预设。 如果您单独使用SMX 12A用作全频段重放的音箱, 请在FULL模式的预设下进行选择; 如果您额外搭配一只低音 音箱使用, 请在TOP模式的预设下进行选择。...
- Page 59 Position A Position B Position C Ceiling/Truss Pole Short wall mount 图�. SMX 12UB U型架提供的不同位置选择 将SMX �2UB U 型架安装到SMX 12A上, 请遵循以下步骤: 使用螺丝刀取下SMX 12A两侧的M10螺丝 在两个带有M10螺纹的旋转把手上, 先放上一个铁质的垫圈, 再放上一个胶质的垫圈。 在两侧M10螺纹的位置, 放入旋转把手, 旋紧3 ‒ 4圈。 将胶质垫圈靠近箱体, 铁质垫圈靠近旋转把手, 使得U型架能够轻松的放至这两个垫圈中间。 将U型架放入音箱两侧的旋转把手内, 保证其两侧的位置都位于胶质垫圈与铁质垫圈中间, 且胶质垫圈位 于内侧, 靠近箱体; 铁质垫圈位于外侧, 靠近旋转把手。...
- Page 60 � � 图�. 将SMX 12UB U型架安装到SMX 12A音箱上。 注意区分不同应用场景所使用的三个卡槽位置。 将音箱与SPS 20支撑杆连接, 需要使用到PS �5转接件, 遵循以下步骤: 将PS �5适配器紧紧旋入SMX �2UB M10螺纹孔内。 松开PS �5上的星型螺丝, 以便随后的支撑杆连接 � 图�. PS 35转接件安装到SMX 12UB U型架上 �. 轻推U型架, 使旋转把手的位置在U型架的"位置B", 参考图6, 随后拧紧把手 10. 将SPS 20支撑杆放在低音音箱的M20螺纹上, 并拧紧 11. 使用SMX �2A两侧的把手将音箱抬起, 并将U型架与支撑杆固定, 详见图8 12.
- Page 61 � Position B 注意: 请先将U型架连接音箱 � � Pole mount 图�0. 将带有U型架的SMX 12A安装在SPS 20支撑杆上 14. 整理好线缆, 防止由于线缆缠绕引发的事故 中文...
- Page 62 在两个带有M10螺纹的旋转把手上, 先放上一个铁质的垫圈, 再放上一个胶质的垫圈。 在两侧M10螺纹的位置, 放入旋转把手, 旋紧3 ‒ 4圈。 将胶质垫圈按在靠近箱体的内侧, 将铁质垫圈放在靠近把手的外侧, 由此U型架就可以轻松的放在这两个垫 圈中间。 使用SMX 12A两侧的把手将音箱抬起, 放至U型架中间。 确保旋转把手位于U型架的正确的位置, 即 “位置A” 。 �. 调整音箱垂直方向上的角度, 并拧紧两侧的旋转把手。 10. 连接信号线与电源线, 并根据实际应用方式, 调整电平旋钮和预设旋钮。 11. 如果想让SMX 12A离墙更近且向下方辐射, 可以使用U型架上的 “位置C” , 详见图11。 � Position A Position A Position C 图��. 不同辐射方向在墙壁或桁架上的应用...
- Page 63 应用方式 舞台返送系统 SMX 12A作为高品质舞台返送音箱, 能够对各种信号源进行重放, 像是人声、 键盘、 鼓组或其他乐器等。 先进的限 幅器算法能够减少明显的压缩听感, 且始终保持不失真。 保证高动态高声压级的重放。 当用作舞台返送应用场景时, 选择FULL模式下的预设1-4, 满足最佳的重放需求。 SMX 12A能够精确的反应出额 外的均衡调节。 一个均衡调整的小建议是, 尽量对目标频段采用衰减的方式, 而不是提升其他的频段, 这样能够保证 最大动态范围。 与低音音箱组合的扩声系统 SMX 12A能够与适配的有源低音音箱, 组合成一个小型便携且高功率的扩声系统。 使用PS �5适配器与SPS 20 支撑杆连接, 同时SPS 20支撑杆能够与低音音箱, 通过上方的M20 螺孔固定。 能够与SMX 12A组合的SE AUDIOTECHNIK 低音音箱有: ®...
- Page 64 规范 SMX �2A 有源舞台返送 参数表 参数值 电声参数 频率响应范围 (-3 dB) 65 Hz - 17 kHz 频率响应范围 (-10 dB) 60 Hz - 20 kHz 覆盖范围 [H x V] 60° x 60° 峰值声压级 12� dB 系统类型 两分频同轴系统 分频类型 低通滤波器: Butterworth 4 order 高通滤波器: Butterworth 6 order 分频频点...
- Page 65 结构图示 图��. SMX 12A的图示与尺寸, 标注以毫米为单位 中文 图��. SMX 12A等距视图...
- Page 66 有限保修期自购买之日起计算。 如需获得保修服务, 必须提供购买证明。 注明购买日期的销售合同或送货收据都可成为购买证明。 如果上述品 如需为产品提供保修服务, 买方必须联系购买产品的 牌的产品在有限的保修期内需要维修, 您有权根据本文件中的条款和条 SE AUDIOTECHNIK®或SE AUDIOTECHNIK®授权经销商。 件享受保修服务。 本有限保修政策仅适用于SE AUDIOTECHNIK®品牌产品的原始购买者, 欧洲共同体合格声明 不适用于从原始购买者处转让而获得该SE AUDIOTECHNIK®产品所有权 的任何人。 在有限保修期内, SE AUDIOTECHNIK®将维修或更换有缺陷的 该设备满足欧洲联盟指令的基本要求和进一步的相关规范。 详细的声明, 零部件或产品。 在本有限保修期内更换掉的所有部件或硬件产品所有权 以及这些指令和协调标准的列表, 可以在我们的网站 仍归SE AUDIOTECHNIK®所有。 www.se-audiotechnik.de上找到。 在不太可能的情况下, SE AUDIOTECHNIK®产品发生重复故障, SE AUDIOTECHNIK®可自行选择提供至少与您的SE AUDIOTECHNIK® 品牌产品在硬件性能上相当的SE AUDIOTECHNIK®替换单元。 正确处置本产品(电气废物) (适用于欧盟及其他设有垃圾回收系统的欧洲国家)
- Page 67 附件A-预设曲线 这些图示展示了DSP中的两组预设曲线细节, FULL模式与TOP模式。 (dB) 声压级 FULL模式预设�-�的频响曲线 -� 频率(Hz) 1 平直模式 3 酒吧模式 2 音乐模式 4 语言扩声模式 图�5. FULL模式预设的频响曲线 (dB) 声压级 TOP模式预设�-�的频响曲线 -� 中文 频率(Hz) 5 平直模式 7 酒吧模式 6 音乐模式 8 语言扩声模式 图��. TOP模式预设的频响曲线...
- Page 68 HEAD OFFICE 总部 Neuenhofer Strasse 42-44 42657 Solingen, Germany info@se-audiotechnik.de ASIA-PACIFIC DEVELOPMENT CENTER 亚太区发展中心 No. 8 Development Zone Road Huimin Sub-district, Jiashan County, Zhejiang, 314112, P.R. China service@se-audiotechnik.com www.se-audiotechnik.com , all rights reserved. The technical data and the functional product characteristics can be subject to modifications. The photocopying, translation, and all other forms of copying of fragments or of the integrity of this user manual is prohibited.
Need help?
Do you have a question about the SMX 12A and is the answer not in the manual?
Questions and answers