Advertisement
Quick Links
Advertisement

Related Manuals for Restomod Air FIREBIRD TRUMOD 1969


Summary of Contents for Restomod Air FIREBIRD TRUMOD 1969
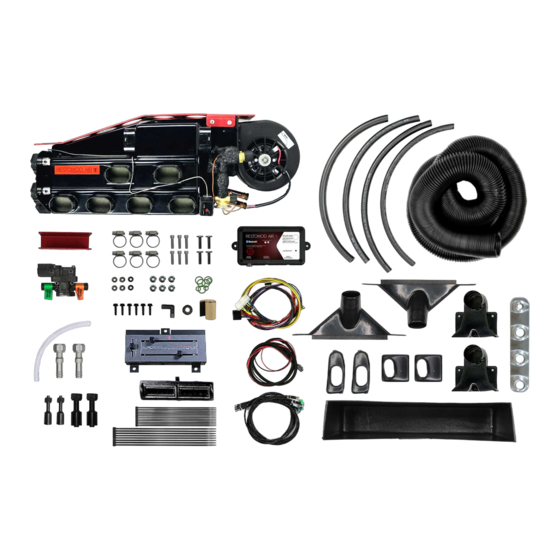
- Page 1 1969 FIREBIRD INSTALL MANUAL ©2020 RESTOMOD AIR...
- Page 2 1969 FIREBIRD CENTER LOUVER Above the control panel opening, cut out the center and down to the control opening of the block o , as shown for the center louver assembly. Follow dash lines in drawing. Feed center dash vent adapter from behind aligning screw holes from front and mount using #10 screws. Installing the center louver vent requires a small amount of cutting to the dash support.
- Page 3 PLANNING INSTALL Since this is a custom installation, many of our procedures can be viewed as suggestions. Your personal preferences will play a major role in the actual installation. LOCATION OF THE CONDENSER Condenser is purchased seperate. Make sure you have the largest possible size condenser for your vehicle. Surface area is important for maximum cooling.
-
Page 4: Install Checklist
INSTALL CHECKLIST PAGE DESCRIPTION 01-02 Plan your install Attach condenser brackets Mount condenser Attach pressure switch & wiring harness into drier Insert drier into mounting bracket Attach hoses INCLUDED IN CONDENSER KIT Drier Bracket Drier Top Condenser Bracket Bottom Condenser Brackets PN#0049-50 PN#0049-51 Splice and... - Page 5 CONDENSER CONDENSER BRACKETS You can perform most of the following steps on a clean flat surface like a workbench. Lay the condenser down so that both hose connections are on the left side (the larger connection will be on top). The drier is conveniently mounted on the left hand side of the condenser.
- Page 6 DRIER When removing caps, pressure will release. Do NOT leave drier open to air longer than a couple minutes. Insert the drier into the drier mounting bracket Attach the drier liquid tube to the “IN” port on drier and to the connection on the To lower/small To evaporator condenser...
-
Page 7: Hose Routing
HOSE ROUTING FIREWALL FIREWALL DRIER COMPRESSOR ELECTRONIC WATER VALVE CONDENSER LARGE CONNECTION SMALL CONNECTION R ES TOM ODA IR.COM P A G E 0 6...
Need help?
Do you have a question about the FIREBIRD TRUMOD 1969 and is the answer not in the manual?
Questions and answers