Advertisement
Table of Contents
the
Happy
Puzzle
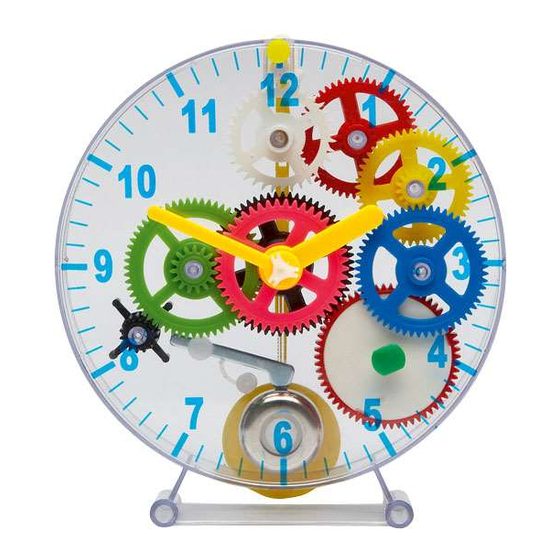
Build Your Own Real Wind-Up Clock!
Company
Instruction ooklet
Introduction
Welcome to
The mazing Clock Kit
. This booklet will guide you through building your
clock. As with any self-assembly kit, it is important to ensure that you use an appropriate
working area with a clear, flat surface. All pieces will fit together simply and in accordance
with the instructions. Please always check that you are using the correct piece and that
you are putting it into place the right way round!
Please also ensure that you keep the pieces of the kit away from children under the age
of 36 months, as the small pieces present a potential choking hazard.
It is important to remember that this is an educational kit, designed to help children
aged from 5 to 15 understand how a wind-up clock works. When fully wound, the clock
should run for around six hours. It is not intended to be a long-term time piece.
Some younger children may benefit from adult assistance in constructing the clock.
How the clock works:
When the clock is wound, the clock's spring is tightened. As the spring gradually releases
its tension, it transfers the energy that makes the clock run, and one by one, the
cogwheels turn. The pendulum controls the speed with which the energy is released and
in so doing, it helps the clock to keep time and regulates the speed at which the
cogwheels turn and the spring loosens. Eventually, when the spring has unwound, it will
have no energy left to transfer to the cogwheels, and so the mechanism will need to be
rewound to start the process again.
So now, let's build the clock! We'll start on page 2 with showing you the different pieces
in the kit. Before you start, familiarise yourself with the pieces and check to make sure
you have all of them to hand! Then, from page 3, you will be able to see a step-by-step
guide to building the clock. Good luck!!
Advertisement
Table of Contents

Related Manuals for Happy Puzzle The Amazing Clock Kit


Summary of Contents for Happy Puzzle The Amazing Clock Kit
- Page 1 Happy Puzzle Build Your Own Real Wind-Up Clock! Company Instruction ooklet Introduction Welcome to The mazing Clock Kit . This booklet will guide you through building your clock. As with any self-assembly kit, it is important to ensure that you use an appropriate working area with a clear, flat surface.
- Page 2 Contents Clock Base Clear Circle Yellow Pendulum With Tail (Top/Bottom) Clock Face Minute Hand Clear Fork Silver Hammer Hour Hand White Gear Black Cog With Blue Wheel Black Wheel Four Legs Silver Bell Yellow Wheel Yellow Pin Large Clear Red Wheel Yellow Lever Stopper x2 Small Clear...
- Page 3 Step Place base of clock on a flat surface. Step Position the clear circle with tail (number 11) on the small pillar as pictured. Then place the silver bell (number 5) and the large clear stopper (number 6) on the pillar directly underneath the clear circle with tail.
- Page 4 Step Place the red wheel (number 16), white wheel (number 17) and yellow wheel (number 15) in this order as pictured. Step Connect the thicker end of the white gear (number 23) through the flat end of the black wheel (number 24). Then place this in the middle of the base of the clock with the thin end of the white gear facing upwards.
- Page 5 Step Position the red and white wheel/spring (number 18) through the green wind-up crank. Make sure the white ratchet wheel is still secure. Place the blue wheel (number 14) on the last remaining pillar. Make sure the blue wheel overlaps the red and white wheel/spring and interlocks with the yellow wheel.
- Page 6 Step Now flip the clock over. Connect the clear fork (number 22) and the yellow lever (number 26) together making sure it clicks into place. Once together the shape should look like a Z with the arms of the clear fork facing downwards. Put the clear fork through the hole at the top of the clock situated directly below the yellow pin holding the face and the base together.
- Page 7 Step The clock is now complete. In order for the clock to start working just wind-up the green crank at the back of the clock and tick-tock - let it rock!!!
- Page 8 Build Your Own Real Wind-Up Clock! © 2009 The Happy Puzzle Company Limited Imported into the UK by Amazing Saving Ltd. London NW11 0AF With special thanks to Luke Charlwood and Talia Schlagman for their assistance in compiling this manual.
Need help?
Do you have a question about the The Amazing Clock Kit and is the answer not in the manual?
Questions and answers