Table of Contents
Advertisement
Available languages
Available languages
Quick Links
Advertisement
Chapters
Table of Contents

Subscribe to Our Youtube Channel
Related Manuals for Demco E96-230


Summary of Contents for Demco E96-230
- Page 1 Demco Model E96-230 Bedienungsanleitung Instruction manual • Mode d´emploi Istruzioni d’uso • Instrucciones para el servicio Инструкция по эксплуатации Manufactured by: CMP Industries LLC • 413 N. Pearl St. • Albany, NY 12207 / USA...
- Page 2 Seriennummer, Herstelldatum und Geräte-Version befinden sich auf dem Geräte-Typenschild. Serial number, date of manufacturing and unit version are shown on the type plate of the unit. Le numéro de série, la date de fabrication et la version se trouvent sur la plaque signalétique de l’appareil. Il numero di serie, la data di costruzione e la versione si trovano sulla targhetta dell’apparecchio.
-
Page 5: Table Of Contents
Demco Schnellschleifer Model E96-230 DEUTSCH Inhalt Einleitung Einleitung Der Demco Schnellschleifer E96 ist ein kompaktes Prä- ......................zisionsschleifgerät für den Einsatz im Dentallabor. Symbole ....................... Er dient zum Beschleifen oder Trennen zahntech- Aufstellen und Inbetriebnahme ......... nischer Modelle und Materialien. -
Page 6: Aufstellen Und Inbetriebnahme
4. Beide Schalter in Schalterstellung „OFF“ schalten. • Mandrell entnehmen. 5. Netzkabel einstecken. • Spannzangen-Schlüssel dem Hebel entnehmen (Bild 5). Der Demco Schnellschleifer ist jetzt betriebsbereit. • Spannzange entgegen dem Uhrzeigersinn lösen und entfernen (Bild 6). • Sechskantschlüssel in Spindelkegel einführen. 2. Bedienung •... -
Page 7: Reinigung / Wartung
• Treibriemen durch Verdrehen der Spindel spannen. 5. Lieferumfang Zur Einstellung der korrekten Riemenspannung siehe Kap. 3.3. • Inbusschraube wieder fest anziehen. Demco Schnellschleifer • Riemenabdeckung wieder montieren. Treibriemen (kurz, für niedrige Drehzahl) Bedienungsanleitung Gerät NIE ohne montierte Riemenabde- Ersatzteilliste... -
Page 8: Fehlersuche
• bei Verschmutzungsgrad 2, Verwendung • bei Überspannungskategorie II, Der Demco Schnellschleifer E96 ist ein kompaktes Präzisionsschleifgerät für den Einsatz im Dentallabor. Von 5 - 30ºC [41 - 86ºF] ist das Gerät bei einer Luftfeuchtigkeit Er dient zum Beschleifen oder Trennen zahntech- von bis zu 80% einsatzfähig. -
Page 9: Gefahren- Und Warnhinweise
B. Gefahren- und C. Zugelassene Personen Warnhinweise Das Produkt ist zur Nutzung ab einem Alter von 14 Jahren bestimmt. Nur zur Verwendung in Innenräumen. Das Bedienung und Wartung darf nur von unterwiesenen Gerät ist nur zur Trockenanwendung be- Personen erfolgen. stimmt und darf nicht im Freien oder unter Reparaturen an der elektrischen Ausrüstung, die nassen Bedingungen verwendet oder auf-... -
Page 10: Haftungsausschluss
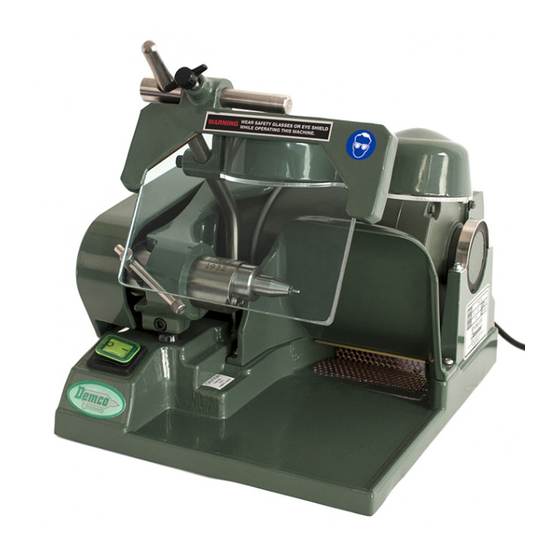
G. Haftungsausschluss CMP Industries LLC lehnt jegliche Schadensersatz- und Gewährleistungsansprüche ab wenn: • das Produkt für andere, als die in der Bedie- nungsanleitung genannten Zwecke eingesetzt wird. • das Produkt in irgendeiner Art und Weise ver- ändert wird - außer den in der Bedienungsanlei- tung beschriebenen Veränderungen. - Page 11 Demco High-Speed Grinder Model E96-230 ENGLISH Content Introduction Introduction The Demco E96 high-speed grinder is a compact ...................... precision grinder for use in dental laboratories. Symbols ....................... It is used for grinding or cutting dental casts and Installation and operation ..........
- Page 12 “A“). 5. Plug in power plug. If the collet does not close in this step, replacement of the collet may be necessary The Demco high-speed grinder is now ready for (see spare parts list). operation. 2.4 Setting spindle speed 2.
- Page 13 5. Scope of delivery • Adjust belt tension so the belt can be moved ap- prox. 8 mm up and down. Demco high-speed grinder Check the belt tension after operating a drive belt (short, for low speed) new belt for a short time, because new instruction manual drive belts tend to stretch after operation.
- Page 14 A.1 Designated use greater than 10% of the nominal value, • at pollution degree 2, The Demco E96 high-speed grinder is a compact • at overvoltage category II, precision grinding machine for use in dental laborato- ries. It is used for grinding or cutting dental casts and The machine can be used at a relative humidity up to materials.
- Page 15 B. Dangers and warnings D. Preparing for operation For inside use only. The machine is de- Before operation for the first time compare signed for use under dry conditions only the information on the name plate with the and must not be used or stored under wet local mains voltage.
- Page 16 All rights reserved - 6 -...
- Page 17 Demco ,Tour rapide Modèle E96-230 FRANÇAIS Contenu Introduction Introduction Le tour rapide Demco E96 est un tour de meulage ...................... rapide compact de précison à employer dans un Symboles ......................laboratoire dentaire. Installation et mise en marche de l‘appareil Il sert au meulage ou à la séparation des modèles et Commande ..................
-
Page 18: Installation Et Mise En Marche De L'appareil
5. Brancher le câble de réseau. • Retirer du levier la clé de serrage de la pince de serrage (fig. 5). Le tour de meulage rapide Demco est maintenant • Dévisser la pince de serrage en tournant dans le prêt à être mis en service. -
Page 19: Nettoyage / Entretien
• Bien resserrer la vis à six pans creux. 5. Etendue de livraison • Remonter le capot de protection. NE JAMAIS faire fonctionner le tour sans Tour rapide Demco que le capot de protection soit monté! Courroie d’entraînement (courte pour un tour de rotation faible) N’utiliser que des courroies d’entraînement... -
Page 20: Recherche Des Défauts
Le tour rapide Demco E96 est un appareil de meu- Tenir ces informations d’emploi toujours à portée de lage compact de précision pour utilisation dans un l’utilisateur. -
Page 21: Conditions D'environnement
• à une humidité relative maximale de 80% pour une température de 31ºC [87,8ºF], à décroissance Lors du travail avec le tour rapide Demco linéaire jusqu’à une humidité relative de 50% pour porter des lunettes de protection! des températures de 40ºC [104ºF] *),... -
Page 22: Données Techniques
F. Données techniques G. Exclusion de responsabilité Tension de réseau: 230 V, 50/60 Hz, 1,5 A Puissance absorbée: 180 W L’industries CMP - LLC refuse toute prise sous garan- Fusible du moteur: 2x 6,3 A (T) tie et demande de dédommagement si: Fusible de l’éclairage: 800 mA (T) •... -
Page 23: Introduzione
Rettificatrice Demco Modello E96-230 ITALIANO Indice Introduzione Introduzione La rettificatrice Demco E96 è un apparecchio di alta ....................precisione e di dimensioni compatte adatto all’uso nel Simboli ........................laboratorio odontotecnico. Installazione e messa in funzione ......Serve a rettificare o a tranciare i modelli e i materiali ....................... -
Page 24: Installazione E Messa In Funzione
5. Inserire il cavo per l’alimentazione di rete. dalla posizione “A“ (Fig. 3) e portarla sulla posi- La rettificatrice Demco è ora pronta all’uso. zione “B“ (Fig. 4), al fine di disaccoppiare il fuso, frenare e aprire la pinza di serraggio. -
Page 25: Pulizia / Manutenzione
• Rimontare il riparo della cinghia di trasmissione. 5. Dotazione Non mettere MAI in funzione l’apparecchio senza il riparo della cinghia di trasmissio- Rettificatrice Demco Cinghia di trasmissione (corta, per bassi regimi di rotazione) Impiegare solamente delle cinghie di tras- Manuale di istruzioni per l’uso... -
Page 26: Elenco Degli Errori
A.1 Utilizzo conforme È necessario istruire gli operatori sulla base di questo manuale riguardo al campo La rettificatrice Demco E96 è un apparecchio per la d’impiego, ai possibili pericoli durante l’uso rettifica di precisione, di dimensioni compatte, adatto e all’utilizzo dell’apparecchio. -
Page 27: Condizioni Ambientali
A.2 Condizioni ambientali Azionare l’apparecchio solo sotto sorvegli- (secondo DIN EN 61010-1) anza. L’apparecchio può essere azionato esclusivamente: Non azionare MAI l’apparecchio senza aver • in ambienti chiusi, montato il riparo delle cinghie di trasmissi- • fino ad una quota di 2.000 m sul livello del mare, one! •... -
Page 28: Dati Tecnici
F. Dati tecnici G. Esclusione della responsabilità Tensione di rete: 230 V, 50/60 Hz, 1,5 A Potenza assorbita: 180 W CMP Industries LLC respingerà qualsiasi istanza di Fusibile motore: 2x 6,3 A (T) risarcimento danni e pretesa di garanzia nel caso in Fusibile illuminazione: 800 mA (T) cui:... - Page 29 Rectificador rápido Demco Modelo E96-230 ESPAÑOL Inhalt Introducción Introducción El rectificador rápido Demco E96 es una unidad rec- ..................... tificadora de alta precisión y dimensiones compactas Símbolos ......................destinada al uso en el laboratorio dental. Instalación y puesta en servicio .......
-
Page 30: Instalación Y Puesta En Servicio
• Posicionar el interruptor de arranque en posición 5. Enchufar el cable de red. “OFF”. El rectificador rápido Demco está ahora listo para el • Mover la palanca lentamente y de forma continua servicio. de posición “A” (figura 3) a posición “B” (figura 4), a fin de desacoplar el husillo, frenar y abrir la pinza portapieza. -
Page 31: Limpieza / Mantenimiento
• Extraer la cubierta de la correa (figura 8). • Soltar el tornillo de hembra hexagonal (figura 9). ¡No accionar NUNCA el aparato sin que se • Distender la correa de transmisión girando el husil- haya montado anteriormente la cubierta de lo (figura 10). -
Page 32: Piezas De Recambio
4. Piezas de recambio 5. Volumen de suministro Por favor, deduzca los números de referencia de las Rectificador rápido Demco piezas de recambio de la lista adjunta. Correa de transmisión (corta, para una veloci- dad de rotación inferior) Instrucciones de servicio Lista de piezas de recambio 6. -
Page 33: Campo De Aplicación
El rectificador rápido Demco E96 es una unidad rec- Controle periódicamente las líneas de tificadora de alta precisión y dimensiones compactas alimentación y los tubos flexibles (como, destinada al uso en el laboratorio dental. -
Page 34: Personas Autorizadas
F. Datos técnicos Desconecte el aparato una vez finalizado el trabajo. Tensión de red: 230 V, 50/60 Hz, 1,5 A Potencia absorbida: 180 W Protección del motor: 2 x 6,3 A (de acción lenta) C. Personas autorizadas Protección de la iluminación: 800 mA (de acción lenta) Este producto está... - Page 35 Шлиф-мотор Demco Модель E96-230 РУССКОМ Содержание Вступление. Demco E96 - это компактный прецизионный Вступление....................шлифовальный прибор для использования в Символика...................... дентальной лаборатории. Установка и ввод в эксплуатацию. Он служит для обработки или резки ....Обслуживание. зуботехнических моделей и материалов.
-
Page 36: Установка И Ввод В Эксплуатацию
„OFF“ (ВЫКЛ). „OFF“ (ВЫКЛ). 5. Вставить сетевой кабель. • Медленным и плавным движением переведите Теперь шлиф-мотор Demco готов к эксплуатации. рычаг из положения “A“ (снимок 3) в положение “B“ (снимок 4), чтобы отсоединить и затормозить шпиндель и открыть зажимную цангу. -
Page 37: Установка Числа Оборотов Шпинделя
2.4 Установка числа 3.2 Замена приводного оборотов шпинделя. ремня. • Выключатель мотора поставьте в положение Перед поставкой всегда устанавлива- “OFF“ (ВЫКЛ). ется наивысшее число оборотов. Для • Извлеките вилку из розетки. установки более низкого числа оборо- • Снимите защитный кожух (снимок 8). тов: •... -
Page 38: Замена Предохранителей
• Извлеките вилку из розетки. 5. Объем поставки. • Положите прибор на бок. • Ослабьте винты и удалите днище (снимок 11). Шлиф-мотор Demco. • Замените неисправный предохранитель (снимок 12): Приводной ремень (короткий, для низкого - F1: предохранитель мотора числа оборотов). -
Page 39: Область Применения
A.1 Применение согласно только специалистом-электротехником. назначению. Перед вводом в эксплуатацию сравнить данные фирменной таблички с параме- Demco E96 - это компактный прецизионный трами местной сети напряжения. шлифовальный прибор для использования Сетевая вилка должна быть в дентальной лаборатории. Он служит для... -
Page 40: Допущенный Персонал
E. Ремонт. Опасность получения травм – ожогов или порезов руки. Ремонт может проводиться только предприятием Вращающиеся инструменты могут быть специализированной торговли. очень острыми, а обрабатываемые Электротехнический ремонт, не описанный в этой детали –нагреваться в процессе работы. инструкции по обслуживанию, может проводиться Во... - Page 44 Hochaktuell und ausführlich auf ... Up to date and in detail at … Actualisé et détaillé sous … Aggiornato e dettagliato su … La máxima actualidad y detalle en ... Актуально и подробно на … www.renfert.com Renfert GmbH • Industriegebiet • 78247 Hilzingen/Germany oder: Postfach 1109 •...
Need help?
Do you have a question about the E96-230 and is the answer not in the manual?
Questions and answers