
Subscribe to Our Youtube Channel
Summary of Contents for TCL TCL-WiredCasCtrl
- Page 1 USER MANUAL WIRED CONTROLLER TCL-WiredCasCtrl Read these instructions carefully and keep them safe for future reference.
- Page 2 CONTENTS SAFETY INTRODUCTION TO WIRED CONTROLLER STARTING UP SETTINGS CLOCK SETTINGS TIMER SETTINGS PARAMETER QUERY SETTINGS TROUBLESHOOTING...
- Page 3 SAFETY WARNINGS • Before attempting installation, the Installation Manual must be fully read and understood. • Check the product model and specification to ensure they meet the requirements of the appliance before installation. • When choosing a suitable position for installation, consideration should be made to avoid external influences which may damage the unit, shorten its life, or make the unit unsafe.
- Page 4 • This unit is only designed for use with the air conditioners listed. Do not attempt installation with any other equipment without confirmation from the manufacturer. • Ensure that any fixings used to wall mount the unit are suitable for the type of wall. •...
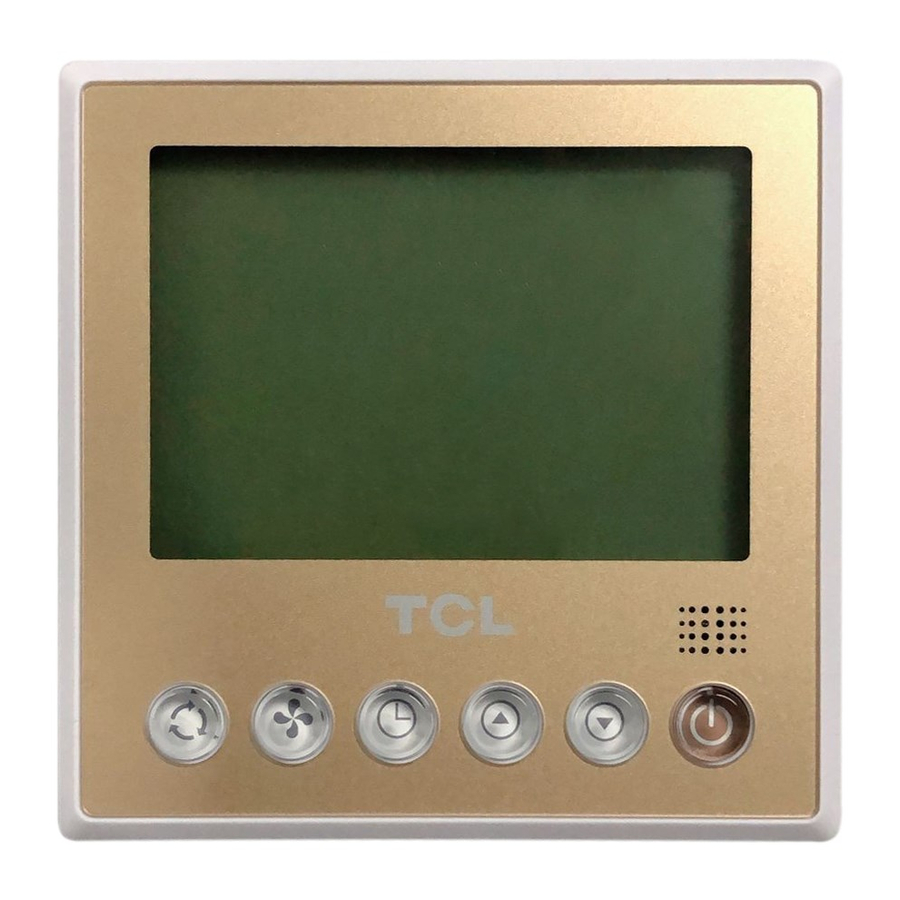
- Page 5 CONTROL PANEL TIMER BUTTON UP BUTTON AIR SPEED BUTTON DOWN BUTTON AIR MODE BUTTON ON/OFF BUTTON SYMBOL LIST Sleep Fresh Door Card Defrost Anti-freeze Child Lock Economic Up/Down Left/Right Degree Fahrenheit Swing Swing centigrade Electric Error Water Level Water Pump Sign Current Ambient...
- Page 6 STARTING UP • It is necessary to initially power the wired controller on for self-check. All the icons and symbols will turn on for 3 seconds. • Press the [ON/OFF] button once to start the controller, press again to turn off. •...
- Page 7 FUNCTION SETTING Press the MODE button for over 5 seconds to enter function selection. Press the MODE button again chose your desired mode. The icon for the mode you have chosen will be displayed on the controller, if it is not displayed, repeat process.
- Page 8 AIR SPEED BUTTON The AIR SPEED button is used to chose between 3 air speeds: Low, Intermediate, High. When the wire controller is initially powered on, its default air speed is low. The icon of low air speed will be displayed. ...
- Page 9 SETTING THE CLOCK • Press and hold the timer button for 5 seconds. The hour display will then flash. • To change the hour, use the [▲]/ [▼] buttons to cycle the time, higher or lower. Press the mode button to change to the minutes section, and repeat the process until you have your desired time.
- Page 10 Parameter Query/Setting • Hold down the [Mode]+ [▲] buttons for 5 seconds to automatically enter the parameter query interface when the “Time Area-Hour” icon flashes and displays the “Parameter Code” and “Temperature Area” displays the current “Parameter Value” matching the “Parameter Code”. •...
- Page 11 When the parameter value flashes, press the [▲] or [▼] buttons to change the “Parameter Value”; press the [Mode] button to save the “Parameter Value” and return to the “Parameter Code” flashing interface. Parameter Code Query the Current Parameter Query Range Parameter Area...
- Page 12 TROUBLESHOOTING When there is an issue with the system, the “ERR” icon will be displayed, and the temperature area flashes with the current error or protection code. Classification Code Error Description The Indoor-outdoor communication goes wrong. The Room Temperature Sensor T1 goes wrong. The Internal Coil Temperature Sensor T2 goes wrong.
- Page 13 Classification Code Error Description The CAN communication goes wrong in an all-round way. Multiple main control panel errors The number of outdoor unit modules is abnormal (Deficiency/increase) Error The communication between the main control panel and the variable-frequency compressor drive goes wrong. The communication between the main control panel and the variable-frequency fan drive goes wrong.
- Page 14 electriQ UK Support Office hours: 9AM - 5PM Monday to Friday www.electriQ.co.uk Unit J6, Lowfields Business Park Lowfields Way, Elland West Yorkshire, HX5 9DA PRODUCT DISPOSAL Do not dispose this product as unsorted municipal waste. Collection of such waste must be handled separately as special treatment is necessary.
Need help?
Do you have a question about the TCL-WiredCasCtrl and is the answer not in the manual?
Questions and answers