Advertisement
WARNING:
The lens contains lead that may be harmful.
Wash hands after touching.
WARNING:
This product can expose you to lead, which is known to the State of
California to cause cancer and birth defects or other reproductive harm.
For more information go to www.P65Warnings.ca.gov.
DO NOT USE THIS TELESCOPE OR ANY ACCOMPANYING FINDER SCOPE TO LOOK AT OR NEAR THE SUN UNLESS YOU ARE USING A SPECIAL
SOLAR FILTER! EVEN MOMENTARY VISUAL CONTACT WITH THE SUN'S LIGHT RAYS CAN INSTANTLY CAUSE IRREVERSIBLE DAMAGE TO YOUR
EYE(S). EYE DAMAGE CAN BE PAINLESS, SO THERE IS NO WARNING TO THE OBSERVER THAT DAMAGE HAS OCCURRED UNTIL IT IS TOO LATE.
TAKE EXTRA CARE WHEN USING THE TELESCOPE OR A FINDER SCOPE DURING DAYLIGHT HOURS, AND DO NOT POINT EITHER AT OR NEAR THE
SUN. DO NOT LOOK THROUGH EITHER WHEN YOU ARE MOVING THE INSTRUMENTS DURING THE DAYTIME. NEVER ALLOW ANYONE TO USE THE
TELESCOPE OR A FINDER SCOPE DURING THE DAYTIME WITHOUT WARNING THEM OF THE HAZARDS OF AIMING EITHER AT OR NEAR THE SUN.
MAKE SURE THAT THEY ARE ADEQUATELY TRAINED ON THE USE OF THESE INSTRUMENTS BEFORE ALLOWING THEM TO START OBSERVING.
CHILDREN SHOULD ALWAYS HAVE INFORMED AND TRAINED ADULT SUPERVISION WHILE OBSERVING.
EXOSPF and Adapter
Instruction Manual
Item #: PFiEXOS100
WARNING:
LR41
Contains button or coin cell battery.
Hazardous if swallowed
SUN HAZARD — Never look directly at the sun with this device.
1
2
X
1.5V
INCLUDED
WARNING:
Advertisement
Table of Contents

Related Manuals for Explore Scientific EXOSPF

Summary of Contents for Explore Scientific EXOSPF
- Page 1 EXOSPF and Adapter Instruction Manual Item #: PFiEXOS100 WARNING: The lens contains lead that may be harmful. LR41 1.5V INCLUDED Wash hands after touching. WARNING: WARNING: Contains button or coin cell battery. This product can expose you to lead, which is known to the State of Hazardous if swallowed California to cause cancer and birth defects or other reproductive harm.
- Page 2 IMPORTANT SAFETY INSTRUCTIONS READ AND FOLLOW THE INSTRUCTIONS BEFORE USE. KEEP THESE INSTRUCTIONS FOR LATER USE. • SUN WARNING: WARNING – NEVER ATTEMPT TO OBSERVE THE SUN WITH THIS DEVICE! OBSERVING THE SUN – EVEN FOR A MOMENT – WILL CAUSE INSTANT AND IRREVERSIBLE DAMAGE TO YOUR EYE OR EVEN BLINDNESS.
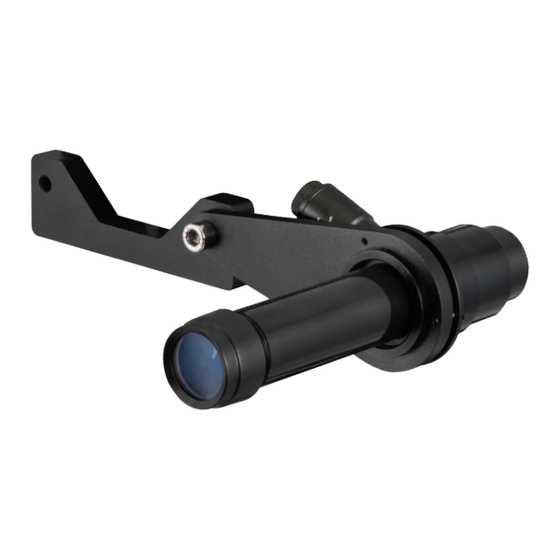
- Page 3 Parts Overview Parts List 1. Polar Finderscope with Illuminated Reticle 2. Illuminator 3. Illuminator ON/OFF and Brightness Adjustment 4. Pivot Collar with Three Collimation Screws 5. Polar Finderscope Bracket 6. Attachment Bolt 7. Mount Adapter Plate 8. Eyepiece 9. 2x M2.5 x 20mm long screws Tools Needed (Not Included): 2mm Hex Wrench...
- Page 4 Assembly Illuminated Polar Finderscope A casual alignment with the celestial pole is sufficient for visual purposes. However, for observers who need to meet the demanding requirements of astrophotography, this polar finderscope allows the iEXOS-100 mount to be more precisely aligned with the celestial pole. How to Install and Use the Adapter &...
- Page 5 Assembly 4. As shown in Figure 3, focus the polar finderscope (#1) by looking through the finderscope at an object that is at least 1 mile away. If the image is not sharp, look through the finderscope while turning the eyepiece (#8) until the image is sharp. Figure 3 5.
- Page 6 Polar Alignment Process Prior to using the polar finderscope to locate objects in the night sky, you will need to make sure it is aligned with your mount. This process is best done during the day. NOTE: Please refer to the iEXOS-100 PMC-Eight Manual as needed to identify the parts of the mount referenced in the following procedure.
- Page 7 Polar Alignment Process 2. Polar peephole cover 1. Declination clutch 5. Right ascension clutch Figure 6 4. Polar peephole 3. Latitude Adjustment Handle 8. Repeat steps 5 and 6 until the 9. For final alignment, perform image remains stationary in steps 5 and 6 on a bright star.
- Page 8 Notes explorescientific.com ©2020 Explore Scientific, LLC. All model names and logos are registered trademarks.
Need help?
Do you have a question about the EXOSPF and is the answer not in the manual?
Questions and answers
para alinear correctamente la iEXOS-100 PMC donde se tiene que estas la estrella polar en el EXOSPF
To correctly align the iEXOS-100 PMC with the polar star using the Explore Scientific EXOSPF:
1. Adjust the position of the polar finder to a comfortable viewing angle and tighten the bolt.
2. Focus the polar finder by looking through it at an object at least 100 meters away. Turn the eyepiece until the image is sharp.
3. Remove any telescope or camera/lens system from the mount.
4. Loosen the declination clutch.
5. Align the polar finder with the mount by making small adjustments.
This alignment is best done during the day. Proper alignment ensures accurate polar positioning before using the system at night.
This answer is automatically generated