Table of Contents
Advertisement
Quick Links
Advertisement
Table of Contents

Related Manuals for IXIA XGS12


Summary of Contents for IXIA XGS12
- Page 1 XGS12 Chassis Platform Assembly Guide Release 8.50 EA ...
- Page 2 acquires commercial computer software Notices Safety Information under the same terms by which the software is customarily provided to the Do not proceed beyond a Copyright Notice public. Accordingly, Keysight provides the hazard notice until the Software to U.S. government customers indicated conditions are fully ©...
- Page 3 Contact Us Ixia headquarters 26601 West Agoura Road Calabasas, California 91302 +1 877 367 4942 – Toll-free North America +1 818 871 1800 – Outside North America +1.818.871.1805 – Fax www.ixiacom.com/contact/info Support Global Support +1 818 595 2599 support@ixiacom.com APAC Support +91 80 4939 6410 support-asiapac@ixiacom.com...
-
Page 4: Table Of Contents
Chapter 2 XGS12 Chassis Modules Chapter 3 Install XGS12 Chassis Unpack and Mount the Chassis Remove and Insert Processor Module Remove and Insert Power Supply Module Remove and Insert Fan Module Chapter 4 Log on to XGS12 Chassis – iv –... - Page 5 This page intentionally left blank. – v –...
-
Page 6: About This Guide
About this guide This section explains the notational and typographical conventions used in this documentation, and provides a list of related documentation. Section contents: Note icons and messages Typographical conventions Textual conventions Note icons and messages The following table describes the note icons and messages used in this document. Name Icon Description... -
Page 7: Textual Conventions
About this guide Convention Description Italic text Italic text indicates: A text reference to the name of a field, option, or parameter. Document and book titles. The first reference to a new term. Special identification or emphasis in a statement. monospace Text shown in a monospace font is used to indicate: text... -
Page 8: Chapter 1 Introduction
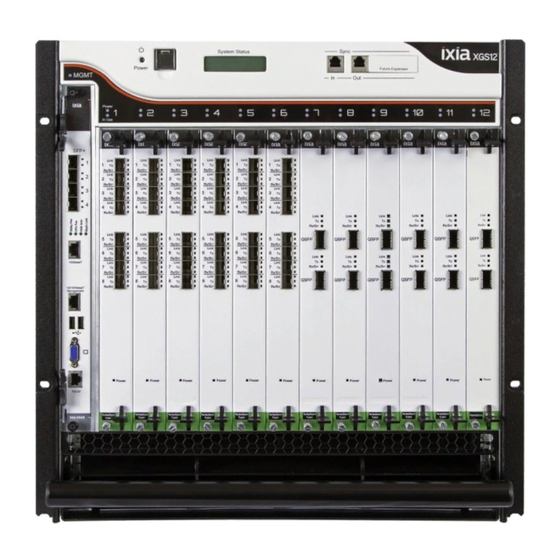
This document describes how to install the XGS12 chassis and its various modules. The XGS12 Chassis is the next generation high performance platform capable of supporting all XM form factor load modules, including full chassis configurations of the Xcellon load modules. It is a 12-slot chassis with high speed backplane (160 Gbps between each adja¬cent two cards) designed for... - Page 9 Chapter 1 Introduction – 2 –...
-
Page 10: Chapter 2 Xgs12 Chassis Modules
The Processor Module is plugged into the front of the chassis, in slot 0. The power supplies and fans are accessible from the rear of the chassis. Each of the modular components is capable of being removed in the field and replaced with minimum downtime. XGS12 Chassis Back View – 3 –... - Page 11 This page intentionally left blank. – 4 –...
-
Page 12: Chapter 3 Install Xgs12 Chassis
Remove and Insert Fan Module on page 11 XGS12 Chassis Installation Precautions The following precautions should be followed while installing the XGS12 chassis: A two person lift is recommended when installing the chassis into the rack. Ensure that each person is properly grounded during installation of either the chassis (onto the rack) or load modules (into the chassis) to prevent an ESD event. - Page 13 Chapter 3 Install XGS12 Chassis Operator intervention may be required to power cycle the XGS12 chassis or restart a software program in the event the XGS12 chassis operation is upset or stopped by electrostatic discharge. – 6 –...
-
Page 14: Unpack And Mount The Chassis
Chapter 3 Install XGS12 Chassis XGS12 Rack Screw Mount Locations Unpack and Mount the Chassis 1. Cut tape and open the carton. 2. Remove accessories box, top foam inserts, and side packing inserts. 3. Lift chassis out of the carton. -
Page 15: Remove And Insert Processor Module
The chassis is CE marked and ULTM certified when using the 200-240 VAC power cords supplied with the chassis. However, these certifications for the chassis safety approvals are only valid when the unit is operating from all three 200-240 VAC main power supplies. Refer to the Ixia Platform Reference Guide at: https://support.ixiacom.com/user-guide/ixos for more details. -
Page 16: Remove And Insert Power Supply Module
Chapter 3 Install XGS12 Chassis 1. Unfasten the screws. 2. Pinch the clips and then pull outwards. Removing processor module To insert the processor module: 1. Slide the module into the slot. 2. Pinch on the clips and push them in. - Page 17 Chapter 3 Install XGS12 Chassis To remove the power supply module: 1. Loosen the thumbscrew in the upper left corner of the power supply module. 2. Pull the power clamp handles. 3. Hold the two handles provided on the power supply module and pull them.
-
Page 18: Remove And Insert Fan Module
Chapter 3 Install XGS12 Chassis 4. Tighten the thumbscrew at the upper left corner of the power supply module. 5. Replace the rear cover and fasten it with the screws. Remove and Insert Fan Module XGS12 Chassis Back View The fan module is located on the rear side of the chassis. For details see the... - Page 19 Chapter 3 Install XGS12 Chassis To install the fan module: 1. Push the rubber grommets over the metal standoff on the chassis. 2. Fasten the four screws tightly. – 12 –...
-
Page 20: Chapter 4 Log On To Xgs12 Chassis
Log on to XGS12 Chassis HAPTER The Username for an XGS12 (Windows 7) remote desktop session is ixia and the password is the CPU module serial number found on the sticker located in front of the CPU module. Note: The chassis windows wallpaper is not displayed. So the credentials are required to log on. - Page 21 This page intentionally left blank. – 14 –...
- Page 22 © Keysight Technologies, 2018 Ixia, a Keysight Business 26601 West Agoura Road Calabasas, California 91302...
Need help?
Do you have a question about the XGS12 and is the answer not in the manual?
Questions and answers