Table of Contents
Advertisement
Quick Links
Advertisement
Table of Contents

Related Manuals for IXIA XGS12


Summary of Contents for IXIA XGS12
- Page 1 XGS12 Chassis Platform Assembly Guide Version 1.0 Release 8.00 EA, December 2015...
- Page 2 Data and Computer Software clause at DFARS 252.227-7013 and FAR 52.227-19. Ixia, the Ixia logo, and all Ixia brand names and product names in this document are either trademarks or registered trademarks of Ixia in the United States and/or other coun- tries.
- Page 3 C h a n g e : 4 1 5 0 2 1 1 , D a t e : S e p t e m b e r 2 4 , 2 0 1 3 XGS12 Chassis Platform Assembly Guide, Release 8.00 EA...
- Page 4 [This page intentionally left blank]...
-
Page 5: Table Of Contents
Install XGS12 Chassis XGS12 Chassis Installation Precautions Un-pack and Mount the Chassis Remove and Insert Processor Module Remove and Insert Power Supply Module Remove and Insert Fan Module Log on to XGS12 Chassis XGS12 Chassis Platform Assembly Guide, Release 8.00 EA... - Page 6 [This page intentionally left blank]...
-
Page 7: Introduction
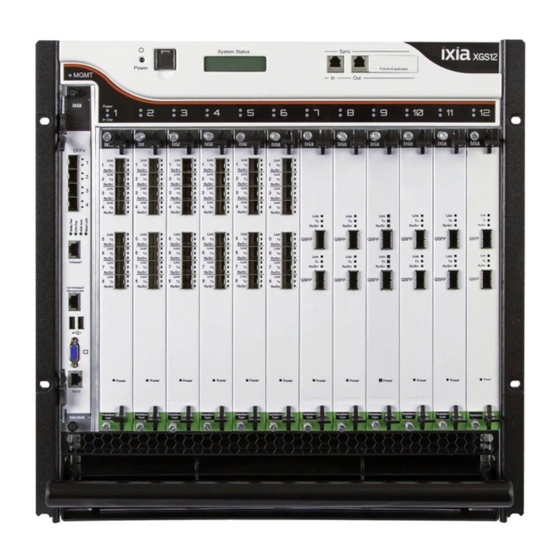
Introduction This document describes how to install the XGS12 chassis and its various modules. The XGS12 Chassis is the next generation high performance platform capable of supporting all XM form factor load modules, including full chassis configurations of the Xcellon load modules. - Page 8 [This page intentionally left blank]...
-
Page 9: Xgs12 Chassis Modules
Each of the modular components is capable of being removed in the field and replaced with minimum downtime. Figure: XGS12 Chassis Back View XGS12 Chassis Platform Assembly Guide, Release 8.00 EA... - Page 10 [This page intentionally left blank]...
-
Page 11: Install Xgs12 Chassis
Remove all external plastic protective film prior to chassis operation. Operator intervention may be required to power cycle the XGS12 chassis or restart a software program in the event the XGS12 chassis operation is upset or stopped by electrostatic discharge. -
Page 12: Un-Pack And Mount The Chassis
8. Insert the other screws and secure the chassis to the rack by tightening the screws. 9. Remove any and all plastic protective film from the chassis external surfaces. XGS12 Chassis Platform Assembly Guide, Release 8.00 EA... -
Page 13: Remove And Insert Processor Module
However, these certifications for the chassis safety approvals are only valid when the unit is operating from all three 200-240 VAC main power supplies. Refer to the Ixia Platform Reference Guide at: https://www.ixi- acom.com/profile/index.php for more details. Remove and Insert Processor Module To remove the processor module: 1. -
Page 14: Remove And Insert Power Supply Module
The power supply module is accessible after removing the rear cover. For details see Fig- ure: XGS12 Chassis Back View. To remove the rear cover, unfasten the four screws around the cover and pull out the cover. To remove the power supply module: XGS12 Chassis Platform Assembly Guide, Release 8.00 EA... - Page 15 To insert the power supply module: 1. Place the power supply module on the bottom chassis rails. See Figure : Inserting Power Supply Module. Figure : Inserting Power Supply Module 2. Push the power supply module inwards. XGS12 Chassis Platform Assembly Guide, Release 8.00 EA...
- Page 16 Figure : Inserting Power Supply Module 4. Tighten the thumbscrew at the upper left corner of the power supply module. Figure : Inserting Power Supply Module 5. Replace the rear cover and fasten it with the screws. XGS12 Chassis Platform Assembly Guide, Release 8.00 EA...
-
Page 17: Remove And Insert Fan Module
Install XGS12 Chassis Figure :Inserting Power Supply Module Remove and Insert Fan Module The fan module is located on the rear side of the chassis. For details see Figure : XGS12 Chassis Back View. To remove the fan module: 1. Unfasten the four screws that are present on the edges of the fan module. - Page 18 [This page intentionally left blank]...
-
Page 19: Log On To Xgs12 Chassis
Log on to XGS12 Chassis Log on to XGS12 Chassis The Username for an XGS12 (Windows 7) remote desktop session is ixia and the password is the CPU module serial number found on the sticker located in front of the CPU module.
Need help?
Do you have a question about the XGS12 and is the answer not in the manual?
Questions and answers