Advertisement
Quick Charger
for Li-ion Batteries
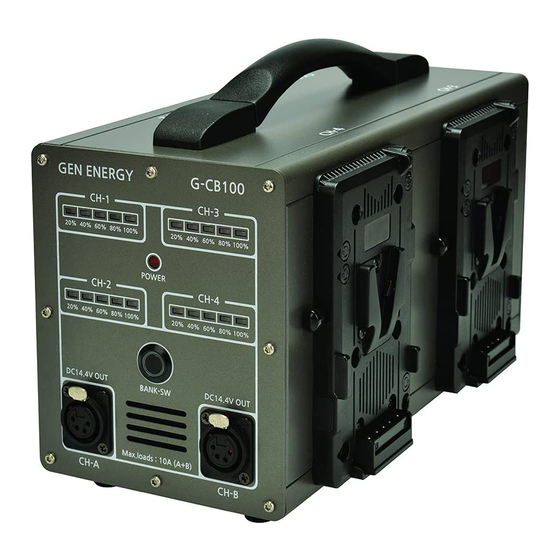
G-CB100
Features
* 6A, 4ch simultaneous charger ( Dual SMPS built-in ) (6A model only)
* 6A or 3A supplied automatically according to capacity.
* No. of LEDs turned on indicates the capacity during charging and discharging
* Power station : Battery packs are hot swappable (G-CB100 only )
04
Safe instructions
1. Risk of electric shock. Do not remove cover, no user serviceable parts inside the product.
2. Protect the product from water, moisture and dust.
3. The presence of electricity near water can be dangerous.
4. Use only with recommended batteries.
5. A standard three-pin AC plug must be used and earth pole must be connected to the earth line.
6. During charging, the temperature of the charger will rise, this is normal, not a malfunction.
7. A short between + and - on charger pins may cause re, electrical shock or other incidents.
1. Slots and openings are intended for ventilation purposes to ensure reliable operation
of the product and protect it from overheating.
2. Do not block or cover any slots and openings.
3. Indoor use only. To reduce the risk of re or electric shock, do not expose
this charger to rain or moisture.
G-C100 (3.5A)
WARNING!
CAUTION!
01
Charger mode
1
2
3
*
Errors
Yellow-green LEDs fully blinking : Battery packs are not activated by sleep mode or any problems
LEDs o : This charger has a problem itself
Red LEDs on each channel fully blinking : SMPS power supply inside charger doesn't work
05
Quick guide
1
2
3
Power station
1
3
2
01
Switch on the main power on the rear panel of the charger
02
Connect the battery packs, then the charger detects which
battery packs they are. It takes max. 12 seconds.
*
It starts charging automatically and simultanuously.
195Wh, 290Wh and 390Wh : by 6A
98Wh and other companies' packs : by 3A
03
Red LEDs on : means it is being charged by 6A
Orange LEDs on : means it is being charged by 3A
Yellow-green LEDs fully on : means fully charged.
*
No. of LEDs on : means remaining capacity
Charging
01
Switch on the main power.
02
Connect the battery packs.
03
Red LED on : 6A charging
Orange LED on : 3A charging
Yellow green LED fully on : fully charged
01
Turn on BANK-SW button. (G-CB100 only)
02
XLR : Sum of two outlets : 10A
03
Red LEDs on : It is being discharged now
Yellow-green LEDs on : They are ready to be used.
No. of LEDs on : means remaining capacity.
Advertisement
Table of Contents

Related Manuals for GEN ENERGY G-CB100

Summary of Contents for GEN ENERGY G-CB100
- Page 1 * No. of LEDs turned on indicates the capacity during charging and discharging Yellow-green LEDs fully blinking : Battery packs are not activated by sleep mode or any problems * Power station : Battery packs are hot swappable (G-CB100 only ) LEDs o : This charger has a problem itself...
- Page 2 DC-out mode Power station mode ( from AC power, G-CB100 only ) ( from batteries, G-CB100 only ) Switch o the main power rst on the rear panel of the charger. Switch on the main power on the rear panel of the charger Connect at least one battery pack on 4 V-mount plates.
Need help?
Do you have a question about the G-CB100 and is the answer not in the manual?
Questions and answers