
Subscribe to Our Youtube Channel
Related Manuals for Designability Wizzybug

Summary of Contents for Designability Wizzybug
- Page 1 Wizzybug Instructions for Use DOC-025 Wizzybug Instructions for Use en-GB 4.0 November 2020...
- Page 2 Do not use Wizzybug until these Instructions for Use have been read and understood. This document may be viewed in a zoomed format or with text- to-speech enabled by downloading a digital version from designability.org.uk/meet-wizzybug/resource-for-families. DISTRIBUTOR CONTACT INFORMATION (IF APPLICABLE)
- Page 3 Your Wizzybug serial number is ....... .
-
Page 4: Table Of Contents
Overview of Wizzybug ................... 8 Wizzybug Features ....................10 Accessories ......................... 12 Getting to Know Wizzybug ................13 How to Put Wizzybug Together ..............18 Armrests and Thoracic Supports ..............24 How to Take Wizzybug Apart ................25 Wheels .......................... 28 Seating System ...................... -
Page 5: Important Information
Unique Device Identification (UDI-DI) numbers are: Wizzybug DX UDI 5060838350000 Wizzybug Shark UDI 5060838350017 Wizzybug LiNX UDI 5060838350024 Includes LiNX Plus accessory To check your Wizzybug model, find the product label on the backrest or body (see page 8) and look for the UDI symbol. - Page 6 Designability. If you live outside the UK, you can ask for help with this from your Wizzybug provider. When your child no longer needs to use Wizzybug, it must not be passed to another child to use unless it has been returned to the...
- Page 7 • Cannot keep their head upright for long enough for them to use Wizzybug to move themselves independently, or if Wizzybug's head support does not give enough head support for your child.
-
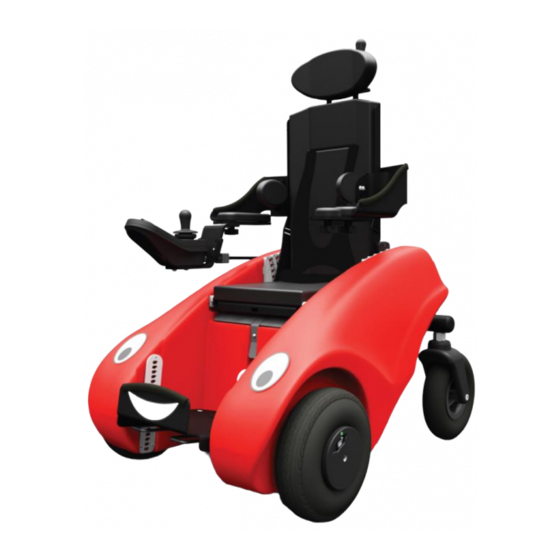
Page 8: Overview Of Wizzybug
Overview of Wizzybug Your Wizzybug is made of the following parts: Headrest (0.5kg) Seating System (7.4kg incl. headrest, controller, harnesses and cushions) Footrest (0.8kg) Battery (located under the seat) and charger: LiFePO4 Battery (2.8kg) and Charger NiMH Battery (6kg) and Charger... -
Page 9: Fig. 2 Overview Of Wizzybug Parts (Side View)
Controller with Joystick (see page 37 for different joystick types) Body (16.4kg) Wheel Release Mechanism Fig. 2 Overview of Wizzybug Parts (Side View) LiNX Carer Control DX Carer Control Shark Carer Control (0.5kg) Rear Control Panel located at back of... -
Page 10: Wizzybug Features
Wizzybug Features Seat Release Knob White Dial Armrest Controller Sockets Footrest Spring Charger Socket Power On/ (For LiFePO4 or Mechanism Off Switch SLA Battery) Charger Socket Lights On/ Footrest (For NiMH Battery) Off Switch Fig. 4 Overview of Features... - Page 11 Carer Control Armrest Reach Controller Adjustment with Joystick Hand-Screw Wheel Release (On Both Front Wheels)
-
Page 12: Accessories
Accessories Wizzybug is supplied in a standard set-up (page 8). The clinician who supports setting up Wizzybug can choose from a range of optional accessories, so that it suits your child. These may include: • Anklesures Kit • Chailey Headrest •... -
Page 13: Getting To Know Wizzybug
Stopping Your child can stop Wizzybug by letting go of the joystick. If you need to stop Wizzybug quickly, you can turn off the on/off switch at the back of Wizzybug (Fig. 5), on the controller (Fig. 6) or use the carer control to take control of Wizzybug. However, the quickest way to stop Wizzybug may be to lift your child’s hand... -
Page 14: Fig. 8 Steepest Slope
Wizzybug prefers firm level surfaces and gentle slopes. Do not attempt slopes steeper than 5° (1 in 12). Wizzybug is not suitable for driving on steep banks, beaches, hilly ground, or very uneven ground. Your child must not drive Wizzybug up a steep slope, because it could slip backwards and turn over. -
Page 15: Fig. 9 Anti-Static Chain
It should not be driven in puddles deeper than the thickness of the tyres. Hot weather On very hot days, be careful not to leave Wizzybug in hot places (such as car boots or conservatories) for any length of time. -
Page 16: Fig. 10 Anklesures On Footrest
Never adjust the seating position with your child sitting in the seat, because you or your child could be injured. Securing your child in Wizzybug Always use the lap strap and full harness. Adjust the straps to make sure they fit your child securely. - Page 17 Adjustment of seating system Check your child’s seating position regularly, and adjust it if you need to. Wizzybug is not a dedicated seating system and should only be used in Wizzybug. Wizzybug should not be used for long periods of time - always check your child’s comfort and posture in Wizzybug, and check their skin for...
-
Page 18: How To Put Wizzybug Together
How to Put Wizzybug Together When you are putting Wizzybug together, do not trap your fingers between the different parts. Wizzybug has the following parts: • Body • Footrest • Rear Wheel Assembly • Seating System • Battery • Carer Control •... -
Page 19: Fig. 12 Fitting The Sla/Nimh Battery
BATTERY Fitting the Battery (SLA or NiMH) 1. Place the battery into the box under the seat, with the cable Cable coming out from the opposite Socket side to the socket (see Fig. 12). 2. Position the connector so that it can easily be pushed into the socket. -
Page 20: Fig. 14 Attaching The Footrest To Wizzybug
Make sure the footrest is fixed in the correct position for your child before using Wizzybug Fig. 14 Attaching the Footrest to Wizzybug (From top to bottom) Footrest bars, height of the footrest - showing the back-plate with the coloured slots, footrest tilt adjustment using the side slots. - Page 21 • The tilt-in-space describes how much the whole seating system is tilted. This is chosen by how far down the seating system is placed into Wizzybug’s body, e.g. third hole from the top. Find out more about choosing and setting the seat depth, tilt-in- space, and backrest recline on page 30.
-
Page 22: Fig. 15 Fitting The Seat
1. Clip the harness together and the lap strap together so that they cannot get caught in the seating system. 2. Turn the white dial fully anti-clockwise to unlock the seat. 3. Lift the seat by holding the harness in one hand and the bottom of the white dial in the other. -
Page 23: Fig. 16 Seat Locking Dial
Do not use the seat unless the white dial is fully locked. 9. Plug the joystick and carer control cables into the two sockets at the back of Wizzybug. Both sockets are the same, but the connectors can only fit in one way up. -
Page 24: Armrests And Thoracic Supports
Fig. 21 Armrest Support Do not remove the hand screws. Width Adjustment Be careful not to trap fingers or clothing if you adjust the armrests and thoracic supports when your child is in the Wizzybug. -
Page 25: How To Take Wizzybug Apart
2. Unplug the cables from the back of Wizzybug and unhook the carer control from the back of the headrest. 3. Unlock the white dial by turning it fully anti-clockwise. -
Page 26: Fig. 24 Removing The Sla Battery
REMOVING THE BATTERY (SLA / NIMH) 1. Turn the collar on the connector anti-clockwise and pull the connector out. 2. Lift out the battery. Never lift the battery using the cable. Fig. 24 Removing the SLA Battery REMOVING THE BATTERY (LIFEPO4) 1. -
Page 27: Fig. 26 Removing The Rear Wheel Assembly
REMOVING REAR WHEEL ASSEMBLY FROM THE BODY 1. Turn the clip towards you and pull it away from the pin. 2. Lift up the back of Wizzybug using the fabric handle. The rear wheel assembly should fall away from the body. If it does not, push down on the black beam with the heel of your hand. -
Page 28: Wheels
When you are transporting Wizzybug, crossing a road or if the battery is flat, you can disengage the front wheels (see Fig. 27 on page 29) and pull Wizzybug along freely. It is easier to roll Wizzybug backwards than forwards. -
Page 29: Fig. 27 Engaging And Disengaging The Front Wheels
Gently push Wizzybug to engage both wheels. If there is not enough space to push Wizzybug, lift one side at a time and rotate each front wheel forwards by hand until it locks. Make sure that both wheels have been engaged or disengaged before moving or transporting Wizzybug. -
Page 30: Seating System
The seating system on Wizzybug is adjusted without tools. It may take a little practice, but it is quick and easy to use. Never adjust the seating position with your child sitting in the seat, because you or your child could be injured. -
Page 31: Fig. 29 White Semi-Circle
4. Repeat until your chosen seat depth colour sticker (e.g. purple) lines up with the white semi-circle (see Fig. 29). When you put the seat into Wizzybug, you must choose the slot in the metal grid (e.g. purple) that matches the new seat depth... -
Page 32: Fig. 30 Move The Seat To The Top Holes
Adjusting the seat depth when it is fitted in the Wizzybug To make the seat depth longer (for example if your child has grown): 1. Unclip the carer control from the back of the headrest and raise both armrests (see page 24). -
Page 33: Fig. 32 Moving The Seat Backwards
5. Squeeze the black seat release knob and lift the whole seat up and backwards into the top of the next coloured slot in the metal grid. (Only move the seat backwards by one coloured slot at a time.) Let go of the seat release knob so that the seat pins fit into the top holes. -
Page 34: Fig. 33 Moving The Seat Forward
To make the seat depth smaller: 1. Unclip the carer control from the back of the headrest and raise both armrests (see page 24). 2. Turn the white dial fully anti-clockwise to unlock the seat. 3. Make sure that the seat pins are in the highest position in the metal grid before you start to adjust the seat depth. -
Page 35: Fig. 34 Making The Seat Depth Shorter
5. Reach under the back of the seat base and pull up the back of the seat base as far as you can, then tilt the backrest backwards as far as you can until it clicks into place. The seat depth is now one size shorter and has a new colour setting which matches the new coloured slot in the metal grid. -
Page 36: Fig. 35 Seat Position Grid
Use the lowest holes to set the seat at the largest tilt-in-space angle of 15°. Wizzybug in an Seat is upright upright position but tilted in with no tilt-in- space 0 to 15°... -
Page 37: Control System
Fig. 38 LiNX Control Fig. 39 LiNX Plus Fig. 40 Shark Control Fig. 41 DX Control Control Wizzybug is also supplied with a carer control (Fig. 42 to Fig. 44). Fig. 43 Shark Carer Fig. 44 DX Carer Control Fig. 42 LiNX Carer... -
Page 38: Fig. 45 Control Sockets
1. Plug the joystick and carer control cables into the two sockets at the back of Wizzybug. Both sockets are the same, but the connectors can only fit in one way up (Fig. 45). -
Page 39: Fig. 52 Switch Between Child Use And Carer Use
CARER CONTROL The carer control allows a carer to control Wizzybug and has its own speed control. The carer can also use it to switch between driving Wizzybug and letting the child drive using the joystick. The carer can take control of Wizzybug using the carer control •... -
Page 40: Fig. 53 Linx Speed Dial
SETTING THE SPEED RANGE (LINX PLUS) Press button I (Fig. 55) to cycle through four speed ranges (slow, medium, fast and fastest). If a carer is controlling Wizzybug, press the speed button repeatedly (Fig. 54) on the carer control to cycle through four speed ranges. -
Page 41: Fig. 57 Shark Speed Buttons
SETTING THE SPEED RANGE (SHARK) Use the hare and the tortoise buttons to set the speed range (Fig. 57). If a carer is controlling the Wizzybug, set the speed range by turning the carer control speed dial (Fig. 58). Fig. 57 Shark Speed Buttons Fig. 58 Shark Carer Control Speed Dial SETTING THE SPEED RANGE (DX) Use the blue button to set the speed range (Fig. -
Page 42: Positioning Of The Joystick
ANGLE ADJUSTMENT The angle of the joystick can also be adjusted towards or away from the centre of Wizzybug by loosening the black hand-screw, moving the joystick, and retightening the hand-screw. Fig. 61 Changing the Angle of the Joystick... -
Page 43: Fig. 62 Height Adjustment Of The Joystick
HEIGHT ADJUSTMENT You can change the height of the joystick by changing the height of the armrest. Adjust the armrest height using the black hand- screw on the backrest. Fig. 62 Height Adjustment of the Joystick FINE ADJUSTMENTS USING AN ALLEN KEY If you want to make smaller changes to the angle and height of the joystick, use the supplied 3mm Allen key to adjust the position... -
Page 44: Using The Horn
It cannot be turned off, but you can reduce the volume by taping a piece of material over the loudspeaker under the joystick. * If Designability or your Wizzybug provider has adapted your LiNX Plus with advanced settings, the horn may work differently. Please refer to page 48. -
Page 45: Locking The Joystick
Locking the Joystick If you want to stop Wizzybug being driven, for safety reasons, you can lock Wizzybug’s joystick controller. To lock Wizzybug: • (LiNX, LiNX Plus or Shark), press and hold the on/off button for several seconds until the lights flash (Fig. 66). -
Page 46: Metal Tray
(see page 47) instead of a joystick, and is easy and quick to remove. The tray will be set up to fit on one side of Wizzybug (left or right) – it cannot be moved to the other side without using tools. If you... -
Page 47: Optional Control Inputs
Switches Four large button switches (known as Buddy Buttons) can be mounted on the tray and pressed to drive Wizzybug forwards, backwards, left and right. Each switch has a cable and a connector that plugs into the Switch Module, which plugs into a DX or LiNX Plus joystick. -
Page 48: Linx Plus Advanced Settings
LiNX Plus Advanced Settings If Designability or your Wizzybug provider has adapted your LiNX Plus with advanced settings, it may work in a different way. As described on page 40, pressing button I will still cycle through four speed ranges. Holding button I for several seconds will still choose joystick control or inputs control. -
Page 49: Battery Indicator
LiNX controller (Fig. 73). REAR BATTERY INDICATOR If your Wizzybug has a separate battery indicator mounted on the back (it will look similar to the one in Fig. 76) use this to check the battery level. Ignore the joystick indicator as it will always show as full. -
Page 50: Battery And Charging
Battery and Charging INTRODUCTION TO CHARGING Wizzybug is supplied with an SLA battery, a NiMH battery or a LiFePO4 battery (see page 8). Your battery will be supplied fully charged on delivery. If you use Wizzybug every day, then charge it every day. If... -
Page 51: Fig. 77 Charging An Sla Battery
Unplug the charger from the mains supply, then unplug the silver connector from the front of the joystick. If you use Wizzybug every day, we recommend that you charge it every day. Fig. 77 Charging an SLA Battery... -
Page 52: Fig. 78 Charging A Nimh Battery
Then unplug the charger connector from the back of Wizzybug. You can use Wizzybug before it is fully charged, but if you often charge it for only a short time we recommend you sometimes charge for up to 12 hours to fully charge the battery. You can keep the charger connected until you need to use Wizzybug. -
Page 53: Fig. 79 Charging A Lifepo4 Battery
Unplug the charger from the mains supply, then unplug the silver connector from the front of the joystick. If you use Wizzybug every day, we recommend that you charge it every day. Fig. 79 Charging a LiFePO4 Battery... -
Page 54: Maintenance Of The Battery
Avoid storing the battery in temperatures above 25°C as this can reduce its performance and life. If you know you will not use Wizzybug at all for a few weeks or longer, charge the battery for at least 5 hours, remove it from Wizzybug and store the battery in a cool, dry place. -
Page 55: Moving And Handling
(for example say, “ready, steady, lift”) so that you both lift together. Please refer to manual handling best practice if you are unsure or need advice on how to lift Wizzybug safely (refer to page 56). Fig. 81 Standard Lifting Position Fig. 82 Alternative Lifting Position... -
Page 56: Transportation
If the wheels are not engaged, move the levers on the sides of the wheels to the opposite position (refer to page 28). Lift Wizzybug one side at a time and rotate each front wheel forwards by hand until it locks. - Page 57 SHIPPING Wizzybug can be shipped by land, air or sea only when it has been taken apart. Wizzybug’s performance can only be guaranteed if it has been shipped in its original packaging (if supplied).
-
Page 58: Maintenance And Servicing
• Do not tumble dry any Wizzybug parts. MAINTENANCE • Make sure you look closely at Wizzybug often to check for any damage, wear or loose or missing parts that may need to be repaired or replaced. • Always store Wizzybug in a secure and dry environment. -
Page 59: Warranty (Sales Customers Only)
12 months from date of delivery, we will repair or, at our option, replace parts free of charge. If it is agreed that Wizzybug needs to be repaired at Designability we will make arrangements with you to send it to and from our workshop from anywhere within the United Kingdom and Republic of Ireland. -
Page 60: Disposal
If you are in the UK, contact Designability using the contact details at the front of these instructions. If you are outside the UK, Wizzybug should be disposed of in line with your local regulations. Contact your Wizzybug provider for... -
Page 61: Glossary Of Symbols Found On Labelling
Separate collection for WEEE is required The marked item is part of a recovery/recycling process Distributer (if applicable) Importer (if applicable) EU Authorised Representative Original information has undergone a translation Note: Some symbols may not appear on some versions of the Wizzybug... -
Page 62: Troubleshooting
If this does not work 1. The joystick does not 1. Check the on/off switch at Stop using Wizzybug turn on. the back of Wizzybug. and phone 2. Check the battery is Designability for help connected (see p19). 3. If the battery is nickel metal... -
Page 63: Fig. 83 Troubleshooting
The joystick is locked – use Count the number of controller is not the blue magnetic key flashes each sequence working (DX). A red key (supplied with Wizzybug) and and phone symbol is flashing. slide it over number display to Designability for help. unlock it. -
Page 64: Specification
Overall length of vehicle 650mm / 25.6in Overall height (headrest not fully extended) 870mm / 34.3in Minimum width of corridor in which Wizzybug can 900mm / 35.4in be turned to be facing in the opposite direction Seat width 235mm / 9.3in Seat depth 155mm - 245mm or 6.1 - 9.7in... - Page 65 Weights, dimensions and performance data are provided for guidance only. The stated distances that Wizzybug can travel will be reduced if Wizzybug is used often on slopes and rough ground.
-
Page 66: Table Of Figures
Table of Figures Fig. 1 Overview of Wizzybug Parts ........................8 Fig. 2 Overview of Wizzybug Parts (Side View) ..................9 Fig. 3 Overview of Wizzybug Parts (Rear View) ..................9 Fig. 4 Overview of Features ..........................10 Fig. 5 On/Off Switch ............................... 13 Fig. - Page 67 Fig. 77 Charging an SLA Battery ........................51 Fig. 78 Charging a NiMH Battery ........................52 Fig. 79 Charging a LiFePO4 Battery ....................... 53 Fig. 80 Pull Wizzybug by the Headrest ......................55 Fig. 81 Standard Lifting Position ........................55 Fig. 82 Alternative Lifting Position ......................... 55 Fig.
-
Page 68: Contacting Designability
Wizzybug Passport The Wizzybug Passport on the next page is for a Wizzybug with a LiFePO4 battery. If you have an SLA or NiMH battery, please download and fill in a copy of FRM-013 Wizzybug Travel Document (SLA or NiMH batteries) from designability.org.uk/meet-wizzybug/resource-for-families. - Page 69 Wizzybug Passport At least 48 hours before you travel, tell your airline operator Wizzybug’s battery type [Lithium Ion], the energy rating [256 Wh] and how to prevent Wizzybug from switching on accidentally, as described here. Specification Manufacturer: Manufacturer contact number: Designability Charity Ltd.
- Page 70 How to Disconnect the Battery Consult Instructions for Use for full guidance. Wizzybug must be prevented from operating accidentally by disconnecting the battery. 1. Remove the seat by turning the white dial, then 2. Open the battery cover by pinching the black squeezing the knob and lifting by the harness.
- Page 71 EU AUTHORISED REPRESENTATIVE Psephos Limited GMIT iHub Galway Dublin Road Galway H91 DCH9 Ireland...
- Page 72 Registered Charity No. 256335 Company registered No. 933932 (London)
Need help?
Do you have a question about the Wizzybug and is the answer not in the manual?
Questions and answers