Table of Contents
Advertisement
Advertisement
Chapters
Table of Contents

Related Manuals for Designability WizzyBug

Summary of Contents for Designability WizzyBug
- Page 1 User Instructions...
- Page 3 MHRA. All enquiries related to the content of this Wizzybug User Guide and the use of Wizzybug must be addressed to Designability or the local distributor or agent from which the WIzzybug was obtained. DOC-0025 - Wizzybug Operating Manual GBR,...
-
Page 5: Table Of Contents
Introduction......................7 Overview of your Wizzybug ................8-9 Wizzybug Features ................... 10-11 Important Information..................12 Getting to Know Wizzybug ................13-17 How to Assemble Wizzybug (including footrest) ........18-23 Armrests and Thoracic Supports ...............24-25 How to Disassemble Wizzybug ..............26-27 Wheels ......................28-29 Seating System ..................30-33 Tray and Switches ..................34... -
Page 6: The History Of Wizzybug
Wizzybugs to families completely free of charge. In 2011, the first Wizzybug went out on loan and we have never looked back! Each Wizzybug on the loan scheme costs £4,750 which covers... -
Page 7: Introduction
Do not adapt Wizzybug in any way without permission from Designability, as adaptations may have serious safety considerations. If you feel Wizzybug is unsafe do not use and contact Designability by calling +44 (0)1225 824103, emailing us at info@designability.org.uk or writing to us at:... -
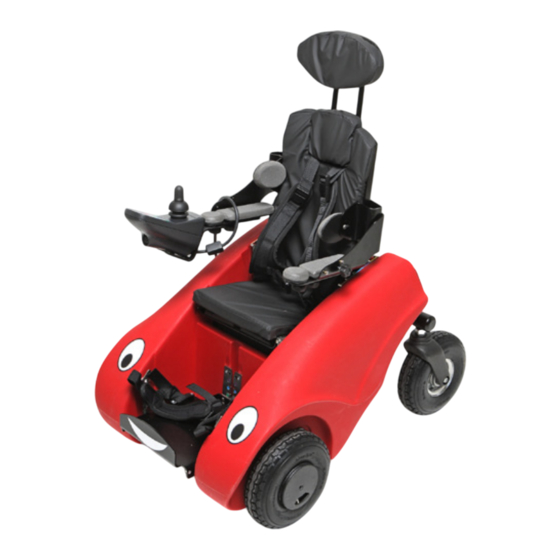
Page 8: Overview Of Your Wizzybug
Overview of Your Wizzybug Your Wizzybug consists of the following parts: Headrest Seating System Footrest Battery (located under the seat) and charger Nickel Metal Hydride Battery and Charger Lead Acid Battery and Charger Older versions of either battery may come in a black carry bag. - Page 9 Controller with Joystick Body Wheel Release Mechanism Fig 2 Overview of Wizzybug parts (side view) DX Carer Control, 2016 Shark Carer Control (located on back of Seating System) Rear Control Panel located at back of Body Rear Wheel Assembly Fig 3 Overview of Wizzybug parts...
-
Page 10: Wizzybug Features
Wizzybug Features Seat Release Knob Harnesses White Dial Armrest Controller Sockets Charger Socket Power On/ (for Lead Acid battery) Off Switch Footrest Spring Mechanism Charger Socket (for Nickel Metal Lights on/ Footrest Hydride Battery) off switch Fig 4 Overview of features... - Page 11 Carer control Controller Armrest Reach with Joystick Adjustment Hand-Screw Wheel Release (on both Front Wheels)
-
Page 12: Important Information
Important Information Please read all instructions before using Wizzybug and take extra care to acknowledge any notes where you see the warning symbol : these are safety cautions. Wizzybug should never be used without close supervision by a carer. The responsible adult should also be ready to take control of Wizzybug when near any potential hazards. -
Page 13: Getting To Know Wizzybug
Stopping For the child to stop they must release their grip of the joystick, allowing it to return to a neutral position. If you need to stop Wizzybug urgently, you can turn off the power switch at the back of the body (fig. 5) or manually switch to the carer control. - Page 14 Wizzybug and any hazard. Wizzybug prefers firm level grass and gentle slopes. Do not attempt gradients steeper than 5° ( 1 in 12). Wizzybug is not suitable for driving on steep banks, beaches, hilly terrain, or very uneven ground. There is a danger that Wizzybug will slip backwards and could be at risk of overturning if too steep a gradient is attempted.
-
Page 15: Anti-Static Chain
Other Children Please ensure you supervise other children near Wizzybug. In particular, close attention should be paid to ensuring Wizzybug does not collide with others, or crush hands and feet. Be vigilant of crawling babies and toddlers close-by. - Page 16 If you are unsure, please contact Designability for advice. Maximum user weight 20kg or 44lb Single occupancy only Wizzybug is only to be operated by a properly seated child and should not be used to give rides to other children.
- Page 17 Transfers Always conform to best practice principles of moving and handling. Your child’s therapist should be able to recommend the optimum way to help your child get in and out of Wizzybug. A walk-in transfer is easier if the footrest is removed.
-
Page 18: How To Assemble Wizzybug (Including Footrest)
How to Assemble Wizzybug Assembling Wizzybug Care must be taken to ensure that you do not place your fingers in-between mating parts while assembling Wizzybug. Wizzybug consists of the following component parts: • Seating System • Body • Footrest •... - Page 19 4. Rotate the spring clip under the rear wheel assembly beam for protection. THE BATTERY Fitting the battery 1. The battery fits into the box under the seat with the cables coming cable out from the opposite side to the connector connector socket (see diagram).
- Page 20 Wizzybug is switched on. • Avoid getting close to strong radio and television transmitters. • If Wizzybug should be set in motion unintentionally, switch it off immediately. • Adding electrical accessories and other components or modifying Wizzybug in any way can make it susceptible to electromagnetic interference.
-
Page 21: Attaching The Footrest To Wizzybug
Fig. 10 Attaching the footrest to Wizzybug (from top left, clockwise) Spring mechanism, height of the footrest - showing the back-plate with the coloured pin slots, footrest tilt adjustment using the side slots. The footrest can be level or tilted to match the tilt-in-space angle of the seat position. - Page 22 SEATING SYSTEM Fitting the seating system onto the body The seat depth can be adjusted. This is colour-coded and matches the colour-coded seat angle holes on the body. Information on how to set the seat depth, tilt-in-space, and recline the backrest can be found on page 33. 1.
- Page 23 (as shown to the right). 6. Connect the joystick and carer controls to the sockets on the rear of Wizzybug. The connector will only fit one way around. The sockets are interchangeable. Hook the carer control onto the...
-
Page 24: Armrests And Thoracic Supports
Armrests and Thoracic Supports Fitting the armrests The armrests are secured to the backrest using a screw, plate and pin fixing system on the backrest of the seat. Fig 11 Fitting the armrests and thoracic supports (two pins shown on right). Assembly of the armrest and thoracic supports is carried out, as shown in Fig 11. - Page 25 Do not try to remove the adjusting hand-screw from the threaded bar. Take care when adjusting the armrests and thoracic supports if the child is seated in the Wizzybug. Adjustments may be required when considering clothing requirements like winter coats.
-
Page 26: How To Disassemble Wizzybug
3. Press down on the black seat release knob (positioned above the white dial). 4. Lift the seat, guiding it free of the Wizzybug body. Do not lift by the headrest. Lift only by the white dial or the harness straps. - Page 27 REMOVAL OF THE BATTERY 1. To disconnect, first unscrew the collar on the charger then pull the connector out. 2. The battery can then be remove. Don’t lift by the cables. change REMOVING REAR WHEEL ASSEMBLY FROM BODY 1. Twist spring clip outwards and pull to remove from pin.
-
Page 28: Wheels
Engaged (In Drive) The wheels are ‘in drive mode’ when the wheel releases are engaged. Wizzybug can then be driven either by the user or by the carer. Do not attempt to pull or push Wizzybug whilst in drive mode. -
Page 29: Wheel Releases
Do not put wheel releases into the disengaged position while on a slope! To engage or disengage the wheels, slide the small lever in the centre of the wheel. This will engage or disengage the wheels. Fig 16 Wheel releases... -
Page 30: Seating System
The seating system on Wizzybug is adjusted without tools. It may take a little practice, but once mastered is very quick and easy to use. Never attempt to adjust the seating position with the child sitting in the seat as there is a risk of injury. - Page 31 Adjusting the seat depth when it is out of the Wizzybug body Please note that it is easier to adjust the seat when it is fitted in the Wizzybug body. To adjust the seat when it is removed from Wizzybug, firstly...
- Page 32 2. Pull the seat base upwards at the rear with one hand, while pushing the seat backrest forwards as far as it will go. 3. Press and hold down the black seat release knob. This pulls the pins in until you release them back into a new grid position.
-
Page 33: Adjusting The Seating
By locating the seat at the top of the grid you will achieve a level seating position of 0°. Using the lower holes will enable you to achieve a maximum tilt in space angle of 15°. Wizzybug in an Seat is upright but tilted in upright position with °... -
Page 34: Tray And Switches
Use of switches Large button switches can be mounted on a tray and pressed to move Wizzybug. Four switches can be used to drive Wizzybug: forwards, backwards, right or left. Each switch has a wire and connector that is plugged into the DX Switch Module which plugs into the DX joystick. -
Page 35: Control System
Control System Wizzybug is supplied with • a carer control. (Fig 22) • a Dynamic Shark control system (Fig 23) as standard, or a Dynamic DX control system (Fig 24) which is used when switches are needed. Fig 22 Shark carer control... -
Page 36: Main On And Off Switch
The joystick and carer control both plug into either of the two sockets on the back of Wizzybug’s body. It does not matter which socket is used, but they will only plug in one way up. -
Page 37: Speed Settings On Dx
Flick switch from user to carer control (located on carer control) The carer control only overrides the child’s control once they have released their joystick to a neutral position. The child still is able to switch Wizzybug on and off using the joystick power button. -
Page 38: Positioning Of Joystick
Positioning of the joystick Reach adjustment The position of the joystick can be adjusted using the black hand-screws. Reach adjustment on Wizzybug Fig 34 It is possible to reposition the joystick unit closer to the armrest by repositioning the black hand-screw under the armrest in the rear hole of the armrest plate. -
Page 39: Allen Key
Angle adjustment The angle of the joystick can also be adjusted using the same black hand-screw. Fine adjustments using an Allen Key Further adjustments to the height and angle of the joystick unit in relation to the end of the armrest can be achieved by using the supplied 3mm Allen key (Fig 38) to adjust the position of the small metal screws and sliding to the desired position. -
Page 40: Battery And Charging
Introduction to Charging Make sure you use the right charging socket for the type of battery in your Wizzybug. If you are unsure please refer to page 8 to check if you have a Lead Acid or Nickel Metal Hydride battery. - Page 41 The need to charge your Wizzybug will depend on how much it is used. However, we would suggest that if it is used daily, then charge Wizzybug daily.
-
Page 42: Control System
Then unplug the charger connector from the back of Wizzybug. Wizzybug can be used even if full charge has not been reached. However, if repeated partial charges are carried out, an extended charge of a further 12 hours is recommended to restore the battery to maximum capacity. -
Page 43: Maintenance Of Battery
3 months. Always handle the battery with care to avoid damage. If you anticipate not using Wizzybug for extended periods (6-8 weeks or more) charge the battery for at least 5 hours, remove from Wizzybug and store in a cool, dry place. -
Page 44: Moving And Handling
Please refer to manual handling best practice if you are unsure or need advice on how to lift Wizzybug safely (refer to page 44). Standard lifting points Alternative lifting position... -
Page 45: Transportation
Wizzybug wheels are engaged at all times (refer to page 29). If the wheels are disengaged move the lever to the opposite position (refer to page 29). Lift Wizzybug, one side at a time and rotate the front wheel forwards, by hand until wheels lock. - Page 46 ‘Flying with Wizzybug’ instructions to help avoid possible damage. Shipping Wizzybug can be shipped by land, air or sea only when it has been dismantled. Performance of Wizzybug can only be guaranteed if it has been shipped in its original packaging (if supplied).
-
Page 47: Troubleshooting
Designability for assistance. 4. The Joystick The joystick is disabled – use the blue controller is not working magnetic key (supplied with Wizzybug) (DX joystick system and slide over the number display to only.) Displays red unlock the joystick. -
Page 48: Specification
Upgrade Battery (Nickel Metal Hydride) 24V, 15Ah, NiMH Overall Height (headrest not fully extended) 870mm / 34.3in Minimum width of corridor in which Wizzybug can 900mm / 35.4in be turned to be facing in the opposite direction Measured sound power level Indoor <65dB... -
Page 49: Maintenance And Servicing
Do not soak the body in water. • Always store Wizzybug in a secure and dry environment. • If Wizzybug is not in regular use, it is still essential to recharge the battery periodically to maintain the battery’s longer term performance. •... -
Page 50: Warranty (Only For Sales)
12 months from date of delivery, we will repair or, at our option, replace parts free of charge. If it is agreed that Wizzybug needs to be repaired at Designability we will make arrangements with you for carriage to and from our workshop from anywhere within the UK and Republic of Ireland. -
Page 51: Disposal
Compliance with these new regulations comes at a cost that will be borne by Designability. Labelling Wizzybug features the approved crossed out wheeled bin symbol (see Glossary) clearly marked on the devices or their packaging. Additionally, printed information is provided in the Glossary outlining the significance of the symbol. -
Page 52: Glossary Of Symbols Found On Wizzybug
Sufficient for (number of devices contained in a pack) Temperature limits (for storage) Keep dry Do not use if packaging is damaged Follow Instructions for Use Manufacturing Date CE Mark Wizzybug is not intended to be used as a child's car seat in a motor vehicle. -
Page 53: Table Of Figures
Table of Figures Figure Content Page no. Overview of Wizzybug parts Overview of Wizzybug parts (side view) Overview of Wizzybug parts (rear view) Overview of features 10-11 On/off switch Hand release from joystick Wizzybug incline restriction Anti-static chain Anklesures on footrest... - Page 54 Reach adjustability on Wizzybug Joystick cover Height adjustment of the joystick Rotational movement of the joystick Allen Key Black hand-screw Pull Wizzybug by the headrest with the wheel releases disengaged. Standard lifting points on Wizzybug Alternative lifting position Troubleshooting Specifications...
-
Page 55: Contacting Designability
Website: www.designability.org.uk Contact us if you need advice on accessories, servicing or repairs. Please quote your Wizzybug number (written on the inside cover of this guidebook or under the seat of Wizzybug) when making enquiries through Designability. Distributor Contact Information...
Need help?
Do you have a question about the WizzyBug and is the answer not in the manual?
Questions and answers